CRANKSHAFT POSITION SENSOR INSTALLATION

-
INSTALL CRANKSHAFT POSITION SENSOR
-
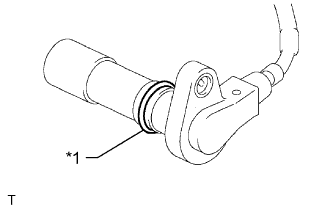
Text in Illustration *1 O-Ring Apply a light coat of engine oil to the O-ring of the crankshaft position sensor.
-
Install the crankshaft position sensor with the bolt.
- Torque:
- 8.5 N*m { 87 kgf*cm, 75 in.*lbf }
Note
Make sure that the O-ring is not cracked or jammed when installing.
-
Connect the crankshaft position sensor connector and attach the wire harness clamp.
-
-
INSTALL NO. 1 COMPRESSOR MOUNTING BRACKET
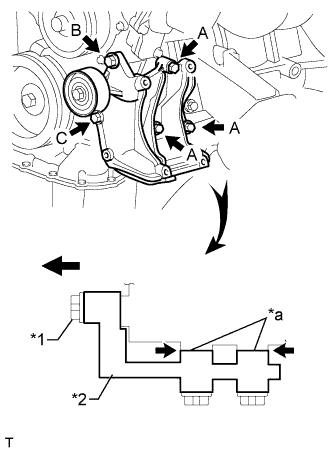
Text in Illustration *1 Bolt B *2 Mounting Bracket *a No Clearance Note
In order to prevent misalignment, which causes belt rattle, the 5 bolts must be tightened exactly as described in the procedures below.
-
Temporarily install the mounting bracket with the 5 bolts.
Tech Tips
Make sure the flanges of the bolts are contacting the bracket surface.
-
Make sure there is no clearance between the cylinder block and bracket as shown in the illustration. Then install the bolt labeled B.
- Torque:
- 45 N*m { 459 kgf*cm, 33 ft.*lbf }
-
Tighten the bolts labeled A and C.
- Torque:
- for bolt A
- 45 N*m { 459 kgf*cm, 33 ft.*lbf }
- for bolt C
- 25 N*m { 250 kgf*cm, 18 ft.*lbf }
-
-
CONNECT COOLER COMPRESSOR ASSEMBLY
-
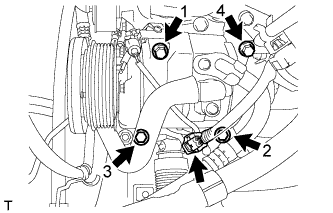
Temporarily install the cooler compressor with the 4 bolts.
-
Tighten the bolts in the order shown in the illustration to connect the cooler compressor.
- Torque:
- 25 N*m { 250 kgf*cm, 18 ft.*lbf }
-
Connect the connector.
-
Install the suction hose with the bolt.
- Torque:
- 7.8 N*m { 80 kgf*cm, 69 in.*lbf }
-
-
CONNECT VANE PUMP ASSEMBLY
-
Connect the vane pump with the 2 bolts.
- Torque:
- 21 N*m { 214 kgf*cm, 15 ft.*lbf }
-
Connect the 2 connectors.
-
Install the pressure feed tube with the bolt.
- Torque:
- 28 N*m { 285 kgf*cm, 21 ft.*lbf }
-
-
INSTALL FAN SHROUD
-
Install the fan shroud Click here.
-