FRONT SEAT ASSEMBLY (for SIA Made Manual Seat) REASSEMBLY

-
INSTALL SEAT TRACK ADJUSTING HANDLE
-
Engage the 2 springs to install the seat track adjusting handle.
-
-
INSTALL SEPARATE TYPE FRONT SEATBACK SPRING ASSEMBLY
-
Engage the 4 guides to install the separate type front seatback spring assembly.
-
Install the 4 bolts.
- Torque:
- 42 N*m { 428 kgf*cm, 31 ft.*lbf }
-
-
INSTALL FRONT SEAT WIRE RH (for Front Passenger Side)
-
Connect the connectors and engage the wire harness clamps to install the front seat wire RH.
-
-
INSTALL OCCUPANT DETECTION ECU (for Front Passenger Side)
-
Engage the claw to install the occupant detection ECU.
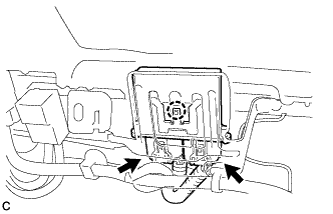
Note
If the occupant detection ECU has been dropped, or there are any cracks, dents or other defects in the case or connector, replace the occupant detection ECU with a new one.
-
Connect the 2 connectors.
Note
When installing the occupant detection ECU, be careful that the SRS wiring does not interfere with or is pinched between other parts.
-
-
INSTALL FRONT SEAT CUSHION EDGE PROTECTOR LH (for Driver Side)
-
Engage the 3 claws to install the front seat cushion edge protector LH.
-
Install the screw.
-
-
INSTALL FRONT SEAT CUSHION EDGE PROTECTOR RH (for Driver Side)
-
Engage the 3 claws to install the front seat cushion edge protector RH.
-
Install the screw.
-
-
INSTALL FRONT SEAT CUSHION EDGE PROTECTOR LH (for Front Passenger Side)
-
Engage the 3 claws to install the front seat cushion edge protector LH.
-
Install the screw.
-
-
INSTALL FRONT SEAT CUSHION EDGE PROTECTOR RH (for Front Passenger Side)
-
Engage the 3 claws to install the front seat cushion edge protector RH.
-
Install the screw.
-
-
INSTALL RECLINING ADJUSTER INSIDE COVER LH
-
Engage the guide to install the reclining adjuster inside cover LH.
-
-
INSTALL RECLINING ADJUSTER INSIDE COVER RH
-
Engage the guide to install the reclining adjuster inside cover RH.
-
-
INSTALL FRONT SEAT LOWER CUSHION SHIELD LH (for Driver Side)
-
Engage the clip to install the front seat lower cushion shield LH.

-
Engage the hook as shown in the illustration.
-
Install the screw.
-
-
INSTALL FRONT SEAT LOWER CUSHION SHIELD RH (for Driver Side)
-
Engage the clip to install the front seat lower cushion shield RH.
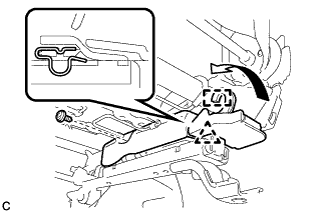
-
Engage the hook as shown in the illustration.
-
Install the screw.
-
-
INSTALL SEPARATE TYPE FRONT SEATBACK COVER
-
Using hog ring pliers, install the separate type front seatback cover to the separate type front seatback pad with 6 new hog rings.
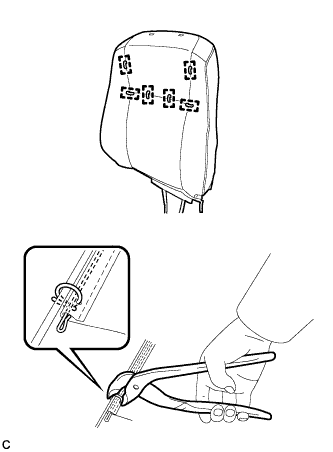
Note
-
Be careful not to damage the separate type front seatback cover.
-
Be sure to securely install the hog rings as shown in the illustration while preventing wrinkles from forming on the separate type front seatback cover.
-
-
-
INSTALL FRONT SEAT AIRBAG ASSEMBLY
CAUTION:
-
The nuts must not be reused.
-
Make sure that the front seatback frame sub-assembly or separate type front seatback spring assembly is not deformed. If it is, replace it with a new one.
-
Install the front seat airbag assembly with 2 new nuts.
- Torque:
- for TMMK Made
- 8.0 N*m { 82 kgf*cm, 71 in.*lbf }
- for SIA Made
- 5.5 N*m { 56 kgf*cm, 49 in.*lbf }
-
Engage the 2 clamps.
-
-
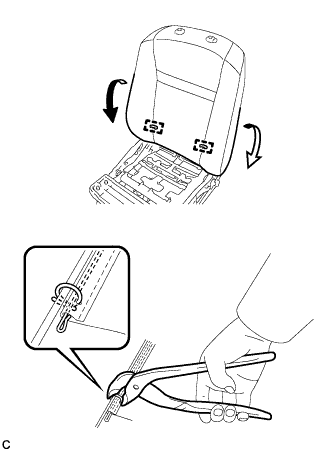
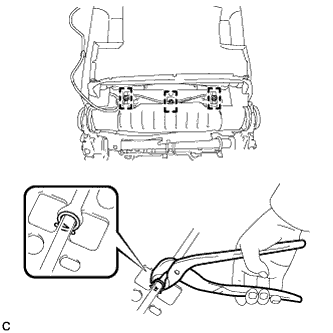
INSTALL SEPARATE TYPE FRONT SEATBACK COVER WITH PAD
-
Temporarily install the separate type front seatback cover with pad.
-
Engage the 4 claws to install the 2 front seat headrest supports.
-
Install the 3 brackets with the 2 nuts.
- Torque:
- 5.5 N*m { 56 kgf*cm, 49 in.*lbf }
CAUTION:
-
For vehicles with a front seat airbag assembly, the separate type front seatback cover must be securely installed. Otherwise, the front seat airbag assembly may not deploy properly.
-
Make sure that the strap is not twisted after installing the nut.
-
Install the bracket securely.
-
Turn back the separate type front seatback cover.
-
Using hog ring pliers, install the 2 new hog rings.
Note
-
Be careful not to damage the separate type front seatback cover.
-
Be sure to securely install the hog rings as shown in the illustration while preventing wrinkles from forming on the separate type front seatback cover.
-
-
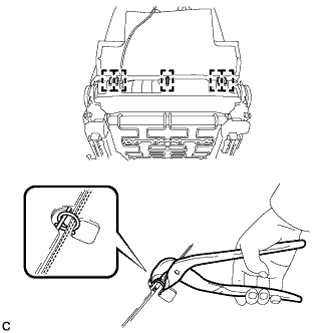
Using hog ring pliers, install 3 new hog rings.
Note
Be sure to securely install the hog rings as shown in the illustration while preventing wrinkles from forming on the separate type front seatback cover.
-
Using hog ring pliers, install 5 new hog rings.
Note
-
Be careful not to damage the separate type front seatback cover.
-
Be sure to securely install the hog rings as shown in the illustration while preventing wrinkles from forming on the separate type front seatback cover.
-
-
-
INSTALL SEPARATE TYPE FRONT SEAT CUSHION COVER
-
Using hog ring pliers, install the separate type front seat cushion cover to the separate type front seat cushion pad with 16 new hog rings.
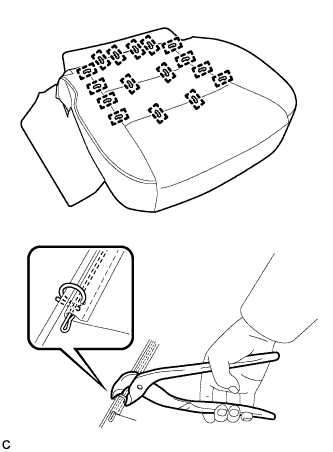
Note
-
Be careful not to damage the separate type front seat cushion cover.
-
Be sure to securely install the hog rings as shown in the illustration while preventing wrinkles from forming on the separate type front seat cushion cover.
-
-
Using hog ring pliers, install 2 new hog rings.
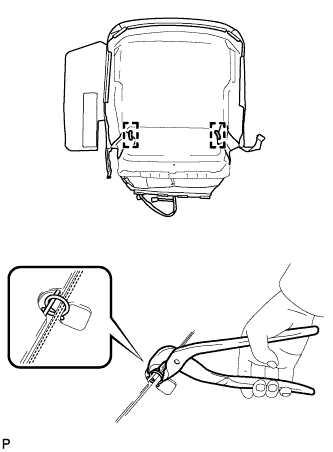
Note
-
Be careful not to damage the separate type front seat cushion cover.
-
Be sure to securely install the hog rings as shown in the illustration while preventing wrinkles from forming on the separate type front seat cushion cover.
-
-
-
INSTALL SEPARATE TYPE FRONT SEAT CUSHION COVER WITH PAD
-
Temporarily install the separate type front seat cushion cover with pad.
-
Engage each hook.
-
Engage the claw and 3 clamps to install the front seat airbag assembly wire harness.
-
Engage the fastener to secure the front seat airbag assembly wire harness.
-
-
INSTALL FRONT SEAT INNER BELT ASSEMBLY (for Driver Side)
-
for TMMK Made:
-
Install the front seat inner belt assembly LH with the nut.
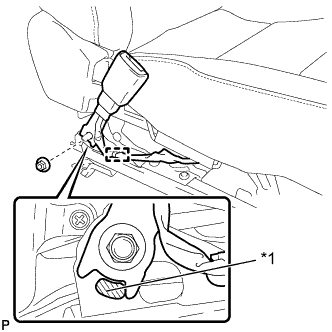
Text in Illustration *1 Protruding Part - Torque:
- 42 N*m { 428 kgf*cm, 31 ft.*lbf }
Note
Do not allow the anchor part of the front seat inner belt assembly LH to overlap the protruding part of the front seat adjuster.
-
Engage the clamp.
-
Engage each clamp under the front seat assembly.
-
-
for SIA Made:
-
Install the front seat inner belt assembly LH with the nut.
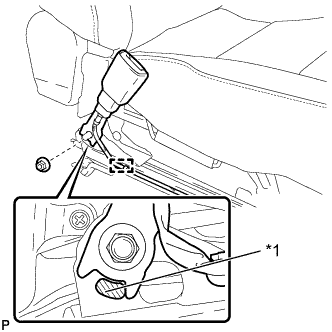
Text in Illustration *1 Protruding Part - Torque:
- 42 N*m { 428 kgf*cm, 31 ft.*lbf }
Note
Do not allow the anchor part of the front seat inner belt assembly LH to overlap the protruding part of the front seat adjuster.
-
Engage the clamp.
-
Engage each clamp under the front seat assembly.
-
-
-
INSTALL FRONT SEAT INNER BELT ASSEMBLY (for Front Passenger Side)
-
for TMMK Made:
-
Install the front seat inner belt assembly RH with the nut.
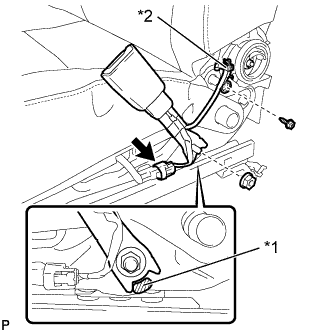
Text in Illustration *1 Protruding Part *2 Limit Switch - Torque:
- 42 N*m { 428 kgf*cm, 31 ft.*lbf }
Note
Do not allow the anchor part of the front seat inner belt assembly RH to overlap the protruding part of the front seat adjuster.
-
Connect the limit switch with the screw.
-
Connect the connector.
-
-
for SIA Made:
-
Install the front seat inner belt assembly RH with the nut.
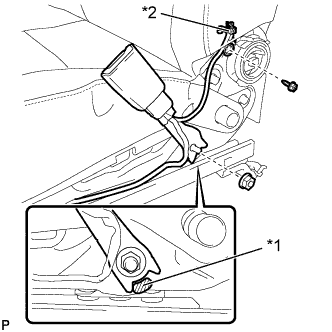
Text in Illustration *1 Protruding Part *2 Limit Switch - Torque:
- 42 N*m { 428 kgf*cm, 31 ft.*lbf }
Note
Do not allow the anchor part of the front seat inner belt assembly RH to overlap the protruding part of the front seat adjuster.
-
Connect the limit switch with the screw.
-
Engage each clamp under the front seat assembly.
-
-
-
INSTALL FRONT SEAT INNER CUSHION SHIELD (for Driver Side)
-
Engage the 5 claws and 6 guides to install the front seat inner cushion shield.
-
-
INSTALL FRONT SEAT INNER CUSHION SHIELD (for Front Passenger Side)
-
Engage the 5 claws and 7 guides to install the front seat inner cushion shield.
-
-
INSTALL FRONT SEAT CUSHION SHIELD (for Driver Side)
-
Engage the 5 claws, 6 guides and clip to install the front seat cushion shield.
-
Install the screw.
-
-
INSTALL FRONT SEAT CUSHION SHIELD (for Front Passenger Side)
-
Engage the 5 claws, 7 guides and clip to install the front seat cushion shield.
-
Install the screw.
-
-
CONNECT SEPARATE TYPE FRONT SEATBACK COVER
-
Connect the rubber band of the separate type front seatback cover.
-
-
INSTALL VERTICAL ADJUSTING HANDLE (for Driver Side)
-
Install the vertical adjusting handle with the screw.
-
-
INSTALL RECLINING ADJUSTER RELEASE HANDLE
-
Engage the claw to install the reclining adjuster release handle.
-
-
INSTALL SEAT ADJUSTER COVER CAP
-
Install the 2 seat adjuster cover caps.
-