REAR STABILIZER BAR REMOVAL

-
REMOVE REAR WHEELS
-
REMOVE NO. 2 FLOOR UNDER COVER (w/ Floor Under Cover)
-
Remove the 2 bolts and 2 clips.
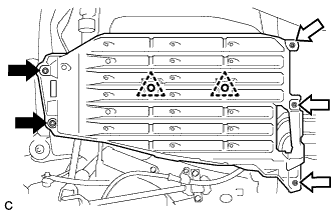
Text in Illustration 
Bolt 
Nut (attached to under cover) -
Disengage the 3 nuts and remove the No. 2 floor under cover.
-
-
REMOVE NO. 1 FLOOR UNDER COVER
-
Remove the 2 bolts.
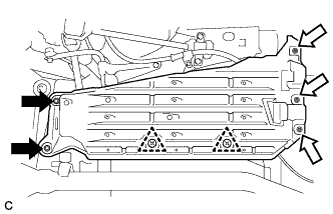
Text in Illustration Bolt Nut (attached to under cover) -
Disengage the 3 nuts and 2 clips, and remove the No. 1 floor under cover.
-
-
REMOVE REAR STABILIZER LINK ASSEMBLY LH
-
Remove the nut and separate the rear stabilizer link assembly LH from the rear shock absorber with coil spring.

If the ball joint turns together with the nut, use a hexagon wrench to hold the stud.
-
Remove the nut and rear stabilizer link assembly LH from the rear stabilizer bar.
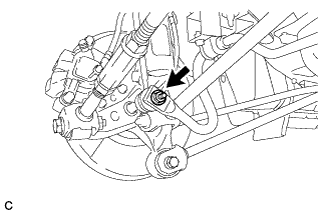
If the ball joint turns together with the nut, use a hexagon wrench to hold the stud.
-
-
REMOVE REAR STABILIZER LINK ASSEMBLY RH
Tech Tips
Perform the same procedure as for the LH side.
-
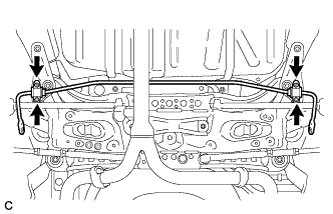
REMOVE REAR STABILIZER BAR
-
Remove the 4 bolts, rear stabilizer bar, 2 rear No. 1 stabilizer bar brackets, 2 rear No. 2 stabilizer bar brackets and 2 rear stabilizer bushings from the rear suspension member sub-assembly.
-
-
REMOVE REAR NO. 2 STABILIZER BAR BRACKET
-
Remove the 2 rear No. 2 stabilizer bar brackets from the rear stabilizer bar.
-
-
REMOVE REAR NO. 1 STABILIZER BAR BRACKET
-
Remove the 2 rear No. 1 stabilizer bar brackets from the rear stabilizer bar.
-
-
REMOVE REAR STABILIZER BUSHING
-
Remove the 2 rear stabilizer bushings from the rear stabilizer bar.
-