- Click here
CLEAN BACK DOOR GLASS
-
Using a scraper, remove the damaged clips, spacers and adhesive sticking to the glass.
-
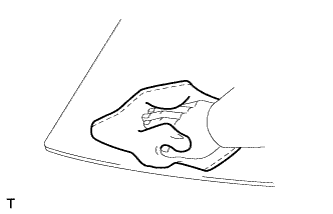
Clean the outer circumference of the glass with non-residue solvent.
Note:
-
Do not touch the glass surface after cleaning it.
-
Be careful not to damage the glass.
-
Even if using new glass, clean the glass with non-residue solvent.
-
-
- Click here
INSTALL BACK WINDOW GLASS CLIP RH
-
Apply Primer G to the glass where the clip will be installed.
Tip:If the primer is applied to an area that is not specified, apply non-residue solvent to a clean cloth and wipe off the excess primer before it dries.
-
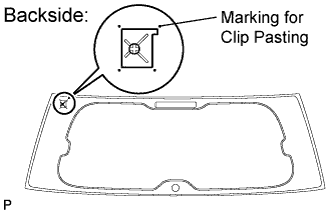
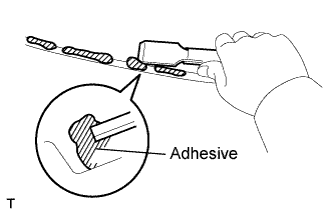
Remove the peeling paper from a new clip. Install a new clip onto the glass as shown in the illustration.
Note:
-
Allow the primer to dry for 3 minutes or more.
-
Throw away any leftover primer.
-
Do not apply too much primer.
-
-
- Click here
INSTALL BACK WINDOW GLASS CLIP LH
-
Apply Primer G to the glass where the clip will be installed.
Tip:If the primer is applied to an area that is not specified, apply non-residue solvent to a clean cloth and wipe off the excess primer before it dries.
-
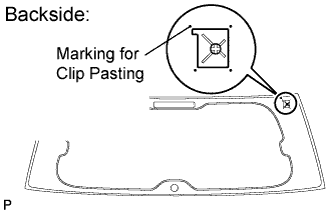
Remove the peeling paper from a new clip. Install a new clip onto the glass as shown in the illustration.
Note:
-
Allow the primer to dry for 3 minutes or more.
-
Throw away any leftover primer.
-
Do not apply too much primer.
-
-
- Click here
INSTALL NO. 1 BACK WINDOW GLASS SPACER
-
Apply Primer G to the glass where the spacer will be installed.
Tip:If the primer is applied to an area that is not specified, apply non-residue solvent to a clean cloth and wipe off the excess primer before it dries.
-
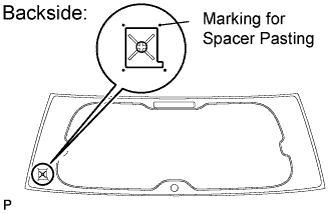
Remove the peeling paper from a new spacer. Install a new spacer onto the glass as shown in the illustration.
Note:
-
Allow the primer to dry for 3 minutes or more.
-
Throw away any leftover primer.
-
Do not apply too much primer.
-
-
- Click here
INSTALL NO. 2 BACK WINDOW GLASS SPACER
-
Apply Primer G to the glass where the spacer will be installed.
Tip:If the primer is applied to an area that is not specified, apply non-residue solvent to a clean cloth and wipe off the excess primer before it dries.
-
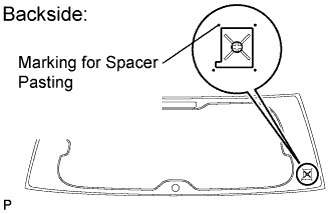
Remove the peeling paper from a new spacer. Install a new spacer onto the glass as shown in the illustration.
Note:
-
Allow the primer to dry for 3 minutes or more.
-
Throw away any leftover primer.
-
Do not apply too much primer.
-
-
- Click here
INSTALL BACK WINDOW OUTSIDE MOULDING
-
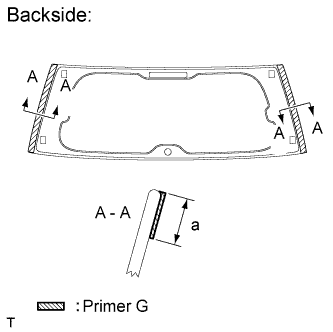
Using a brush or sponge, coat the application area of the back window glass outside moulding with Primer G.
Standard Area Specified Condition a 13.0 mm (0.512 in.) Note:
-
Allow the primer to dry for 3 minutes or more.
-
Throw away any leftover primer.
-
Do not apply too much primer.
Tip:If the primer is applied to an area that is not specified, apply non-residue solvent to a clean cloth and wipe off the excess primer before it dries.
-
-
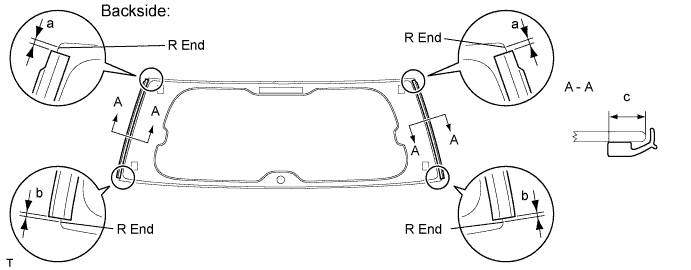
Remove the peeling paper from 2 new back window outside mouldings. Install the 2 mouldings as shown in the illustration.
Standard Area Specified Condition a 1.5 mm (0.0591 in.) b 1.0 mm (0.0394 in.) c 11.0 mm (0.433 in.)
-
-
Click here
INSTALL BACK WINDOW GLASS
-
Using a brush or sponge, apply Primer M to the exposed part of the vehicle body.
Note:
-
Allow the primer to dry for 3 minutes or more.
-
Do not apply primer to the adhesive.
-
Throw away any leftover primer.
-
Do not apply too much primer.
-
-
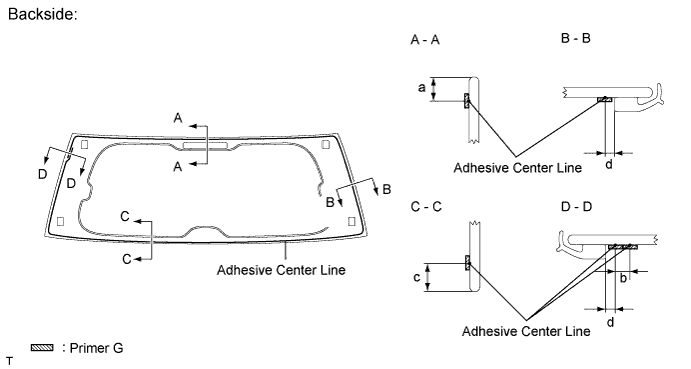
Using a brush or sponge, apply Primer G to the contact surface of the back window glass.
Standard Area Specified Condition a 11.0 mm (0.433 in.) b 8.0 mm (0.315 in.) c 13.0 mm (0.512 in.) d 5.0 mm (0.197 in.) Tip:If primer is applied to an area that is not specified, wipe off the primer with a non-residue solvent before it dries.
Note:
-
Allow the primer to dry for 3 minutes or more.
-
Throw away any leftover primer.
-
Do not apply too much primer.
-
-
Apply adhesive to the back window glass.
Adhesive Toyota Genuine Windshield Glass Adhesive or equivalent
-
Cut off the tip of the cartridge nozzle as shown in the illustration below.
Tip:After cutting off the tip, use all adhesive within the time written in the table below.
Usage Time Frame Temperature Usage Time Frame 35°C (95°F) 15 minutes 20°C (68°F) 1 hour 40 minutes 5°C (41°F) 8 hours -
Load the sealer gun with the cartridge.
-
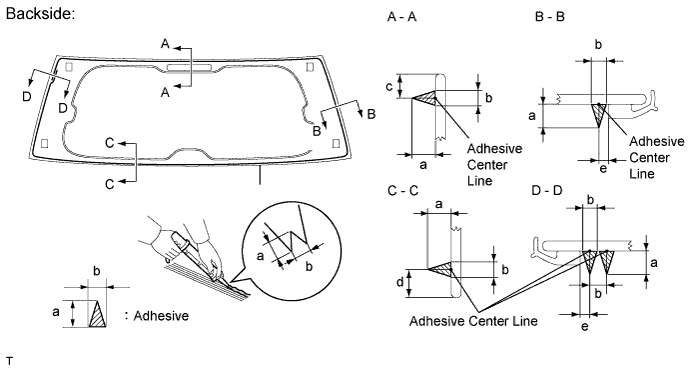
Apply adhesive to the back window glass as shown in the illustration.
Standard Area Specified Condition a 12.0 mm (0.472 in.) b 8.0 mm (0.315 in.) c 11.0 mm (0.433 in.) d 13.0 mm (0.512 in.) e 5.0 mm (0.197 in.)
-
-
Install the back window glass to the vehicle body.
-
Hold the back window glass securely in place with tape or equivalent until the adhesive has hardened.
Note:
-
Allow the primer coating to dry for 3 minutes or more.
-
Check that the clips are attached to the vehicle body correctly.
-
Check the clearance between the vehicle body and glass.
-
-
Lightly press the front surface of the back window glass to ensure that the back window glass is securely fit to the vehicle body.
-
Using a scraper, remove any excess or protruding adhesive.
Tip:Apply adhesive onto the glass rim.
Note:Do not drive the vehicle within the time written in the table below.
Minimum time Temperature Minimum Time Prior to Driving Vehicle 35°C (95°F) 1 hour 30 minutes 20°C (68°F) 5 hours 5°C (41°F) 24 hours -
Connect the connectors.
-
-
- Click here
INSTALL REAR WIPER MOTOR ASSEMBLY (w/ Rear Wiper)
-
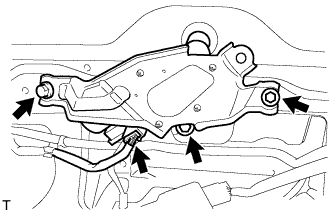
Temporarily install the rear wiper motor assembly with the 3 bolts.
-
Tighten the 3 bolts.
5.5 N*m 56 kgf*cm 49 in.*lbf -
Connect the connector.
-
- Click here
INSTALL REAR WIPER MOTOR GROMMET (w/ Rear Wiper)
-

Apply MP grease to the entire inner surface of the rear wiper motor grommet.
Table 1. Text in Illustration *1 MP Grease Tip:Make sure that the hole does not get clogged with grease and the grooves in the grommet are filled with grease.
-
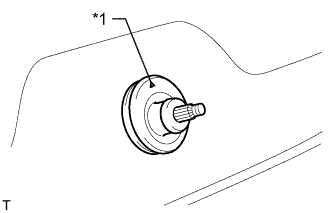
Install the rear wiper motor grommet with the position mark facing upward as shown in the illustration.
Table 2. Text in Illustration *1 Position Mark
-
- Click here
INSTALL REAR WIPER ARM (w/ Rear Wiper)
-
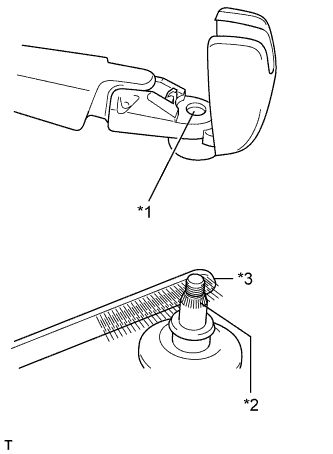
Operate the rear wiper, and stop the rear wiper motor at the automatic stop position.
Table 3. Text in Illustration *1 Wiper Arm Serration *2 Wiper Pivot Serration *3 Wire Brush -
Clean the wiper arm serration and wiper pivot serration with a wire brush.
-
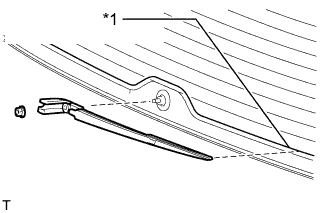
Set the head of the blade on the defogger line.
Table 4. Text in Illustration *1 Defogger Line -
Install the nut and rear wiper arm.
5.5 N*m 56 kgf*cm 49 in.*lbf -
Close the cover.
-
- Click here
CHECK FOR LEAK AND REPAIR
-
Conduct a leak test after the adhesive has completely hardened.
-
Seal any leaks with auto glass sealer.
-
- Click here
INSTALL REAR SPOILER SUB-ASSEMBLY (w/ Rear Spoiler)
-
Attach the 3 clips to install the rear spoiler sub-assembly.
-
w/ Power Back Door:
-
Install the 4 bolts and 2 hole plugs.
-
-
w/o Power Back Door:
-
Install the 4 bolts.
-
-
-
Click here
INSTALL BACK DOOR GLASS CHANNEL LH
-
Attach the clip and install the back door glass channel.
-
-
Click here
INSTALL BACK DOOR GLASS CHANNEL RH
-
Attach the clip and install the back door glass channel.
-
- Click here
INSTALL BACK DOOR GARNISH
-
Attach the 14 clips to install the back door garnish.
-
- Click here
INSTALL POWER BACK DOOR MAIN SWITCH (for Face to Face Seat Type)
-
Attach the 2 claws to install the power back door main switch.
-
- Click here
INSTALL NO. 2 BACK DOOR SERVICE HOLE COVER (for Face to Face Seat Type)
-
Connect the connector.
-
Attach the 4 claws to install the No. 2 back door service hole cover.
-
- Click here
INSTALL ASSIST GRIP (for Face to Face Seat Type)
-
Install the assist grip with the 2 screws.
-
- Click here
INSTALL BACK DOOR SIDE GARNISH LH
-
Attach the 3 clips and 2 claws to install the back door side garnish LH.
-
- Click here
INSTALL BACK DOOR SIDE GARNISH RH
-
w/o Power Back Door:
Tip:Use the same procedure described for the LH side.
-
w/ Power Back Door:
-
Attach the clip and 4 claws to install the back door side garnish RH.
-
-
- Click here
INSTALL CENTER BACK DOOR GARNISH
-
Attach the 5 clips and 4 claws to install the center back door garnish.
-
- Click here
CONNECT CABLE TO NEGATIVE BATTERY TERMINAL
Note:When disconnecting the cable, some systems need to be initialized after the cable is reconnected (Click here).