REAR LOWER ARM REMOVAL

Tech Tips
-
Use the same procedures for the RH side and LH side.
-
The procedures listed below are for the LH side.
-
REMOVE STABILIZER CONTROL VALVE PROTECTOR (w/ KDSS)
-
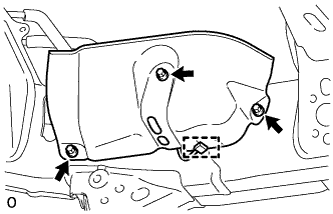
Detach the clamp, and disconnect the connector from the protector.
-
Remove the 3 bolts and protector.
-
-
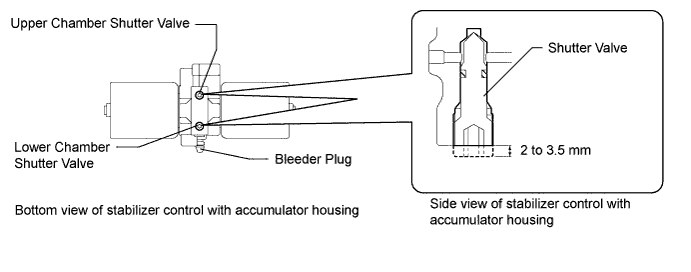
OPEN STABILIZER CONTROL WITH ACCUMULATOR HOUSING SHUTTER VALVE (w/ KDSS)
-
Using a 5 mm hexagon socket wrench, loosen the lower and upper chamber shutter valves of the stabilizer control with accumulator housing 2.0 to 3.5 turns.
Note
-
When loosening a shutter valve, make sure that the end protrudes 2 to 3.5 mm (0.0787 to 0.137 in.) from the surface of the block, and do not turn the shutter valve any further.
-
Do not remove the shutter valves.
-
-
-
REMOVE REAR WHEEL
-
SUPPORT REAR AXLE HOUSING ASSEMBLY
-
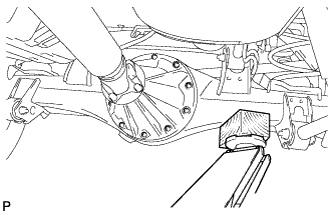
Support the rear axle housing with a jack using a wooden block to avoid damage.
-
-
REMOVE LOWER CONTROL ARM ASSEMBLY LH
-
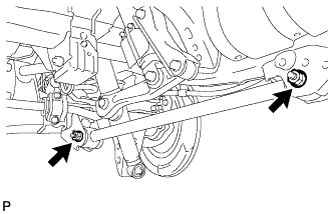
Remove the 2 nuts, 2 washers, 2 bolts and lower control arm.
-