DESCRIPTION
In case that the height control has not finished in spite of performing the raise control for a certain period of time, the ECU interrupts the height control.
| DTC Code | Detection Condition | Trouble Area |
|---|---|---|
| C1766 | When the height control pump and motor operates continuously for 135 seconds. |
|
INSPECTION PROCEDURE
-
If the suspension control ECU or height control sensor is replaced, the vehicle height offset calibration must be performed (Click here).
-
When the cargo weight is extremely heavy, this DTC may be stored.
PROCEDURE
- Click here
INSPECT FOR FLUID LEAK
-
Inspect for fluid leaks (Click here).
- OKClick here
- NGClick here
-
- Click here
PERFORM ACTIVE TEST USING INTELLIGENT TESTER (LEVELING VALVE, ACCUMULATOR VALVE AND GATE VALVE)
-
Connect the intelligent tester to the DLC3.
-
Start the engine and turn the tester on.
-
Select the Active Test mode on the intelligent tester.
-
Check the operation of the leveling valve solenoid, accumulator valve solenoid and gate valve solenoid when operating the solenoid with the intelligent tester.
Table 1. AHC Tester Display Test Part Control Range Diagnostic Note Front Right Height Solenoid Front height control solenoid valve RH ON or OFF Operation of solenoid can be heard. Front Left Height Solenoid Front height control solenoid valve LH ON or OFF Operation of solenoid can be heard. Rear Right Height Solenoid Rear height control solenoid valve RH ON or OFF Operation of solenoid can be heard. Rear Left Height Solenoid Rear height control solenoid valve LH ON or OFF Operation of solenoid can be heard. Accumulator Valve Accumulator solenoid valve ON or OFF Operation of solenoid can be heard. Front Gate Valve Front gate solenoid valve ON or OFF When the Front Gate Valve item of the Active Test is operated, the Front Gate Valve item of the Data List changes to ON/OFF. Rear Gate Valve Rear gate solenoid valve ON or OFF When the Rear Gate Valve item of the Active Test is operated, the Rear Gate Valve item of the Data List changes to ON/OFF. OK The leveling valve solenoid, accumulator valve solenoid and/or gate valve solenoid operates.
- OKClick here
- NGClick here
-
- Click here
INSPECT SUSPENSION CONTROL RELAY (AHC)
-
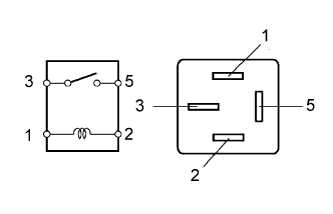
Remove the suspension control relay from the engine room relay block.
-
Measure the resistance according to the value(s) in the table below.
Standard Resistance Tester Connection Condition Specified Condition 3 - 5 Battery voltage is not applied to terminal 1 and 2 10 kΩ or higher Battery voltage is applied to terminal 1 and 2 Below 1 Ω
- OKClick here
- NGClick here
-
- Click here
CHECK HEIGHT CONTROL PUMP AND MOTOR
-
Remove the height control pump and motor (Click here).
-
Inspect if the compressor is stuck.
-
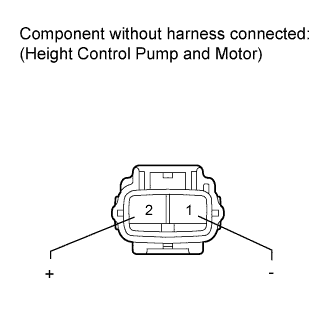
Apply battery voltage to the compressor motor and check the operation of the motor.
OK Measurement Condition Specified Condition Battery positive (+) → Terminal 2
Battery negative (-) → Terminal 1
Motor operates Note:
-
Do not allow the motor to operate for 60 seconds or more.
-
If the height control pump and motor is shorted, locked, or has a similar type of malfunction, a large amount of current will be flowing. Therefore, if the motor does not operate, immediately stop this inspection.
-
-
- OKClick here
- NGClick here
-
- Click here
INSPECT FLUID LINE
-
Check if the fluid line is clogged.
Tip:
-
Check if the fluid line that connects the height control pump and motor and No. 1 height control valve is clogged. If it is not clogged, there probably is foreign matter clogging the interior of the No. 1 height control valve.
-
Follow the removal and installation procedures for each part, as all parts need to be removed.
-
- OKClick here
- NGClick here
-
- Click here
REPAIR FLUID LEAK OR REPLACE LEAKING PART(S)
- Click here
REPLACE HEIGHT CONTROL PUMP AND MOTORClick here
- Click here
REPLACE SUSPENSION CONTROL RELAY
- Click here
REPLACE SUSPENSION CONTROL ECUClick here
- Click here
REPAIR OR REPLACE CLOGGED PARTS
- Click here
REPLACE NO. 1 HEIGHT CONTROL VALVEClick here