VALVE BODY ASSEMBLY INSTALLATION

-
INSTALL TRANSMISSION VALVE BODY ASSEMBLY
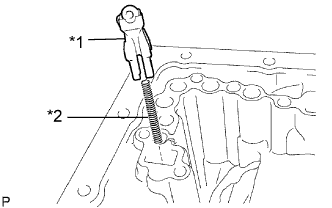
Text in Illustration *1 Check Ball Body *2 Spring
-
Install the spring and check ball body.
-
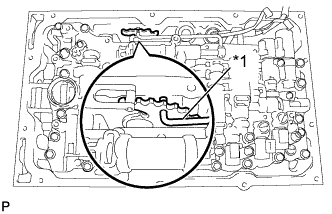
Text in Illustration *1 Pin Insert the pin of the manual valve into the hole of the manual valve lever.
-
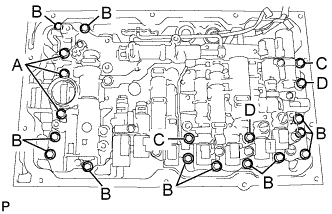
Install the 19 bolts.
- Torque:
- 11 N*m { 112 kgf*cm, 8 ft.*lbf }
Tech Tips
Each bolt length is indicated below.
36 mm (1.42 in.) for bolt A
25 mm (0.984 in.) for bolt B
45 mm (1.77 in.) for bolt C
50 mm (1.97 in.) for bolt D
-
Install the detent spring and detent spring cover with the bolt.
- Torque:
- 10 N*m { 102 kgf*cm, 7 ft.*lbf }
-
-
CONNECT TRANSMISSION WIRE
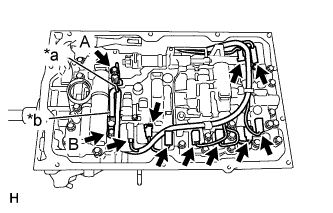
Text in Illustration *a Orange *b Blue
-
Connect the 9 connectors to the solenoid valves.
-
Connect the 2 ATF temperature sensors with the 2 clamps and 2 bolts.
- Torque:
- for bolt A
- 10 N*m { 102 kgf*cm, 7 ft.*lbf }
- for bolt B
- 11 N*m { 112 kgf*cm, 8 ft.*lbf }
Tech Tips
Each bolt length is indicated below.
12 mm (0.472 in.) for bolt A
36 mm (1.41 in.) for bolt B
-
-
INSTALL VALVE BODY OIL STRAINER ASSEMBLY
-
Coat a new O-ring with ATF and install it to the oil strainer.
-
Install the oil strainer with the 4 bolts.
- Torque:
- 10 N*m { 102 kgf*cm, 7 ft.*lbf }
-
-
INSTALL AUTOMATIC TRANSMISSION OIL PAN SUB-ASSEMBLY
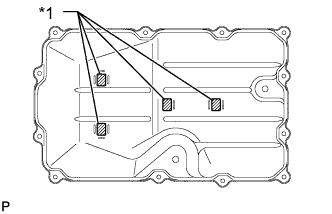
Text in Illustration *1 Magnet
-
Install the 4 transmission oil cleaner magnets to the oil pan.
-
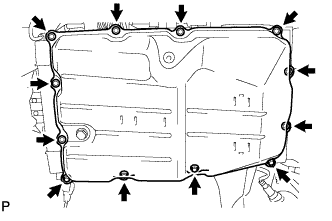
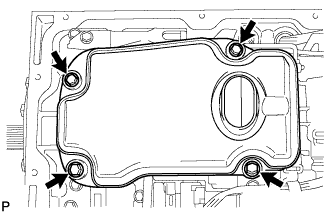
Text in Illustration *1 Sleeve *2 Protrusion *a Correct *b Incorrect Install a new gasket and the oil pan with the 12 bolts.
- Torque:
- 7.4 N*m { 75 kgf*cm, 65 in.*lbf }
Note

-
Make sure that there is no oil or foreign matter on the gasket seal surface and oil pan contact surface.
-
Install the gasket so that there is no slack in the gasket, and make sure the entire circumference of the seal surface is level.
-
Make sure that the 9 gasket drop prevention protrusions are set on the oil pan.
-
When tightening the bolts of the oil pan, make sure that the gasket is not pinched between the gasket tightening area sleeve and the transmission seal surface.
-
-
RESET MEMORY
for 1UR-FE: Click here
for 3UR-FE: Click here
for 1VD-FTV: Click here
-
ADD AUTOMATIC TRANSMISSION FLUID
-
INSTALL OIL PAN PROTECTOR ASSEMBLY
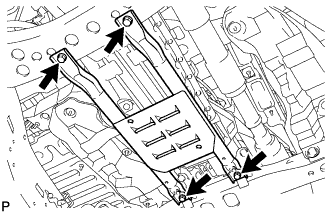
-
Install the oil pan protector with the 4 bolts.
- Torque:
- 63 N*m { 642 kgf*cm, 46 ft.*lbf }
-
-
INSTALL NO. 2 ENGINE UNDER COVER
-
Install the No. 2 engine under cover with the 2 bolts.
- Torque:
- 29 N*m { 296 kgf*cm, 21 ft.*lbf }
-