EXHAUST PIPE (w/o DPF) INSTALLATION

CAUTION:
-
Wear protective gloves and protective glasses when installing the exhaust pipe.
-
The exhaust pipe is extremely hot immediately after the engine has stopped.
-
Confirm that the exhaust pipe has cooled down before removing it.
-
INSTALL OUTLET TURBINE ELBOW LH (w/o Monolithic Converter)
-
Set a new gasket to the turbocharger.
-
Temporarily install the outlet turbine elbow LH with 3 new nuts.
-
Temporarily install the manifold stay LH with the 3 bolts.
-
Tighten the 3 nuts of the outlet turbine elbow LH.
- Torque:
- 47 N*m { 479 kgf*cm, 35 ft.*lbf }
-
Tighten the 3 bolts of the manifold stay LH.
- Torque:
- 43 N*m { 438 kgf*cm, 32 ft.*lbf }
-
-
INSTALL OUTLET TURBINE ELBOW RH (w/o Monolithic Converter)
-
Set a new gasket to the turbocharger.
-
Temporarily install the outlet turbine elbow RH with 3 new nuts.
-
Temporarily install the manifold stay RH with the 3 bolts.
-
Tighten the 3 nuts of the outlet turbine elbow RH.
- Torque:
- 47 N*m { 479 kgf*cm, 35 ft.*lbf }
-
Tighten the 3 bolts of the manifold stay RH.
- Torque:
- 43 N*m { 438 kgf*cm, 32 ft.*lbf }
-
-
INSTALL MONOLITHIC CONVERTER ASSEMBLY LH (w/ Monolithic Converter)
-
Set a new gasket to the turbocharger.
-
Temporarily install the monolithic converter LH with 3 new nuts.
-
Temporarily install the manifold stay LH with the 3 bolts.
-
Tighten the 3 nuts of the monolithic converter LH.
- Torque:
- 47 N*m { 479 kgf*cm, 35 ft.*lbf }
-
Tighten the 3 bolts of the manifold stay LH.
- Torque:
- 43 N*m { 438 kgf*cm, 32 ft.*lbf }
-
-
INSTALL MONOLITHIC CONVERTER ASSEMBLY RH (w/ Monolithic Converter)
-
Set a new gasket to the turbocharger.
-
Temporarily install the monolithic converter RH with 3 new nuts.
-
Temporarily install the manifold stay RH with the 3 bolts.
-
Tighten the 3 nuts of the monolithic converter RH.
- Torque:
- 47 N*m { 479 kgf*cm, 35 ft.*lbf }
-
Tighten the 3 bolts of the manifold stay RH.
- Torque:
- 43 N*m { 438 kgf*cm, 32 ft.*lbf }
-
-
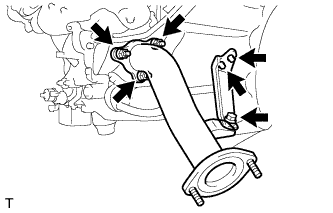
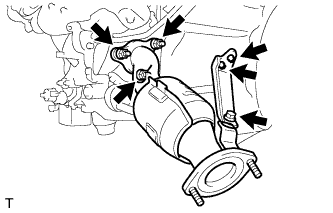
INSTALL FRONT NO. 2 EXHAUST PIPE ASSEMBLY
-
Install a new gasket and the front No. 2 exhaust pipe to the monolithic converter/outlet turbine elbow with 2 new nuts.
- Torque:
- 54 N*m { 554 kgf*cm, 40 ft.*lbf }
-
-
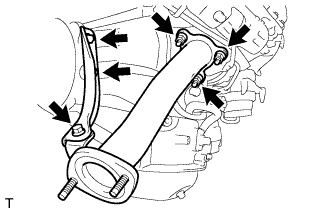
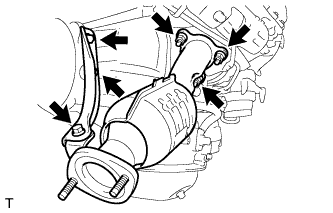
INSTALL FRONT NO. 1 EXHAUST PIPE ASSEMBLY
-
Install a new gasket and the front No. 1 exhaust pipe to the converter/outlet turbine elbow with 2 new nuts.
- Torque:
- 54 N*m { 554 kgf*cm, 40 ft.*lbf }
-
-
INSTALL CENTER EXHAUST PIPE ASSEMBLY
-
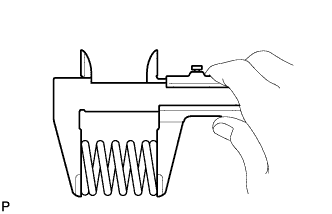
Check the free length.
-
Using a vernier caliper, measure the free length of the compression spring.
Free length 43 mm (1.69 in.) If the free length is less that the minimum, replace the compression spring.
-
-
Connect the center exhaust pipe to the 3 exhaust pipe supports.
-
Set 2 new gaskets to the front No. 1 and No. 2 exhaust pipes.
-
Install the center exhaust pipe with the 4 bolts and 2 compression springs.
- Torque:
- for center exhaust pipe and front No. 1 exhaust pipe
- 43 N*m { 438 kgf*cm, 32 ft.*lbf }
- for center exhaust pipe and front No. 2 exhaust pipe
- 48 N*m { 489 kgf*cm, 35 ft.*lbf }
-
-
INSTALL TAILPIPE ASSEMBLY
-
Connect the tailpipe to the 2 exhaust pipe supports.
-
Set a new gasket to the center exhaust pipe.
-
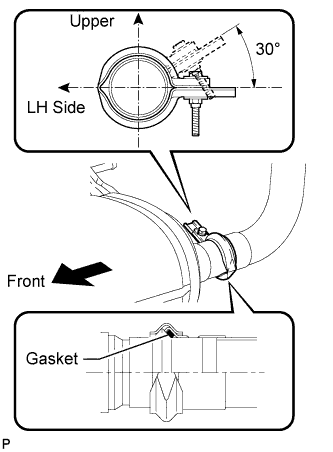
Connect the tailpipe to the center exhaust pipe with a new clamp.
Tech Tips
Install the clamp within the angle range shown in the illustration.
-
Tighten the bolt.
- Torque:
- 32 N*m { 326 kgf*cm, 24 ft.*lbf }
-
-
INSPECT FOR EXHAUST GAS LEAK
-
INSTALL NO. 2 ENGINE UNDER COVER
-

Install the under cover the with the 6 bolts.
- Torque:
- 29 N*m { 296 kgf*cm, 21 ft.*lbf }
-
-
INSTALL FRONT FENDER APRON SEAL REAR LH
-
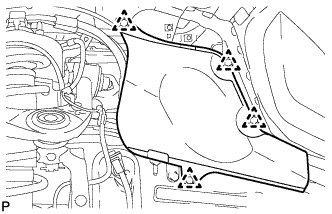
Install the fender apron seal with the 4 clips.
-
-
INSTALL FRONT FENDER APRON SEAL REAR RH
-
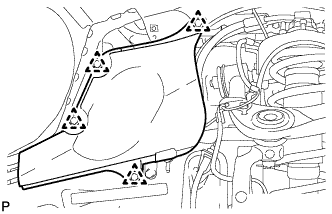
Install the fender apron seal with the 4 clips.
-