Wear protective gloves. Sharp areas on the parts may injure your hands.
-
Use the same procedure for the RH and LH sides.
-
The procedure listed below is for the LH side.
- Click here
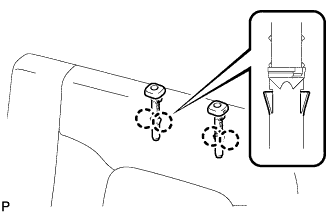
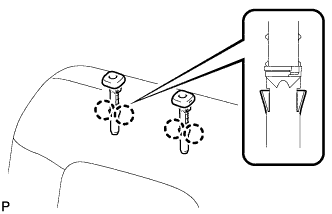
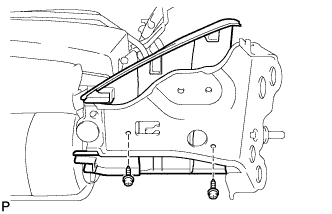
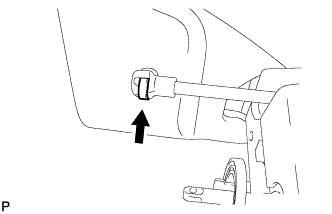
INSTALL NO. 2 SEAT RECLINING RELEASE HANDLE SUB-ASSEMBLY
-
Install the release handle with the bolt.
-
- Click here
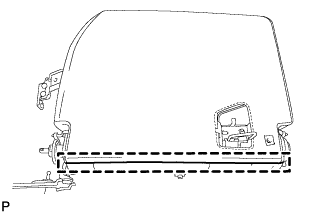
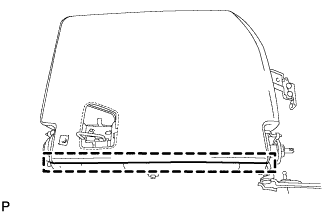
INSTALL REAR SEATBACK LOCK STRIKER COVER LH
-
Attach the 2 clamps to install the cover.
-
- Click here
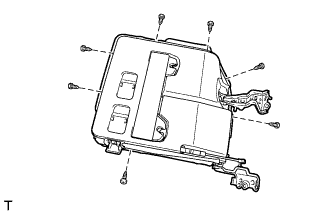
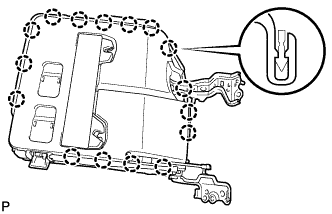
INSTALL REAR NO. 2 SEATBACK COVER LH
-
Attach the 3 claws to install the cover.
-
-
Click here
INSTALL REAR SEATBACK LOCK STRIKER ASSEMBLY LH
-
Install the lock striker with the 2 nuts.
14 N*m 138 kgf*cm 10 ft.*lbf
-
-
Click here
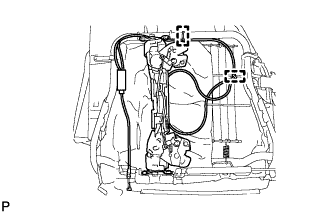
INSTALL REAR SEAT LOCK CONTROL CABLE
-
Attach the 2 clamps to install the lock control cable.
-
Attach the 2 cable clamps to connect the 2 cables.
-
-
Click here
INSTALL REAR INNER SEAT RECLINING COVER RH
-
Attach the claw to install the cover.
-
Install the screw.
-
- Click here
INSTALL REAR INNER SEAT RECLINING COVER LH
-
Attach the claw to install the cover.
-
Install the screw.
-
-
Click here
INSTALL NO. 3 SEATBACK COVER SUB-ASSEMBLY LH
-
Using hog ring pliers, install the seatback cover to the seatback pad with new hog rings.
Note:
-
Be careful not to damage the cover.
-
When installing the hog rings, avoid wrinkling the cover.
Table 1. Text in Illustration *1 Hog Ring Pliers -
-
- Click here
INSTALL SEATBACK COVER WITH PAD
-
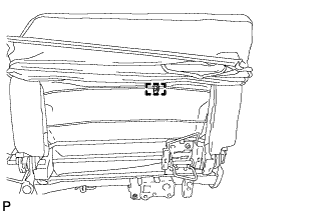
Using hog ring pliers, install the seatback cover with pad to the seatback frame with a new hog rings.
-
LH Side:
-
w/ Rear Center Seat Headrest:
-
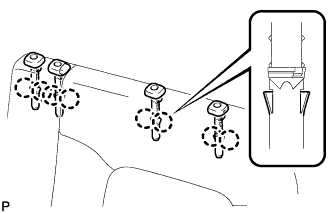
Attach the 8 claws to install the 4 headrest supports.
-
Install the rear seat protector.
-
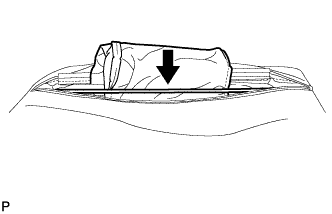
Insert the center headrest storage bag.
-

Attach the 2 hooks.
-
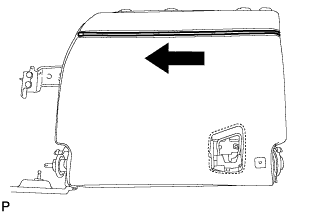
Close the fastener.
-
-
w/o Rear Center Seat Headrest:
-
Attach the 4 claws to install the 2 headrest supports.
-
Install the rear seat protector.
-
Attach the hook.
-
-
-
RH Side:
-
Attach the 4 claws to install the 2 headrest supports.
-
Install the rear seat protector.
-
Attach the hook.
-
-
- Click here
INSTALL REAR SEAT HEADREST HANDLE
-
Install the snap ring to the headrest handle.
-

Install the headrest handle to the headrest.
-
-
Click here
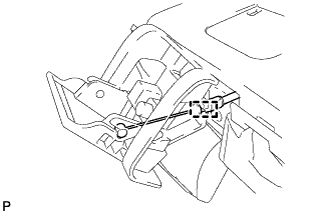
INSTALL REAR SEAT HEADREST ASSEMBLY (w/ Folding Headrest)
-
While releasing the lock inside the headrest support with a screwdriver, install the headrest.
Tip:Tape the screwdriver tip before use.
Table 2. Text in Illustration *1 Protective Tape
-
- Click here
INSTALL REAR SEAT HEADREST ASSEMBLY (w/o Folding Headrest)
-
Click here
INSTALL REAR SEAT HINGE PAWL GUIDE
-
Install the guide with the screw.
-
-
Click here
INSTALL REAR SEAT HINGE PAWL GUIDE
-
Attach the 5 claws to install the guide.
-
-
Click here
INSTALL REAR LOWER SEATBACK LOCK BEZEL
-
Attach the 3 claws and clip to install the seatback lock bezel.
-
-
Click here
INSTALL REAR NO. 2 SEATBACK CUSHION
-
Install the seatback cushion with the screw.
-
- Click here
INSTALL NO. 3 FOLD SEAT LOCK CONTROL CABLE ASSEMBLY
-
Attach the 2 clamps to install the 2 cables.
-
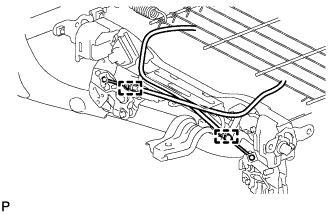
Attach the 2 cable clamps to connect the 2 cables.
-
-
Click here
INSTALL NO. 2 SEAT STAY SUB-ASSEMBLY
-
Install the seat stay with the bolt.
-
- Click here
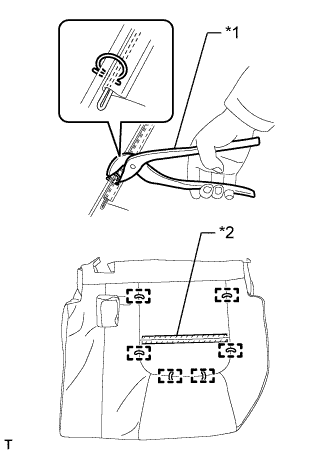
INSTALL NO. 3 SEAT CUSHION COVER SUB-ASSEMBLY LH
-
w/o Bottle Holder:
-
Attach the fastening tape to install the seatback cover.
-
Using hog ring pliers, install the seat cushion cover to the seat cushion pad with new hog rings.
Note:
-
Be careful not to damage the cover.
-
When installing the hog rings, avoid wrinkling the cover.
Table 3. Text in Illustration *1 Hog Ring Pliers *2 Fastening Tape -
-
-
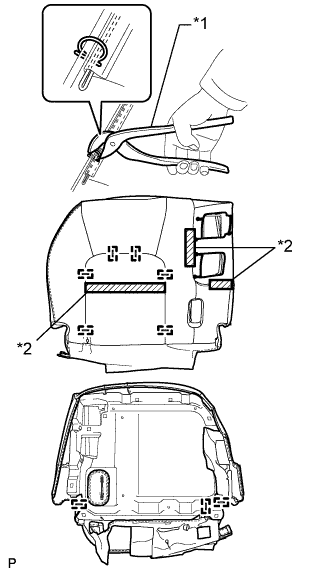
w/ Bottle Holder:
-
Attach the 3 fastening tapes to install the seatback cover.
-
Using hog ring pliers, install the seat cushion cover to the seat cushion pad with new hog rings.
Note:
-
Be careful not to damage the cover.
-
When installing the hog rings, avoid wrinkling the cover.
Table 4. Text in Illustration *1 Hog Ring Pliers *2 Fastening Tape -
-
-
- Click here
INSTALL NO. 3 SEAT CUSHION PAD LH
- Click here
INSTALL SEAT CUSHION COVER WITH PAD
- Click here
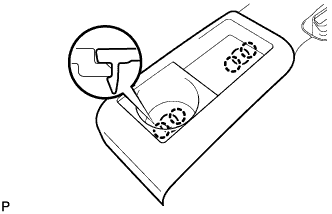
INSTALL NO. 2 BOTTLE HOLDER
-
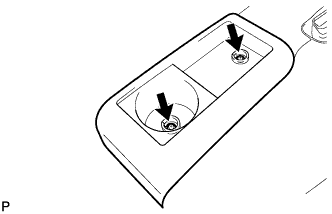
Install the No. 2 bottle holder with the 2 screws.
-
- Click here
INSTALL CAP
-
Attach the 4 claws to install the 2 caps.
-
-
Click here
INSTALL REAR SEAT CUSHION CARPET
-
Install the seat cushion carpet with new tack pins.
-
- Click here
INSTALL REAR NO. 2 SEAT INNER BELT SUB-ASSEMBLY
-
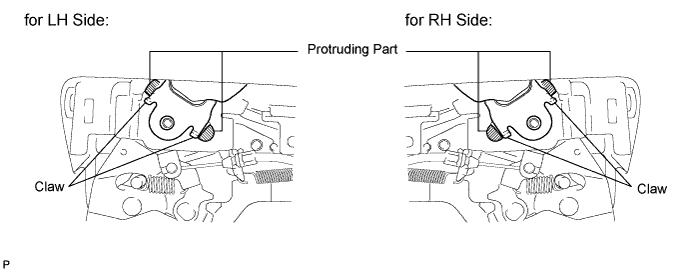
Install the 2 belts.
Note:
-
Make sure the claws are facing away from the seat.
-
Do not overlap the anchor part of the seat belt and protruding parts of the seat.
-
-
-
Click here
INSTALL REAR CENTER SEAT INNER BELT LH (w/ Rear Center Seat Headrest)
-
Install the belt with the nut.
42 N*m 428 kgf*cm 31 ft.*lbf Note:Do not overlap the anchor part of the seat belt and protruding parts of the seat.
Tip:The rear No. 2 seat inner belt is fixed with the same nut as the rear seat inner belt. Therefore, connect it when installing the rear seat inner belt.
-
-
Click here
INSTALL REAR CENTER SEAT INNER BELT RH (w/ Rear Center Seat Headrest)
-
Install the belt with the nut.
42 N*m 428 kgf*cm 31 ft.*lbf Note:Do not overlap the anchor part of the seat belt and protruding parts of the seat.
Tip:The rear No. 2 seat inner belt is fixed with the same nut as the rear seat outer belt. Therefore, connect it when installing the rear seat outer belt.
-
- Click here
INSTALL SEAT CUSHION LOCK RELEASE LEVER ASSEMBLY LH
-
Attach the cable clamp to connect the cable.
-

Attach the claw to install the release lever.
-
Install the screw.
-
-
Click here
INSTALL SEAT STAND FRAME CAP
-
Attach the 2 claws to install the stand frame cap.
-
-
Click here
INSTALL REAR SEAT LOCK COVER LH
-
Attach the 2 clamps to install the cover.
-
Install the 2 screws.
-
-
Click here
INSTALL NO. 3 SEAT LEG COVER NO. 2
-
Attach the 4 claws to install the cover.
-
Install the 2 screws.
-
-
Click here
INSTALL NO. 3 SEAT FRONT BRACKET COVER LH
-
Attach the 4 claws to install the cover.
-
- Click here
INSTALL REAR SEAT CUSHION UNDER COVER LH
-
Install the cover with the 7 screws.
-
Attach the 16 claws.
-
-
Click here
INSTALL 3RD SEAT CUSHION LOCK COVER
-
Attach the 4 claws to install the 2 covers.
-
-
Click here
INSTALL 3RD SEAT LINK SUB-ASSEMBLY LH
-
Install the seat link with the bolt and nut.
8.5 N*m 87 kgf*cm 75 in.*lbf
-
-
Click here
INSTALL NO. 2 SEAT LEG COVER NO. 2
-
Install the seat leg cover with the screw.
-
- Click here
INSTALL REAR NO. 3 SEAT LEG COVER LH
-
Install the seat leg cover with the 2 screws.
-
Install the spring of the seat stay ball-joint.
-
Connect the seat stay to the seat frame.
-
- Click here
INSTALL REAR SEAT REAR BRACKET COVER REAR
-
Attach the 2 claws to install the cover.
-
-
Click here
INSTALL RECLINING ADJUSTER COVER RH
-
Attach the 5 claws in the order shown in the illustration to install the cover.
-
Install the screw.
-
-
Click here
INSTALL RECLINING ADJUSTER COVER LH
-
Attach the 3 claws in the order shown in the illustration to install the cover.
-
Install the screw.
-
-
Click here
INSTALL NO. 2 RECLINING ADJUSTER RELEASE HANDLE LH
-
Install the release handle with the screw.
-
-
Click here
INSTALL SEAT ADJUSTER BOLT COVER
-
Attach the 2 claws to install the cover.
-