REAR PACKAGE TRAY SPEAKER REMOVAL

-
REMOVE REAR SEATBACK ASSEMBLY
-
REMOVE REAR DOOR SCUFF PLATE LH
-
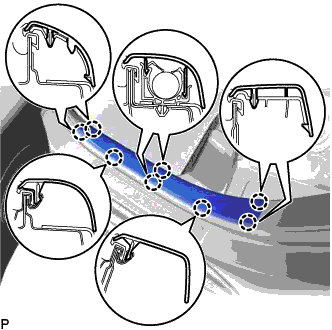
Disengage the 8 claws and remove the rear door scuff plate LH.
-
-
REMOVE REAR DOOR SCUFF PLATE RH
Tech Tips
Use the same procedure as for the LH side.
-
REMOVE REAR SEAT SIDE GARNISH LH
-
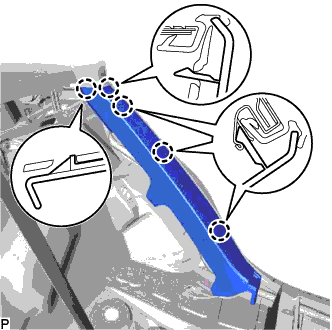
Disengage the 5 claws and remove the rear seat side garnish LH.
-
-
REMOVE REAR SEAT SIDE GARNISH RH
Tech Tips
Use the same procedure as for the LH side.
-
REMOVE ROOF SIDE INNER GARNISH ASSEMBLY LH
-
Disengage the 4 clips.
-
Disengage the 2 guides and remove the roof side inner garnish assembly LH.
-
-
REMOVE ROOF SIDE INNER GARNISH ASSEMBLY RH
Tech Tips
Use the same procedure as for the LH side.
-
DISCONNECT REAR SEAT 3 POINT TYPE OUTER BELT ASSEMBLY LH
-

Remove the bolt and disconnect the floor anchor of the rear seat 3 point type outer belt assembly LH.
-
-
DISCONNECT REAR SEAT 3 POINT TYPE OUTER BELT ASSEMBLY RH
Tech Tips
Use the same procedure as for the LH side.
-
REMOVE CHILD RESTRAINT SEAT ANCHOR BRACKET SUB-ASSEMBLY LH
-

Remove the 2 nuts and child restraint seat anchor bracket sub-assembly LH.
-
-
DISCONNECT REAR SEAT INNER WITH CENTER BELT ASSEMBLY LH
-

Remove the bolt and disconnect the floor anchor of the rear seat inner with center belt assembly LH.
-
-
REMOVE CENTER STOP LIGHT SET (w/o Rear Sunshade)
-

Slide the center stop light set in the order and directions shown by the arrows in the illustration while pushing it towards the rear of the vehicle to disengage the 4 claws.
-

Turn the center stop light set 180° as shown by the arrow in the illustration.
Tech Tips
This makes it easier to disconnect the connector.
-
Disconnect the connector and remove the center stop light set.
-
-
REMOVE REAR SEAT SHOULDER BELT HOLE COVER
-

Using a moulding remover, disengage the 2 claws and 2 guides and remove the rear seat shoulder belt cover.
Tech Tips
Use the same procedure for the other 2 rear seat shoulder belt hole covers.
-
-
REMOVE CHILD RESTRAINT SEAT TETHER ANCHOR COVER
-

Disengage the 2 claws and 2 guides and remove the child restraint seat tether anchor cover.
Tech Tips
Use the same procedure for the other child restraint seat tether anchor cover.
-
-
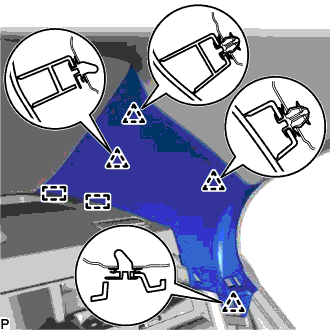
REMOVE PACKAGE TRAY TRIM PANEL ASSEMBLY (w/o Rear Sunshade)
-

Disengage the 3 clips.
-
Disengage the 5 guides.
-
Pass the 3 rear seat belt floor anchors through the package tray trim panel assembly then remove the package tray trim panel assembly.
-
-
REMOVE PACKAGE TRAY TRIM PANEL ASSEMBLY (w/ Rear Sunshade)
-

Disengage the 3 clips.
-
Disengage the guide.
-
Pass the 3 rear seat belt floor anchors through the package tray trim panel assembly then remove the package tray trim panel assembly.
-
-
REMOVE STEREO COMPONENT SPEAKER ASSEMBLY
-
Disconnect the connector.
-

Remove the 4 bolts and stereo component speaker assembly.
Note
Do not touch the speaker cone.
Tech Tips
If the stereo component speaker assembly is difficult to remove, turn back the room partition panel insulator so that the stereo component speaker assembly can be removed.
-
-
REMOVE CENTER STOP LIGHT SET (for 15 Speakers)
-
Slide the center stop light set in the order and directions shown by the arrows in the illustration while pushing it towards the rear of the vehicle to disengage the 4 claws.
-
Turn the center stop light set 180° as shown by the arrow in the illustration.
Tech Tips
This makes it easier to disconnect the connector.
-
Disconnect the connector and remove the center stop light set.
-
-
REMOVE NO. 2 PACKAGE TRAY TRIM PANEL ASSEMBLY (for 15 Speakers)
-
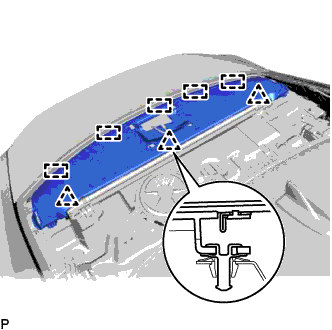
Disengage the 3 clips and 5 guides, and remove the No. 2 package tray trim panel assembly.
-
-
REMOVE REAR HEADER SPEAKER ASSEMBLY (for 15 Speakers)
-

Disconnect the connector and remove the bolt.
-
Disengage the guide and remove the rear header speaker assembly.
Note
Do not touch the speaker cone.
Tech Tips
Use the same procedure for the RH side and LH side.
-