REAR SUNSHADE ASSEMBLY REMOVAL

-
REMOVE REAR SEAT ASSEMBLY
-
REMOVE REAR DOOR SCUFF PLATE LH
-
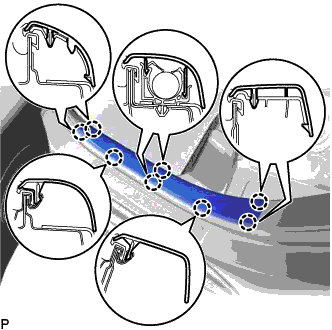
Disengage the 8 claws and remove the rear door scuff plate LH.
-
-
REMOVE REAR DOOR SCUFF PLATE RH
Tech Tips
Use the same procedure as for the LH side.
-
REMOVE REAR SEAT SIDE GARNISH LH
-
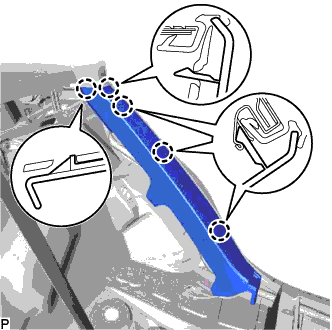
Disengage the 5 claws and remove the rear seat side garnish LH.
-
-
REMOVE REAR SEAT SIDE GARNISH RH
Tech Tips
Use the same procedure as for the LH side.
-
REMOVE ROOF SIDE INNER GARNISH ASSEMBLY LH
-
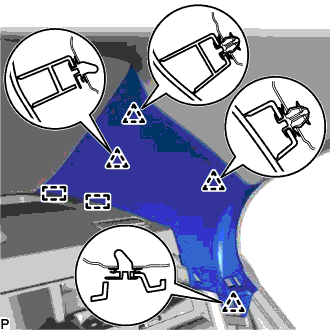
Disengage the 4 clips.
-
Disengage the 2 guides and remove the roof side inner garnish assembly LH.
-
-
REMOVE ROOF SIDE INNER GARNISH ASSEMBLY RH
Tech Tips
Use the same procedure as for the LH side.
-
DISCONNECT REAR SEAT 3 POINT TYPE OUTER BELT ASSEMBLY LH
-

Remove the bolt and disconnect the floor anchor of the rear seat 3 point type outer belt assembly LH.
-
-
DISCONNECT REAR SEAT 3 POINT TYPE OUTER BELT ASSEMBLY RH
Tech Tips
Use the same procedure as for the LH side.
-
REMOVE CHILD RESTRAINT SEAT ANCHOR BRACKET SUB-ASSEMBLY LH
-

Remove the 2 nuts and child restraint seat anchor bracket sub-assembly LH.
-
-
DISCONNECT REAR SEAT INNER WITH CENTER BELT ASSEMBLY LH
-

Remove the bolt and disconnect the floor anchor of the rear seat inner with center belt assembly LH.
-
-
REMOVE REAR SEAT SHOULDER BELT HOLE COVER
-

Using a moulding remover, disengage the 2 claws and 2 guides and remove the rear seat shoulder belt cover.
Tech Tips
Use the same procedure for the other 2 rear seat shoulder belt hole covers.
-
-
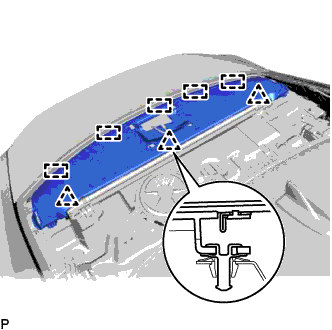
REMOVE PACKAGE TRAY TRIM PANEL ASSEMBLY
-

Disengage the 3 clips.
-
Disengage the guide.
-
Pass the 3 rear seat belt floor anchors through the package tray trim panel assembly then remove the package tray trim panel assembly.
-
-
REMOVE CENTER STOP LIGHT SET
-

Slide the center stop light set in the order and directions shown by the arrows in the illustration while pushing it towards the rear of the vehicle to disengage the 4 claws.
-

Turn the center stop light set 180° as shown by the arrow in the illustration.
Tech Tips
This makes it easier to disconnect the connector.
-
Disconnect the connector and remove the center stop light set.
-
-
REMOVE NO. 2 PACKAGE TRAY TRIM PANEL ASSEMBLY
-
Disengage the 3 clips and 5 guides, and remove the No. 2 package tray trim panel assembly.
-
-
REMOVE REAR WINDOW SHADE ASSEMBLY
-
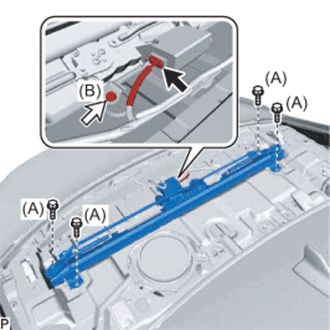
Disconnect the connector.
-
Remove the 4 bolts (A).
-
Loosen the bolt (B) and remove the rear window shade assembly.
Note
The bolt (B) cannot be removed from the rear window shade assembly.
-
-
REMOVE REAR SUNSHADE RELAY
Note
When disassembling the rear sunshade assembly, eliminate static electricity by touching the vehicle body to prevent the components from being damaged.
-
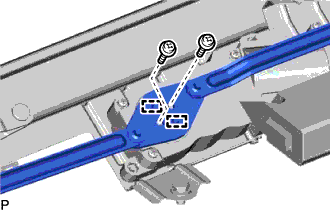
Remove the 2 screws.
-
Disengage the 2 pins and disconnect the link.
-
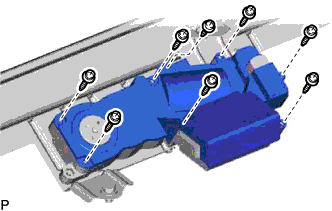
Remove the 8 screws and rear sunshade relay cover.
-
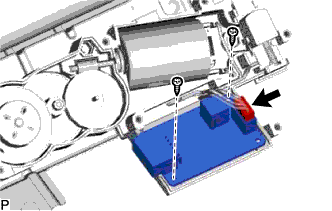
Disconnect the connector.
-
Remove the 2 screws and rear sunshade relay.
-