REAR SEAT OUTER BELT ASSEMBLY INSTALLATION

-
INSPECT REAR SEAT 3 POINT TYPE OUTER BELT ASSEMBLY
-
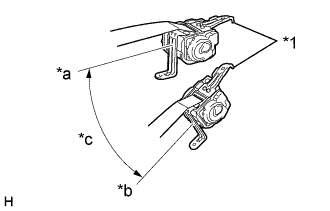
Text in Illustration *1 Retractor *a Unlocked *b Locked *c 45° Before installing the rear seat 3 point type outer belt assembly LH, check the ELR function.
Note
Do not disassemble the retractor.
-
When the inclination of the retractor is 15° or less, check that the belt can be pulled from the retractor. When the inclination of the retractor is over 45°, check that the belt locks.
If the result is not as specified, replace the rear seat 3 point type outer belt assembly LH.
-
-
-
INSTALL REAR SEAT 3 POINT TYPE OUTER BELT ASSEMBLY LH
-
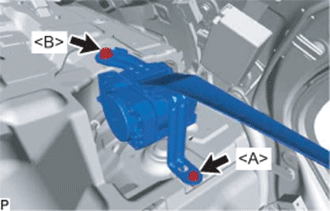
Install the rear seat 3 point type outer belt assembly LH with the bolt <A> and bolt <B>.
- Torque:
- Bolt <A>
- 7.5 N*m { 76 kgf*cm, 66 in.*lbf }
- Bolt <B>
- 42 N*m { 428 kgf*cm, 31 ft.*lbf }
-
Check that the ELR locks.
Note
The check should be performed with the seat 3 point type outer belt assembly LH installed.
-
With the belt assembly installed, check that the belt locks when it is pulled out quickly.
-
-
-
INSTALL REAR SEAT 3 POINT TYPE OUTER BELT ASSEMBLY RH
Tech Tips
Use the same procedure as for the LH side.
-
INSTALL PACKAGE TRAY TRIM PANEL ASSEMBLY (w/o Rear Sunshade)
-
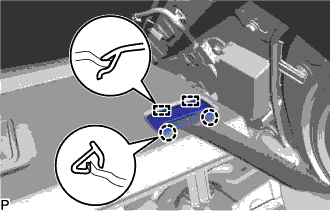
Pass the 3 rear seat belt floor anchors through the package tray trim panel assembly.
-
Engage the 5 guides and 3 clips to install the package tray trim panel assembly.
-
-
INSTALL PACKAGE TRAY TRIM PANEL ASSEMBLY (w/ Rear Sunshade)
-
Pass the 3 rear seat belt floor anchors through the package tray trim panel assembly.
-
Engage the guide and 3 clips to install the package tray trim panel assembly.
-
-
INSTALL CHILD RESTRAINT SEAT TETHER ANCHOR COVER
-
Engage the 2 guides and 2 claws to install the child restraint seat tether anchor cover.
Tech Tips
Use the same procedure for the other child restraint seat tether anchor cover.
-
-
INSTALL REAR SEAT SHOULDER BELT HOLE COVER
-
Engage the 2 guides and 2 claws to install the rear seat shoulder belt hole cover.
Tech Tips
Use the same procedure for the other 2 rear seat shoulder belt hole covers.
-
-
INSTALL CENTER STOP LIGHT SET (w/o Rear Sunshade)
-
Connect the connector.
-
Temporarily install the center stop light set.
-
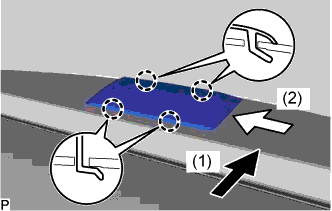
Slide the center stop light set in the order and directions shown by the arrows in the illustration while pushing it towards the rear of the vehicle to engage the 4 claws.
-
-
INSTALL ROOF SIDE INNER GARNISH ASSEMBLY LH
-
Engage the 2 guides.
-
Engage the 4 clips to install the roof side inner garnish assembly LH.
-
-
INSTALL ROOF SIDE INNER GARNISH ASSEMBLY RH
Tech Tips
Use the same procedure as for the LH side.
-
CONNECT REAR SEAT INNER WITH CENTER BELT ASSEMBLY LH
-
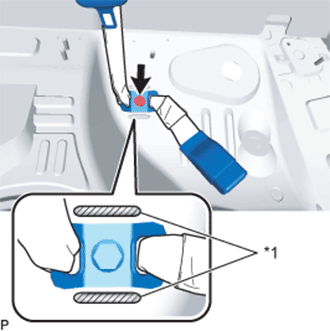
Text in Illustration *1 Protruding Part Connect the floor anchor of the rear seat inner with center belt assembly LH with the bolt.
- Torque:
- 42 N*m { 428 kgf*cm, 31 ft.*lbf }
Note
-
Install the rear seat inner with center belt assembly LH with the arrow on the anchor part facing the front of the vehicle.
-
Do not allow the anchor part of the rear seat inner with center belt assembly LH to overlap the protruding parts of the floor panel.
-
-
INSTALL CHILD RESTRAINT SEAT ANCHOR BRACKET SUB-ASSEMBLY LH
-
Install the child restraint seat anchor bracket sub-assembly LH with the 2 nuts.
- Torque:
- 18 N*m { 184 kgf*cm, 13 ft.*lbf }
-
-
CONNECT REAR SEAT 3 POINT TYPE OUTER BELT ASSEMBLY LH
-
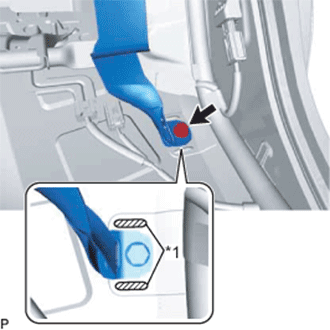
Text in Illustration *1 Protruding Part Connect the floor anchor of the rear seat 3 point type outer belt assembly LH with the bolt.
Note
-
Install the rear seat 3 point type outer belt assembly LH with the arrow on the anchor part facing the front of the vehicle.
-
Do not allow the anchor part of the rear seat 3 point type outer belt assembly LH to overlap the protruding parts of the floor panel.
-
-
-
CONNECT REAR SEAT 3 POINT TYPE OUTER BELT ASSEMBLY RH
Tech Tips
Use the same procedure as for the LH side.
-
INSTALL REAR SEAT SIDE GARNISH LH
-
Engage the 5 claws to install the rear seat side garnish LH.
-
-
INSTALL REAR SEAT SIDE GARNISH RH
Tech Tips
Use the same procedure as for the LH side.
-
INSTALL REAR DOOR SCUFF PLATE LH
-
Engage the 8 claws to install the rear door scuff plate LH.
-
-
INSTALL REAR DOOR SCUFF PLATE RH
Tech Tips
Use the same procedure as for the LH side.
-
INSTALL REAR SEAT ASSEMBLY