CAMSHAFT OIL CONTROL VALVE INSTALLATION

-
INSTALL CAMSHAFT TIMING OIL CONTROL VALVE ASSEMBLY
-
Camshaft timing oil control valve assembly (for exhaust side)
-
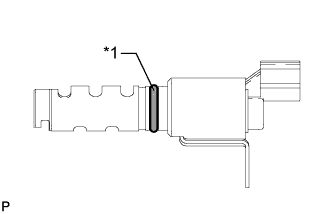
Text in Illustration *1 New O-ring Apply a light coat of engine oil to a new O-ring, and install it to the camshaft timing oil control valve assembly.
-
Install the camshaft timing oil control valve assembly with the bolt.
- Torque:
- 10 N*m { 102 kgf*cm, 7 ft.*lbf }
Note
-
Do not allow foreign matter to contact the oil seal face of the camshaft timing oil control valve assembly (connecting surface with cylinder head cover).
-
Make sure that the O-ring is not cracked or moved out of place when installing the camshaft timing oil control valve assembly.
-
Connect the camshaft timing oil control valve assembly connector.
-
-
Camshaft timing oil control valve assembly (for intake side)
-
Text in Illustration *1 New O-ring Apply a light coat of engine oil to a new O-ring, and install it to the camshaft timing oil control valve assembly.
-
Install the camshaft timing oil control valve assembly with the bolt.
- Torque:
- 10 N*m { 102 kgf*cm, 7 ft.*lbf }
Note
-
Do not allow foreign matter to contact the oil seal face of the camshaft timing oil control valve assembly (connecting surface with cylinder head cover).
-
Make sure that the O-ring is not cracked or moved out of place when installing the camshaft timing oil control valve assembly.
-
Connect the camshaft timing oil control valve assembly connector.
-
-
-
INSTALL ENGINE WIRE
-
Install the engine wire with the 2 nuts.
- Torque:
- 8.0 N*m { 82 kgf*cm, 71 in.*lbf }
-
-
INSPECT FOR OIL LEAK
-
INSTALL NO. 1 ENGINE COVER SUB-ASSEMBLY
-
Engage the 3 pins to install the No.1 engine cover sub-assembly.
-