FRONT POWER SEAT CONTROL SYSTEM(w/ Memory), Diagnostic DTC:B2652
| DTC Code | DTC Name |
|---|---|
| B2652 | Front Vertical Sensor Malfunction |
DESCRIPTION
When the front power seat switch (for driver) or front power seat switch (for front passenger) do not receive a sensor signal despite upward or downward movement of the front of the seat cushion by power seat motor operation, this DTC is stored.
| DTC Code | DTC Detection Condition | Trouble Area |
|---|---|---|
| B2652 | The upward and downward lock detection position of the sensor the same. |
|
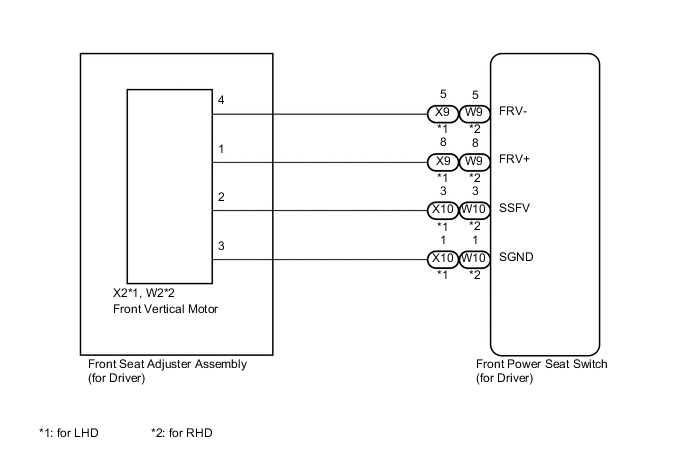
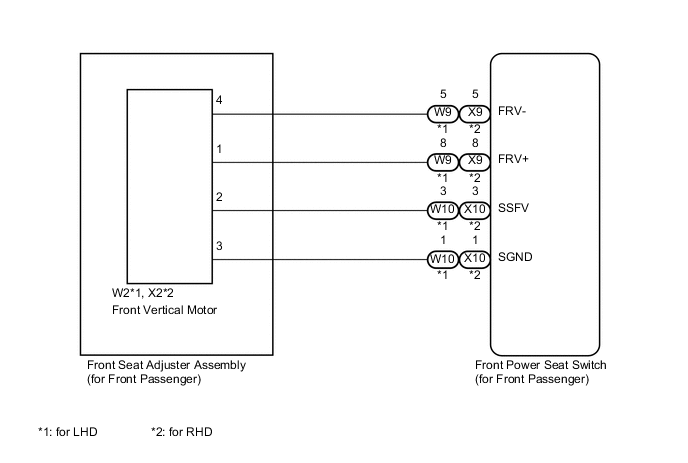
WIRING DIAGRAM
-
for Driver
-
for Front Passenger
PROCEDURE
-
CHECK FOR DTC
-
Check for DTCs Click here.
Result Result Proceed to DTC is not output A DTC output from "Driver Seat" B DTC output from "Passenger Seat" C
A 
USE SIMULATION METHOD TO CHECK Click here
C 
PERFORM ACTIVE TEST USING GTS (FRONT VERTICAL MOTOR) Click here
B 
-
-
PERFORM ACTIVE TEST USING GTS (FRONT VERTICAL MOTOR)
-
Connect the GTS to the DLC3.
-
Turn the power switch on (IG).
-
Turn the GTS on.
-
Enter the following menus: Body Electrical / Driver Seat / Active Test.
-
Perform the Active Test according to the display on the GTS.
Driver Seat Tester Display Test Part Control Range Diagnostic Note Front Vertical Operation Seat front vertical operation OFF/Up/Down - OK Motor operates normally.
NG
INSPECT FRONT VERTICAL MOTOR (FRONT SEAT ADJUSTER ASSEMBLY (FOR DRIVER)) Click here
OK
-
-
CHECK FRONT POWER SEAT SWITCH (FOR DRIVER) (FRONT VERTICAL MOTOR CIRCUIT)
-
Disconnect the X2*1 or W2*2 front vertical motor connector.
-
*1: for LHD
-
*2: for RHD
-
-
Measure the voltage according to the value(s) in the table below.
Standard Voltage for LHD Tester Connection Condition Specified Condition X2-2 - X2-3 Front vertical switch on 4.8 to 5.1 V for RHD Tester Connection Condition Specified Condition W2-2 - W2-3 Front vertical switch on 4.8 to 5.1 V
NG
CHECK HARNESS AND CONNECTOR (FRONT POWER SEAT SWITCH (FOR DRIVER) - FRONT VERTICAL MOTOR) Click here
OK
-
-
CHECK FRONT VERTICAL MOTOR (FRONT SEAT ADJUSTER ASSEMBLY (FOR DRIVER))
-
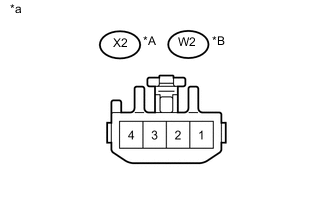
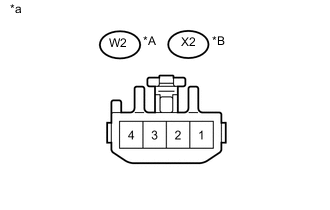
Text in Illustration *A for LHD *B for RHD *a Component with harness connected
(Front Vertical Motor (Front Seat Adjuster Assembly (for Driver)))
Reconnect the X2*1 or W2*2 front vertical motor connector.
-
*1: for LHD
-
*2: for RHD
-
-
Measure the voltage according to the value(s) in the table below.
Standard Voltage for LHD Tester Connection Condition Specified Condition X2-2 - Body ground Front vertical switch on 4.5 to 4.8 V for RHD Tester Connection Condition Specified Condition W2-2 - Body ground Front vertical switch on 4.5 to 4.8 V
OK
REPLACE FRONT POWER SEAT SWITCH (FOR DRIVER) Click here
NG
REPLACE FRONT VERTICAL MOTOR (FRONT SEAT ADJUSTER ASSEMBLY (FOR DRIVER)) Click here
-
-
CHECK HARNESS AND CONNECTOR (FRONT POWER SEAT SWITCH (FOR DRIVER) - FRONT VERTICAL MOTOR)
-
Disconnect the X10*1 or W10*2 front power seat switch (for driver) connector.
-
*1: for LHD
-
*2: for RHD
-
-
Measure the resistance according to the value(s) in the table below.
Standard Resistance for LHD Tester Connection Condition Specified Condition X10-3 (SSFV) - X2-2 Always Below 1 Ω X10-1 (SGND) - X2-3 Always Below 1 Ω X10-3 (SSFV) - Body ground Always 10 kΩ or higher X10-1 (SGND) - Body ground Always 10 kΩ or higher for RHD Tester Connection Condition Specified Condition W10-3 (SSFV) - W2-2 Always Below 1 Ω W10-1 (SGND) - W2-3 Always Below 1 Ω W10-3 (SSFV) - Body ground Always 10 kΩ or higher W10-1 (SGND) - Body ground Always 10 kΩ or higher
OK
REPLACE FRONT POWER SEAT SWITCH (FOR DRIVER) Click here
NG
REPAIR OR REPLACE HARNESS OR CONNECTOR
-
-
INSPECT FRONT VERTICAL MOTOR (FRONT SEAT ADJUSTER ASSEMBLY (FOR DRIVER))
-
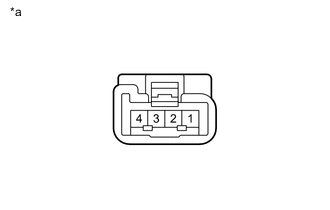
Text in Illustration *a Component without harness connected
(Front Vertical Motor (Front Seat Adjuster Assembly (for Driver)))
Disconnect the X2*1 or W2*2 front vertical motor connector.
-
*1: for LHD
-
*2: for RHD
-
-
Check if the seat cushion moves smoothly when the auxiliary battery is connected to the front vertical motor connector terminals.
OK Condition Operational Direction Auxiliary battery positive (+) → Terminal 4
Auxiliary battery negative (-) → Terminal 1
Seat cushion moves downward Auxiliary battery positive (+) → Terminal 1
Auxiliary battery negative (-) → Terminal 4
Seat cushion moves upward
NG
REPLACE FRONT VERTICAL MOTOR (FRONT SEAT ADJUSTER ASSEMBLY (FOR DRIVER)) Click here
OK
-
-
CHECK HARNESS AND CONNECTOR (FRONT POWER SEAT SWITCH (FOR DRIVER) - FRONT VERTICAL MOTOR)
-
Disconnect the X9*1 or W9*2 front power seat switch (for driver) connector.
-
*1: for LHD
-
*2: for RHD
-
-
Measure the resistance according to the value(s) in the table below.
Standard Resistance for LHD Tester Connection Condition Specified Condition X9-8 (FRV+) - X2-1 Always Below 1 Ω X9-5 (FRV-) - X2-4 Always Below 1 Ω X9-8 (FRV+) - Body ground Always 10 kΩ or higher X9-5 (FRV-) - Body ground Always 10 kΩ or higher for RHD Tester Connection Condition Specified Condition W9-8 (FRV+) - W2-1 Always Below 1 Ω W9-5 (FRV-) - W2-4 Always Below 1 Ω W9-8 (FRV+) - Body ground Always 10 kΩ or higher W9-5 (FRV-) - Body ground Always 10 kΩ or higher
OK
REPLACE FRONT POWER SEAT SWITCH (FOR DRIVER) Click here
NG
REPAIR OR REPLACE HARNESS OR CONNECTOR
-
-
PERFORM ACTIVE TEST USING GTS (FRONT VERTICAL MOTOR)
-
Connect the GTS to the DLC3.
-
Turn the power switch on (IG).
-
Turn the GTS on.
-
Enter the following menus: Body Electrical / Passenger Seat / Active Test.
-
Perform the Active Test according to the display on the GTS.
Passenger Seat Tester Display Test Part Control Range Diagnostic Note Front Vertical Operation Seat front vertical operation OFF/Up/Down - OK Motor operates normally.
NG
INSPECT FRONT VERTICAL MOTOR (FRONT SEAT ADJUSTER ASSEMBLY (FOR FRONT PASSENGER)) Click here
OK
-
-
CHECK FRONT POWER SEAT SWITCH (FOR FRONT PASSENGER) (FRONT VERTICAL MOTOR CIRCUIT)
-
Disconnect the W2*1 or X2*2 front vertical motor connector.
-
*1: for LHD
-
*2: for RHD
-
-
Measure the voltage according to the value(s) in the table below.
Standard Voltage for LHD Tester Connection Condition Specified Condition W2-2 - W2-3 Front vertical switch on 4.8 to 5.1 V for RHD Tester Connection Condition Specified Condition WX2-2 - X2-3 Front vertical switch on 4.8 to 5.1 V
NG
CHECK HARNESS AND CONNECTOR (FRONT POWER SEAT SWITCH (FOR FRONT PASSENGER) - FRONT VERTICAL MOTOR) Click here
OK
-
-
CHECK FRONT VERTICAL MOTOR (FRONT SEAT ADJUSTER ASSEMBLY (FOR FRONT PASSENGER))
-
Text in Illustration *A for LHD *B for RHD *a Component with harness connected
(Front Vertical Motor (Front Seat Adjuster Assembly (for Front Passenger)))
Reconnect the W2*1 or X2*2 front vertical motor connector.
-
*1: for LHD
-
*2: for RHD
-
-
Measure the voltage according to the value(s) in the table below.
Standard Voltage for LHD Tester Connection Condition Specified Condition W2-2 - Body ground Front vertical switch on 4.5 to 4.8 V for RHD Tester Connection Condition Specified Condition X2-2 - Body ground Front vertical switch on 4.5 to 4.8 V
OK
REPLACE FRONT POWER SEAT SWITCH (FOR FRONT PASSENGER) Click here
NG
REPLACE FRONT VERTICAL MOTOR (FRONT SEAT ADJUSTER ASSEMBLY (FOR FRONT PASSENGER)) Click here
-
-
CHECK HARNESS AND CONNECTOR (FRONT POWER SEAT SWITCH (FOR FRONT PASSENGER) - FRONT VERTICAL MOTOR)
-
Disconnect the W10*1 or X10*2 front power seat switch (for front passenger) connector.
-
*1: for LHD
-
*2: for RHD
-
-
Measure the resistance according to the value(s) in the table below.
Standard Resistance for LHD Tester Connection Condition Specified Condition W10-3 (SSFV) - W2-2 Always Below 1 Ω W10-1 (SGND) - W2-3 Always Below 1 Ω W10-3 (SSFV) - Body ground Always 10 kΩ or higher W10-1 (SGND) - Body ground Always 10 kΩ or higher for RHD Tester Connection Condition Specified Condition X10-3 (SSFV) - X2-2 Always Below 1 Ω X10-1 (SGND) - X2-3 Always Below 1 Ω X10-3 (SSFV) - Body ground Always 10 kΩ or higher X10-1 (SGND) - Body ground Always 10 kΩ or higher
OK
REPLACE FRONT POWER SEAT SWITCH (FOR FRONT PASSENGER) Click here
NG
REPAIR OR REPLACE HARNESS OR CONNECTOR
-
-
INSPECT FRONT VERTICAL MOTOR (FRONT SEAT ADJUSTER ASSEMBLY (FOR FRONT PASSENGER))
-
Text in Illustration *a Component without harness connected
(Front Vertical Motor (Front Seat Adjuster Assembly (for Front Passenger)))
Disconnect the W2*1 or X2*2 front vertical motor connector.
-
*1: for LHD
-
*2: for RHD
-
-
Check if the seat cushion moves smoothly when the auxiliary battery is connected to the front vertical motor connector terminals.
OK Condition Operational Direction Auxiliary battery positive (+) → Terminal 4
Auxiliary battery negative (-) → Terminal 1
Seat cushion moves downward Auxiliary battery positive (+) → Terminal 1
Auxiliary battery negative (-) → Terminal 4
Seat cushion moves upward
NG
REPLACE FRONT VERTICAL MOTOR (FRONT SEAT ADJUSTER ASSEMBLY (FOR FRONT PASSENGER)) Click here
OK
-
-
CHECK HARNESS AND CONNECTOR (FRONT POWER SEAT SWITCH (FOR FRONT PASSENGER) - FRONT VERTICAL MOTOR)
-
Disconnect the W9*1 or X9*2 front power seat switch (for front passenger) connector.
-
*1: for LHD
-
*2: for RHD
-
-
Measure the resistance according to the value(s) in the table below.
Standard Resistance for LHD Tester Connection Condition Specified Condition W9-8 (FRV+) - W2-1 Always Below 1 Ω W9-5 (FRV-) - W2-4 Always Below 1 Ω W9-8 (FRV+) - Body ground Always 10 kΩ or higher W9-5 (FRV-) - Body ground Always 10 kΩ or higher for RHD Tester Connection Condition Specified Condition X9-8 (FRV+) - X2-1 Always Below 1 Ω X9-5 (FRV-) - X2-4 Always Below 1 Ω X9-8 (FRV+) - Body ground Always 10 kΩ or higher X9-5 (FRV-) - Body ground Always 10 kΩ or higher
OK
REPLACE FRONT POWER SEAT SWITCH (FOR FRONT PASSENGER) Click here
NG
REPAIR OR REPLACE HARNESS OR CONNECTOR
-