СТАРТЕР УСТАНОВКА
-
INSTALL STARTER ASSEMBLY
-
Using an E14 "TORX" socket wrench, install the starter assembly with the 2 bolts.
- Torque:
- 64 N*m { 653 kgf*cm, 47 ft.*lbf }
-
Connect the engine wire with the nut to the starter assembly.
- Torque:
- 5.0 N*m { 51 kgf*cm, 44 in.*lbf }
-
Connect the No. 2 engine wire with the nut and close the terminal cap.
- Torque:
- 9.8 N*m { 100 kgf*cm, 87 in.*lbf }
-
-
INSTALL ENGINE OIL LEVEL DIPSTICK GUIDE
-
Apply a light coat of engine oil to a new O-ring.
-
Install a new O-ring to the engine oil level dipstick guide.
-
Using a T25 "TORX" socket wrench, install the engine oil level dipstick guide with the bolt.
Tech Tips
Refer to "SPECIFICATIONS - STANDARD BOLT" for the tightening torque.
-
Attach the clamp and connect the fuel feed pipe sub-assembly to the engine oil level dipstick guide.
-
Install the engine oil level dipstick.
-
Attach the 6 clamps and connect the No. 2 engine wire to the engine oil level dipstick guide.
-
-
CONNECT NO. 1 VACUUM PIPE
-
Apply a light coat of engine oil to a new O-ring.
-
Install a new O-ring to the No. 1 vacuum pipe.
-
Using an E7 "TORX" socket wrench, connect the No. 1 vacuum pipe with the bolt to the cylinder block sub-assembly.
- Torque:
- 8.0 N*m { 82 kgf*cm, 71 in.*lbf }
-
-
INSTALL BATTERY CARRIER
-
Install the battery carrier with the 4 bolts.
- Torque:
- 19 N*m { 189 kgf*cm, 14 ft.*lbf }
-
Attach the 2 clamps to connect the engine wire.
-
-
INSTALL BATTERY TRAY
-
INSTALL BATTERY
-
INSTALL BATTERY INSULATOR
-
INSTALL BATTERY CLAMP SUB-ASSEMBLY
-
Attach the hook of the battery clamp sub-assembly to the battery carrier.
-
Partially tighten the nut and temporarily install the bolt.
-
Adjust the battery clamp sub-assembly position.
-
Tighten the nut and bolt.
- Torque:
- for bolt
- 17 N*m { 168 kgf*cm, 12 ft.*lbf }
- for nut
- 3.5 N*m { 36 kgf*cm, 31 in.*lbf }
-
-
INSTALL NO. 1 ENGINE UNDER COVER
-
Установите защиту картера двигателя № 1 и закрепите ее 11 фиксаторами и 6 болтами.
-
-
INSTALL RADIATOR SUPPORT OPENING COVER
-
Установите крышку отверстия кронштейна радиатора и введите в зацепление 4 крюка.
-
Установите 3 фиксатора.
-
-
INSTALL NO. 1 ENGINE COVER
-
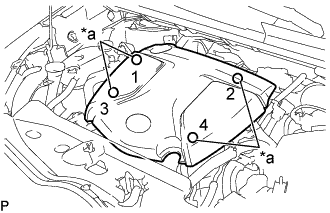
Обозначения на рисунке *a Точки установки Введите в зацепление 4 фиксатора, чтобы закрепить крышку двигателя № 1.
Tech Tips
Устанавливая фиксаторы, нажимайте на выступы в верхней части крышки двигателя № 1 в точках установки фиксаторов.
-
-
CONNECT CABLE TO POSITIVE BATTERY TERMINAL
-
CONNECT CABLE TO NEGATIVE BATTERY TERMINAL
Note
When disconnecting the cable, some systems need to be initialized after the cable is reconnected Click here.
-
CLEAR NUMBER OF STARTER OPERATIONS
Note
После замены стартера в сборе обязательно удалите количество запусков стартера, сохраненное в ЭБУ запуска и останова двигателя.
-
Подключите GTS к DLC3.
-
Установите замок зажигания в положение ON (ВКЛ).
-
Включите GTS.
-
Войдите в следующие меню: Powertrain / Stop and Start / Utility / Starter Exchange.
-