ДАТЧИК ТЕМПЕРАТУРЫ ОТРАБОТАВШИХ ГАЗОВ (для датчика 1) УСТАНОВКА
-
INSTALL EXHAUST GAS TEMPERATURE SENSOR (for Sensor 1)
Note
If the exhaust gas temperature sensor is dropped, replace it with a new one.
-
Using a 14 mm union nut wrench, install the exhaust gas temperature sensor.
- Torque:
- 30 N*m { 306 kgf*cm, 22 ft.*lbf }
Note
Use the formula to calculate special torque values for situations where a union nut wrench is combined with a torque wrench Click here.
-
-
CONNECT VACUUM CONTROL VALVE BRACKET
-
Using a T45 "TORX" socket wrench, connect the vacuum control valve bracket with the 3 screws.
-
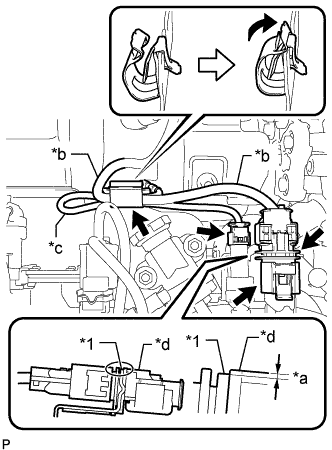
Text in Illustration *1 Vacuum Control Valve Bracket *a 1.5 mm (0.0591 in.) or less *b Air Fuel Ratio Sensor Connector Wire *c Exhaust Gas Temperature Sensor Connector Wire *d Air Fuel Ratio Sensor Connector Move the clamp as shown in the illustration, and secure the air fuel ratio sensor and exhaust gas temperature sensor with the clamp.
Note
The sensor harness may become damaged if not installed when the clamp is open.
-
Lower the air fuel ratio sensor connector to the position shown in the illustration.
-
Connect the air fuel ratio sensor connector.
-
Connect the exhaust gas temperature sensor connector.
-
Slide the bracket clamp with differential pressure sensor to connect the bracket clamp with differential pressure sensor to the vacuum control valve bracket.
-
Attach the wire harness clamp.
-
Connect the differential pressure sensor connector.
-
-
CONNECT SENSOR INSULATOR
-
Connect the sensor insulator with the nut.
- Torque:
- 8.0 N*m { 82 kgf*cm, 71 in.*lbf }
-
-
INSPECT FOR EXHAUST GAS LEAK
При наличии утечки газа затяните соединения в местах утечки. При необходимости замените поврежденные детали.
-
INSTALL NO. 1 ENGINE COVER
-
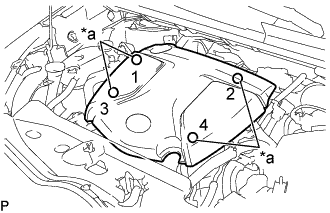
Обозначения на рисунке *a Точки установки Введите в зацепление 4 фиксатора, чтобы закрепить крышку двигателя № 1.
Tech Tips
Устанавливая фиксаторы, нажимайте на выступы в верхней части крышки двигателя № 1 в точках установки фиксаторов.
-