ДАТЧИК ДАВЛЕНИЯ В ВЫПУСКНОМ КОЛЛЕКТОРЕ СНЯТИЕ
-
REMOVE NO. 1 ENGINE COVER
-
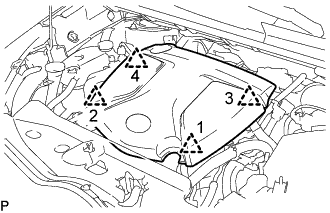
Поднимите крышку двигателя № 1, чтобы освободить 4 фиксатора в порядке, показанном на рисунке, и снимите крышку двигателя № 1.
Note
Попытка одновременно освободить задние и передние фиксаторы может привести к повреждению крышки двигателя № 1.
-
-
REMOVE AIR CLEANER CAP SUB-ASSEMBLY WITH AIR CLEANER HOSE ASSEMBLY
-
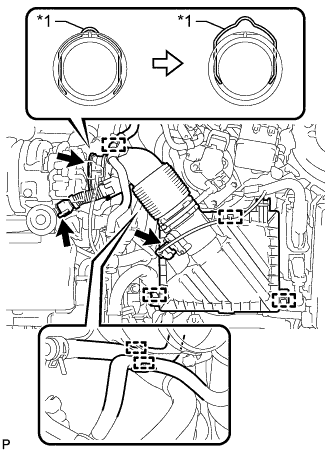
Text in Illustration *1 Retainer Detach the clamp and disconnect the mass air flow meter sub-assembly connector.
-
Detach the clamp and disconnect the vacuum hose from the air cleaner hose assembly.
-
Detach the clamp and disconnect the No. 1 fuel hose from the air cleaner hose assembly.
-
Detach the clamp and disconnect the No. 2 fuel hose from the air cleaner hose assembly.
-
Disconnect the ventilation hose from the cylinder head cover sub-assembly.
-
Release the retainer and disconnect the air cleaner hose assembly from the turbocharger sub-assembly as shown in the illustration.
-
Detach the 2 clamps and remove the air cleaner cap sub-assembly with air cleaner hose assembly.
-
-
REMOVE EXHAUST MANIFOLD PRESSURE SENSOR
-
Disconnect the exhaust manifold pressure sensor connector.
-
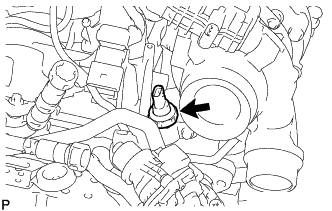
Using a 27 mm deep socket wrench, remove the exhaust manifold pressure sensor.
-