- Click here
INSTALL ECM
-
Install the No. 2 ECM bracket to the ECM with the 2 screws.
3.0 N*m 31 kgf*cm 27 in.*lbf -
Install the No. 1 ECM bracket to the ECM with the 2 screws.
3.0 N*m 31 kgf*cm 27 in.*lbf -
Install the ECM with bracket with the 2 bolts.
8.0 N*m 82 kgf*cm 71 in.*lbf -
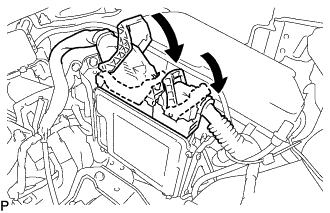
Connect the 2 ECM connectors and lower the 2 levers.
Note:
-
When connecting the ECM connector, make sure that dirt, water or other foreign matter is not stuck between the ECM connector and ECM.
-
Make sure that the 2 levers are securely lowered.
-
-
- Click here
INSTALL NO. 2 AIR CLEANER INLET
-
Install the No. 2 air cleaner inlet with the bolt.
7.0 N*m 71 kgf*cm 62 in.*lbf
-
- Click here
INSTALL NO. 1 AIR CLEANER INLET
-
Attach the 2 claws to install the No. 1 air cleaner inlet.
-
Install the clip.
-
- Click here
INSTALL AIR CLEANER CASE SUB-ASSEMBLY
-
Install the air cleaner case sub-assembly with the 3 bolts.
7.0 N*m 71 kgf*cm 62 in.*lbf
-
- Click here
INSTALL AIR CLEANER FILTER ELEMENT SUB-ASSEMBLY
- Click here
INSTALL AIR CLEANER CAP SUB-ASSEMBLY WITH AIR CLEANER HOSE ASSEMBLY
-
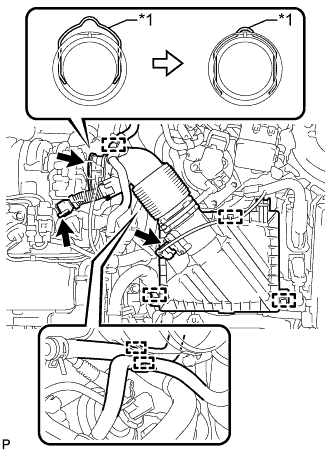
Connect the air cleaner hose assembly to the turbocharger sub-assembly and lock the retainer as shown in the illustration.
Table 1. Text in Illustration *1 Retainer -
Attach the 2 clamps to install the air cleaner cap sub-assembly.
-
Connect the ventilation hose to the cylinder head cover sub-assembly.
-
Attach the clamp and connect the No. 2 fuel hose to the air cleaner hose assembly.
-
Attach the clamp and connect the No. 1 fuel hose to the air cleaner hose assembly.
-
Attach the clamp and connect the vacuum hose to the air cleaner hose assembly.
-
Attach the clamp and connect the mass air flow meter sub-assembly connector.
-
- Click here
INSTALL RADIATOR SUPPORT OPENING COVER
-
Установите крышку отверстия кронштейна радиатора и введите в зацепление 4 крюка.
-
Установите 3 фиксатора.
-
- Click here
INSTALL NO. 1 ENGINE COVER
-
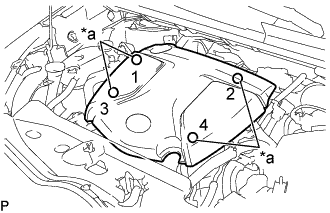
Введите в зацепление 4 фиксатора, чтобы закрепить крышку двигателя № 1.
Tip:Устанавливая фиксаторы, нажимайте на выступы в верхней части крышки двигателя № 1 в точках установки фиксаторов.
Table 2. Обозначения на рисунке *a Точки установки
-
- Click here
CONNECT CABLE TO NEGATIVE BATTERY TERMINAL
Note:When disconnecting the cable, some systems need to be initialized after the cable is reconnected (Click here).
- Click here
PERFORM REGISTRATION
- Click here
PERFORM INITIALIZATION