ECM СНЯТИЕ
-
PERFORM REGISTRATION
-
PRECAUTION
Note
After turning the ignition switch off, waiting time may be required before disconnecting the cable from the battery terminal. Therefore, make sure to read the disconnecting the cable from the battery terminal notice before proceeding with work Click here.
-
DISCONNECT CABLE FROM NEGATIVE BATTERY TERMINAL
Note
When disconnecting the cable, some systems need to be initialized after the cable is reconnected Click here.
-
REMOVE NO. 1 ENGINE COVER
-
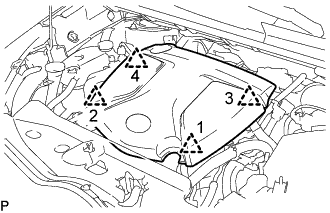
Поднимите крышку двигателя № 1, чтобы освободить 4 фиксатора в порядке, показанном на рисунке, и снимите крышку двигателя № 1.
Note
Попытка одновременно освободить задние и передние фиксаторы может привести к повреждению крышки двигателя № 1.
-
-
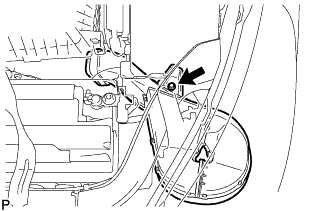
REMOVE RADIATOR SUPPORT OPENING COVER
-
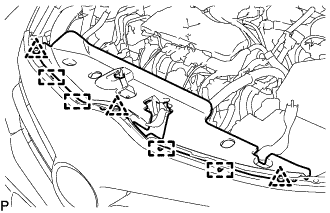
Снимите 3 фиксатора.
-
Открепите 4 крюка и снимите крышку отверстия кронштейна радиатора.
-
-
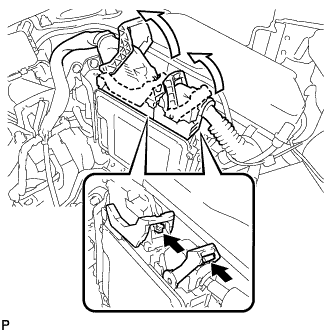
REMOVE AIR CLEANER CAP SUB-ASSEMBLY WITH AIR CLEANER HOSE ASSEMBLY
-
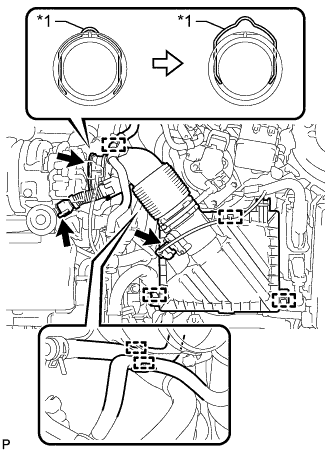
Text in Illustration *1 Retainer Detach the clamp and disconnect the mass air flow meter sub-assembly connector.
-
Detach the clamp and disconnect the vacuum hose from the air cleaner hose assembly.
-
Detach the clamp and disconnect the No. 1 fuel hose from the air cleaner hose assembly.
-
Detach the clamp and disconnect the No. 2 fuel hose from the air cleaner hose assembly.
-
Disconnect the ventilation hose from the cylinder head cover sub-assembly.
-
Release the retainer and disconnect the air cleaner hose assembly from the turbocharger sub-assembly as shown in the illustration.
-
Detach the 2 clamps and remove the air cleaner cap sub-assembly with air cleaner hose assembly.
-
-
REMOVE AIR CLEANER FILTER ELEMENT SUB-ASSEMBLY
-
REMOVE AIR CLEANER CASE SUB-ASSEMBLY
-
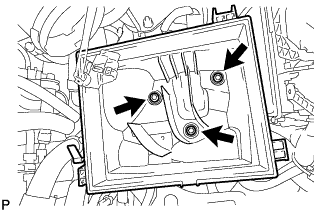
Remove the 3 bolts and air cleaner case sub-assembly.
-
-
DISCONNECT NO. 1 AIR CLEANER INLET
-
Remove the bolt and disconnect the No. 1 air cleaner inlet.
Note
Slide the No. 1 air cleaner inlet to ensure a space for the removal and installation of the ECM installation bolt.
-
-
REMOVE ECM
-
Push in the locks on the 2 levers, raise the levers and disconnect the 2 ECM connectors.
Text in Illustration 
Push Note
After disconnecting the ECM connectors, make sure that dirt, water or other foreign matter does not contact the connecting parts of the ECM connectors.
-
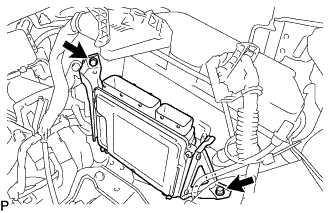
Remove the 2 bolts and ECM with bracket.
-
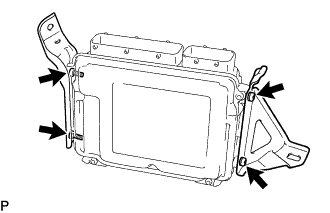
Remove the 2 screws and No. 1 ECM bracket.
-
Remove the 2 screws and No. 2 ECM bracket.
-