ROOF HEADLINING REMOVAL
Info Added 2017-10-06 ![]()
CAUTION / NOTICE / HINT
Tech Tips
-
Use the same procedure for LHD and RHD vehicles.
-
The procedure listed below is for the LHD vehicles.
PROCEDURE
-
REMOVE FRONT SEAT ASSEMBLY LH
-
REMOVE FRONT SEAT ASSEMBLY RH
Tech Tips
Use the same procedure as for the LH side.
-
REMOVE REAR SEAT ASSEMBLY
-
REMOVE PACKAGE TRAY TRIM PANEL ASSEMBLY (w/ Package Tray Trim)
-
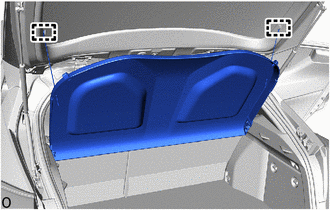
Disengage the hooks.
-
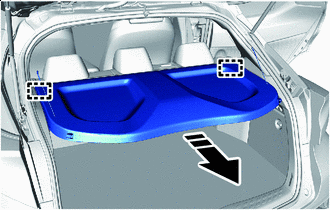

Remove in this Direction Disengage the guides to remove the package tray trim panel assembly as shown in the illustration.
-
-
REMOVE TONNEAU COVER ASSEMBLY (w/ Tonneau Cover)
-
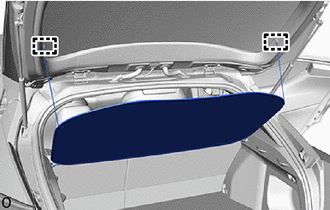
Disengage the hooks.
-
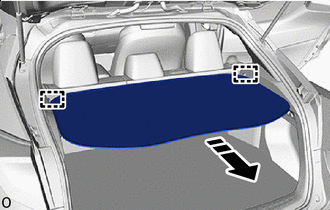
Remove in this Direction Disengage the guides to remove the tonneau cover assembly as shown in the illustration.
-
-
REMOVE DECK BOARD ASSEMBLY (w/ Deck Board)
-
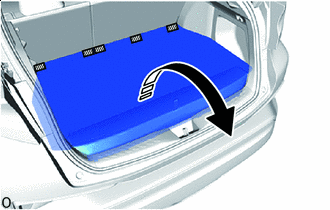

Hook and Loop Fastener Remove in this Direction for Type A:
-
Disengage the hook and loop fastener.
-
Remove the deck board assembly as shown in the illustration.
-
-
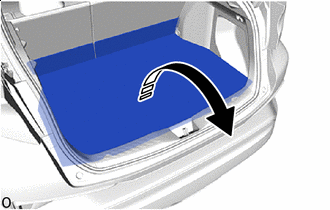
Remove in this Direction for Type B:
-
Remove the deck board assembly as shown in the illustration.
-
-
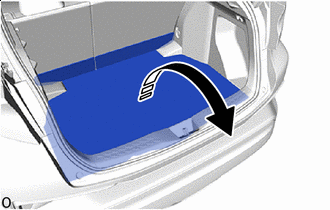
Remove in this Direction for Type C:
-
Remove the deck board assembly as shown in the illustration.
-
-
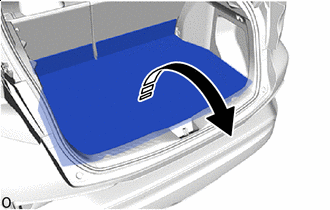
Remove in this Direction for Type D:
-
Remove the deck board assembly as shown in the illustration.
-
-
-
REMOVE SPARE WHEEL CUSHION (w/ Deck Board)
-
Remove in this Direction for Type A:
-
Remove the spare wheel cushion as shown in the illustration.
-
-
Remove in this Direction for Type B:
-
Remove the spare wheel cushion as shown in the illustration.
-
-
Remove in this Direction for Type C:
-
Remove the spare wheel cushion as shown in the illustration.
-
-
Remove in this Direction for Type D:
-
Remove the clip.
-
Remove the spare wheel cushion as shown in the illustration.
-
-
-
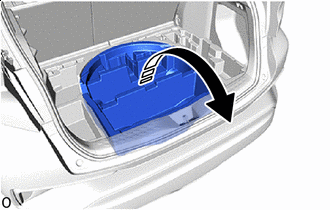
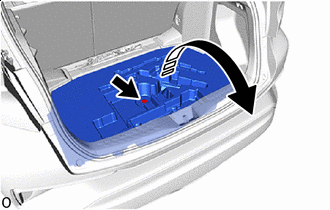
REMOVE DECK FLOOR BOX LH (w/ Deck Floor Box)
-
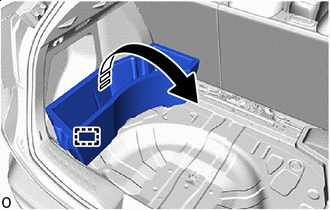
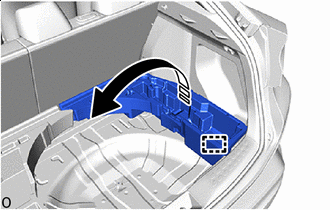
Remove in this Direction for Type A:
-
Disengage the guide to remove the deck floor box LH as shown in the illustration.
-
-
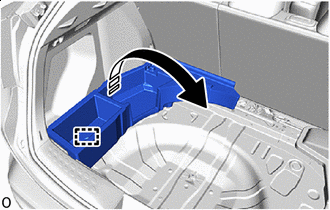
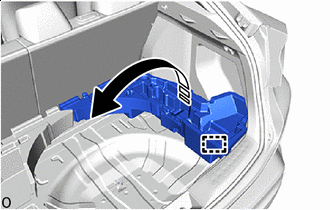
Remove in this Direction for Type B:
-
Disengage the guide to remove the deck floor box LH as shown in the illustration.
-
-
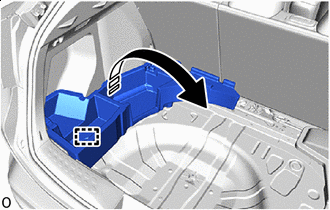
Remove in this Direction for Type C:
-
Disengage the guide to remove the deck floor box LH as shown in the illustration.
-
-
-
REMOVE DECK FLOOR BOX RH (w/ Deck Floor Box)
-
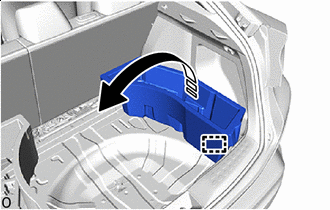
Remove in this Direction for Type A:
-
Disengage the guide to remove the deck floor box RH as shown in the illustration.
-
-
Remove in this Direction for Type B:
-
Disengage the guide to remove the deck floor box RH as shown in the illustration.
-
-
Remove in this Direction for Type C:
-
Disengage the guide to remove the deck floor box RH as shown in the illustration.
-
-
-
REMOVE FRONT DOOR SCUFF PLATE LH
-
REMOVE FRONT DOOR SCUFF PLATE RH
Tech Tips
Use the same procedure as for the LH side.
-
REMOVE COWL SIDE TRIM BOARD LH
-
REMOVE COWL SIDE TRIM BOARD RH
Tech Tips
Use the same procedure as for the LH side.
-
REMOVE FRONT DOOR OPENING TRIM WEATHERSTRIP LH
-
REMOVE FRONT DOOR OPENING TRIM WEATHERSTRIP RH
Tech Tips
Use the same procedure as for the LH side.
-
REMOVE FRONT PILLAR GARNISH LH
-
REMOVE FRONT PILLAR GARNISH RH
Tech Tips
Use the same procedure as for the LH side.
-
REMOVE REAR DOOR SCUFF PLATE LH
-
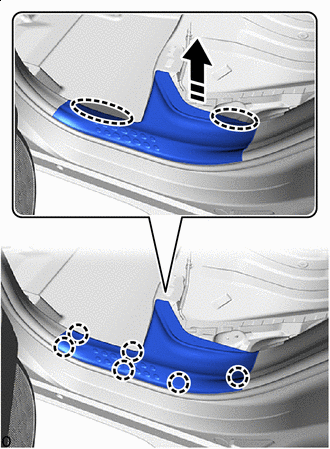

Place Hands Here Remove in this Direction Disengage the claws to remove the rear door scuff plate LH as shown in the illustration.
-
-
REMOVE REAR DOOR SCUFF PLATE RH
Tech Tips
Use the same procedure as for the LH side.
-
REMOVE REAR DOOR OPENING TRIM WEATHERSTRIP LH
-
REMOVE REAR DOOR OPENING TRIM WEATHERSTRIP RH
Tech Tips
Use the same procedure as for the LH side.
-
REMOVE REAR SEATBACK HINGE SUB-ASSEMBLY LH
-
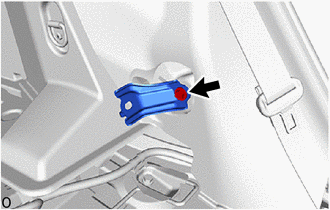
Loosen the bolt and rear seatback hinge sub-assembly LH.
-
-
REMOVE REAR SEATBACK HINGE SUB-ASSEMBLY RH
Tech Tips
Use the same procedure as for the LH side.
-
REMOVE REAR SEAT SIDE GARNISH LH
-
Place Hands Here Remove in this Direction Disengage the clip, claws and guide to remove the rear seat side garnish LH as shown in the illustration.
-
-
REMOVE REAR SEAT SIDE GARNISH RH
Tech Tips
Use the same procedure as for the LH side.
-
REMOVE LAP BELT OUTER ANCHOR COVER
-
DISCONNECT FRONT SEAT OUTER BELT ASSEMBLY LH
-
DISCONNECT FRONT SEAT OUTER BELT ASSEMBLY RH
Tech Tips
Use the same procedure as for the LH side.
-
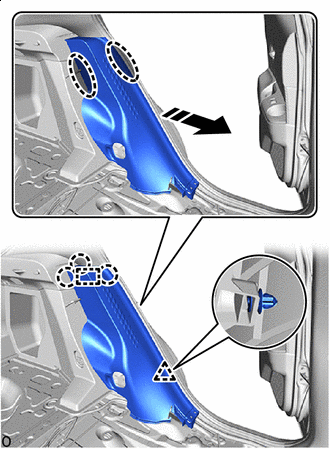
REMOVE CENTER PILLAR LOWER GARNISH LH
-
Place Hands Here Remove in this Direction Disengage the clips and claws to remove the center pillar lower garnish LH as shown in the illustration.
-
-
REMOVE CENTER PILLAR LOWER GARNISH RH
Tech Tips
Use the same procedure as for the LH side.
-
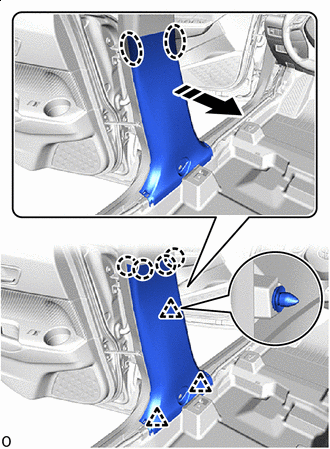
REMOVE CENTER PILLAR GARNISH ASSEMBLY LH
-
Place Hands Here Remove in this Direction (1) 
Remove in this Direction (2) Remove the 2 clips.
-
Disengage the clip and guides to remove the center pillar garnish assembly LH as shown in the illustration.
-
When reusing the center pillar garnish assembly LH (w/ Curtain Shield Airbag):
-
Remove the clip from the center pillar garnish assembly LH.
-
-
-
REMOVE CENTER PILLAR GARNISH ASSEMBLY RH
Tech Tips
Use the same procedure as for the LH side.
-
REMOVE DECK TRIM REAR COVER
-
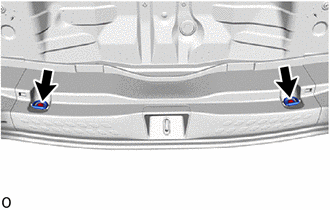
w/ Hook:
-
Remove the 2 bolts and 2 luggage hold belt strikers.
-
-
w/o Hook:
-
Remove the 2 clips.
-
-
Place Hands Here Remove in this Direction Disengage the clips, claws and guides to remove the deck trim rear cover as shown in the illustration.
-
-
REMOVE NO. 1 LUGGAGE COMPARTMENT LIGHT ASSEMBLY (w/ Luggage Compartment Room Light)
-
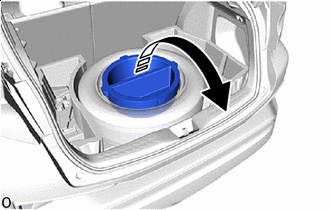
REMOVE DECK TRIM SIDE COVER LH (w/ Cover)
-
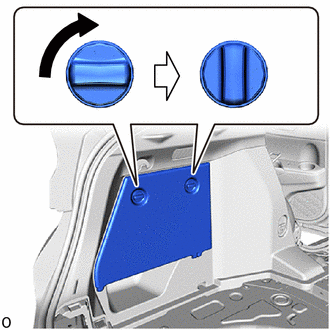
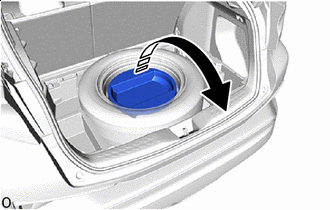
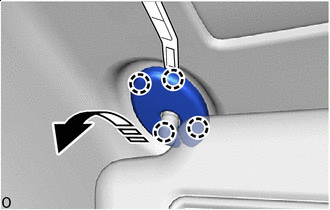
Turn the cover knob as shown in the illustration and unlock it.
-
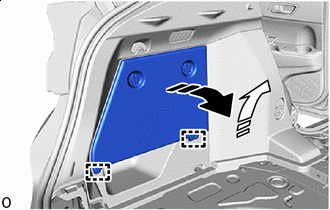
Remove in this Direction (1) Remove in this Direction (2) Disengage the guides to remove the deck trim side cover LH as shown in the illustration.
-
-
REMOVE DECK TRIM SIDE COVER RH (w/ Cover)
Tech Tips
Use the same procedure as for the LH side.
-
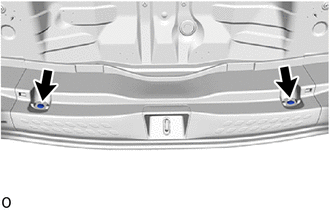
REMOVE DECK TRIM SIDE PANEL ASSEMBLY LH
-
w/ Hook:
-
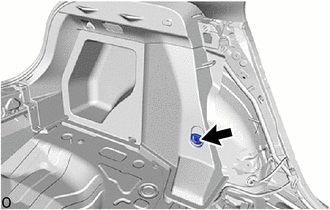
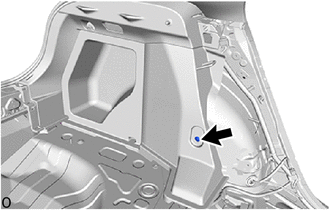
Remove the bolt and luggage hold belt striker.
-
-
w/o Hook:
-
Remove the clip.
-
-
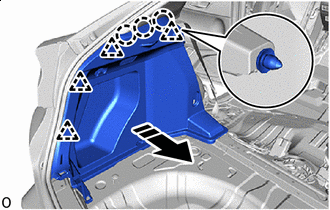
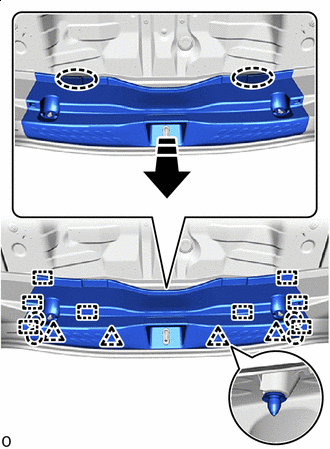
Remove in this Direction Disengage the clips and claws to remove the deck trim side panel assembly LH as shown in the illustration.
-
Disconnect the rear seat 3 point type outer belt assembly LH.
-
-
REMOVE DECK TRIM SIDE PANEL ASSEMBLY RH
Tech Tips
Use the same procedure as for the LH side.
-
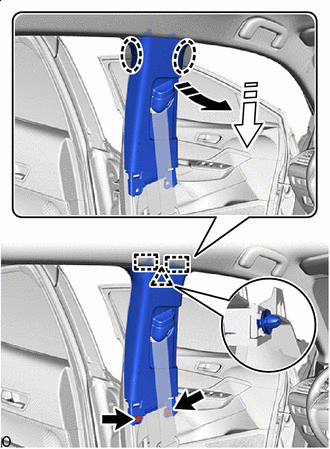
REMOVE ROOF SIDE INNER GARNISH ASSEMBLY LH
-

Place Hands Here Remove in this Direction (1) Remove in this Direction (2) Disengage the clips and guide to remove the roof side inner garnish assembly LH as shown in the illustration.
-
When reusing the roof side inner garnish assembly LH (w/ Curtain Shield Airbag):
-
Remove the 5 clips from the roof side inner garnish assembly LH.
-
-
-
REMOVE ROOF SIDE INNER GARNISH ASSEMBLY RH
Tech Tips
Use the same procedure as for the LH side.
-
REMOVE RAIN SENSOR COVER (w/ Rain Sensor)
-
REMOVE NO. 2 FORWARD RECOGNITION COVER (w/ Lane Departure Alert System)
-
REMOVE NO. 1 FORWARD RECOGNITION COVER (w/ Lane Departure Alert System)
-
REMOVE INNER REAR VIEW MIRROR STAY HOLDER COVER (w/ EC Mirror)
-
REMOVE VANITY LIGHT ASSEMBLY (w/ Vanity Light)
-
REMOVE MAP LIGHT ASSEMBLY (w/ Map Light)
-
REMOVE NO. 1 ROOM LIGHT ASSEMBLY (w/ Map Light)
-
REMOVE THEFT WARNING ULTRASONIC SENSOR (w/ Intrusion Sensor)
-
REMOVE VISOR BRACKET COVER
Tech Tips
Use the same procedures for the opposite side.
-
Remove in this Direction Using a molding remover A, disengage the claws to remove the visor bracket cover as shown in the illustration.
-
-
REMOVE VISOR ASSEMBLY LH (w/ Vanity Light)
-
REMOVE VISOR ASSEMBLY RH (w/ Vanity Light)
Tech Tips
Use the same procedure as for the LH side.
-
REMOVE VISOR ASSEMBLY LH (w/o Vanity Light)
-
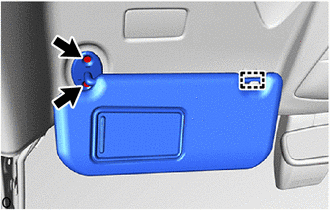
Using a T10H "TORX" driver, remove the 2 screws.
-
Disengage the guide to remove the visor assembly LH.
-
-
REMOVE VISOR ASSEMBLY RH (w/o Vanity Light)
Tech Tips
Use the same procedure as for the LH side.
-
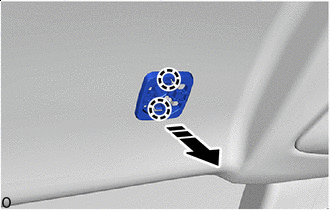
REMOVE VISOR HOLDER
Tech Tips
Use the same procedures for the opposite side.
-


Turn in this Direction Remove in this Direction Turn the holder clockwise approximately 45° and pull it out as shown in the illustration.
-
Remove in this Direction Disengage the claws to remove the base as shown in the illustration.
-
-
REMOVE ASSIST GRIP COVER
Tech Tips
Use the same procedures for the opposite side.
-
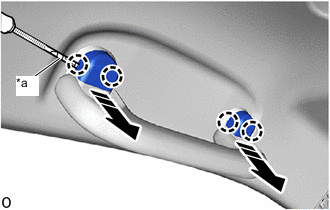
*a Protective Tape Remove in this Direction Using a screwdriver with its tip wrapped in protective tape, disengage the claws to remove the 2 assist grip covers as shown in the illustration.
-
-
REMOVE ASSIST GRIP SUB-ASSEMBLY
Tech Tips
Use the same procedures for the opposite side.
-
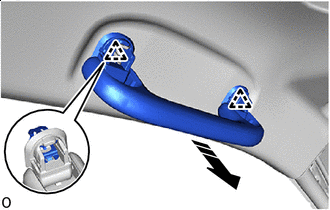
Remove in this Direction Disengage the clips to remove the assist grip sub-assembly as shown in the illustration.
-
Remove the 2 clips from the vehicle body.
-
-
REMOVE ROOF HEADLINING
-
for Front Pillar LH Side:
-
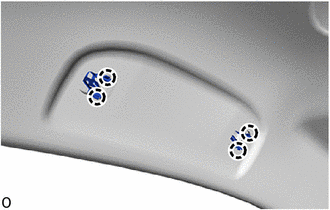
Disconnect the 2 connectors.
-
Using a clip remover, disengage the wire harness clamps.
-
-
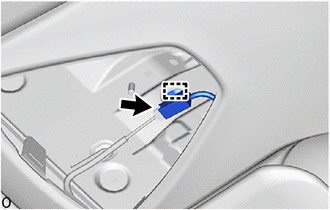
for Front Pillar RH Side:
-
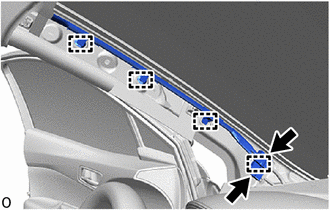
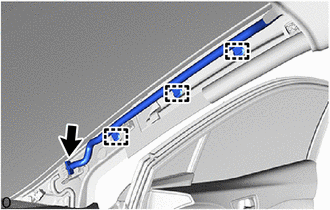
Disconnect the connector.
-
Using a clip remover, disengage the wire harness clamps.
-
-
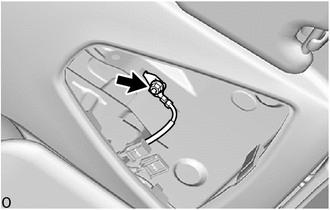
for Rear Pillar RH Side:
-
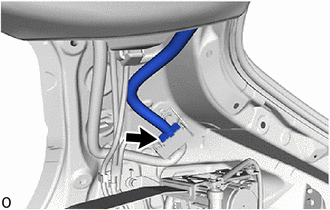
Disconnect the connector.
-
-
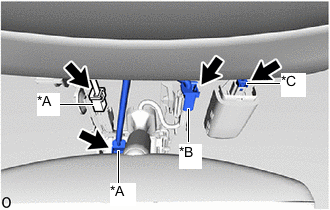
*A w/ Lane Departure Alert System *B w/ EC Mirror *C w/ Rain Sensor for Windshield Glass Side:
-
Disconnect each connector.
-
-
for Roof Panel Side:
-
w/ Lane Departure Alert System:
-
Remove the nut to disconnect the ground wire.
-
-
w/ Digital Audio Broadcasting Antenna:
-
Using a clip remover, disengage the clamp to disconnect the wire harness.
-
Disconnect the connector.
-
-
-

Using a clip remover, remove the 3 clips.
-
Disengage the guides to remove the roof headlining.
-
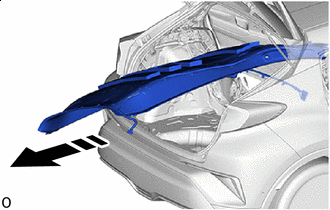
Remove in this Direction Turn the roof headlining diagonally and bend slightly to remove it from the back door.
Note
-
Make sure that wrinkles do not form in the roof headlining during removal.
-
Make sure that the roof headlining does not get caught on anything as it may become bent or damaged.
-
Do not damage the roof headlining or vehicle interior.
-
-