DOOR CONTROL RECEIVER INSTALLATION
PROCEDURE
-
INSTALL DOOR CONTROL RECEIVER (w/o Smart Key System)
Note
-
Do not drop, strike or otherwise subject the door control receiver to impact.
-
If the door control receiver is subjected to an impact, replace it with a new one.
-
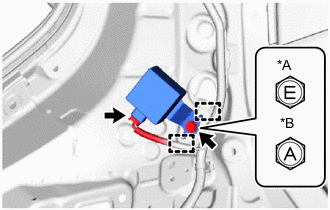
*A for Type A *B for Type B Connect the connector.
-
Engage the guides.
-
Install the door control receiver with the bolt.
- Torque:
- for Type A
- 8.0 N*m { 82 kgf*cm, 71 in.*lbf }
- for Type B
- 13 N*m { 133 kgf*cm, 10 ft.*lbf }
-
-
INSTALL SMART DOOR CONTROL RECEIVER ASSEMBLY (w/ Smart Key System)
Note
-
Do not drop, strike or otherwise subject the smart door control receiver assembly to impact.
-
If the smart door control receiver assembly is subjected to an impact, replace it with a new one.
-
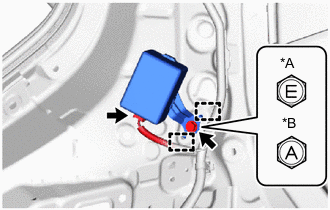
*A for Type A *B for Type B Connect the connector.
-
Engage the guides.
-
Install the smart door control receiver assembly with the bolt.
- Torque:
- for Type A
- 8.0 N*m { 82 kgf*cm, 71 in.*lbf }
- for Type B
- 13 N*m { 133 kgf*cm, 10 ft.*lbf }
-
-
INSTALL DOOR CONTROL AND TIRE PRESSURE MONITORING SYSTEM RECEIVER ASSEMBLY (w/ Tire Pressure Warning System)
Note
-
Do not drop, strike or otherwise subject the door control and tire pressure monitoring system receiver assembly to impact.
-
If the door control and tire pressure monitoring system receiver assembly is subjected to an impact, replace it with a new one.
-
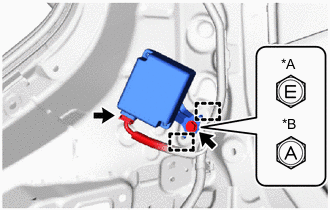
*A for Type A *B for Type B Connect the connector.
-
Engage the guides.
-
Install the door control and tire pressure monitoring system receiver assembly with the bolt.
- Torque:
- for Type A
- 8.0 N*m { 82 kgf*cm, 71 in.*lbf }
- for Type B
- 13 N*m { 133 kgf*cm, 10 ft.*lbf }
-
-
INSTALL ROOF SIDE INNER GARNISH ASSEMBLY LH