TRANSFER ASSEMBLY INSTALLATION

PROCEDURE
-
INSTALL TRANSFER AND TRANSAXLE SETTING STUD BOLT
-
Clean the bolt holes.
-
Apply adhesive 1324 to 2 or 3 threads on one half of a new transfer and transaxle setting stud bolt A as shown in the illustration.
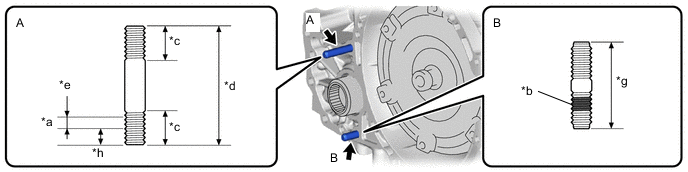
*a Adhesive 1324 *b Sealant *c 22 mm (0.866 in.) *d 69 mm (2.72 in.) *e 5.0 to 7.5 mm (0.200 to 0.300 in.) *f 13 mm (0.512 in.) *g 47 mm (1.85 in.) *h 13 mm (0.512 in.) - Torque:
- 39.2 N*m { 400 kgf*cm, 29 ft.*lbf }
Note
-
Install the stud bolt immediately after applying adhesive to prevent the adherence of foreign matter.
-
Do not apply adhesive 1324 to the ends of the stud bolt.
-
-
INSTALL TRANSFER ASSEMBLY
- SST
- 09961-00950
-
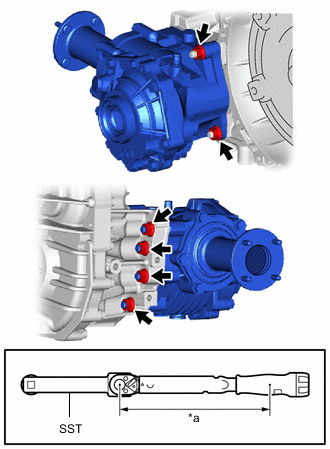
*a Torque Wrench Fulcrum Length Clean the bolt holes.
-
Install the transfer assembly to the transaxle with the 6 nuts.
- Torque:
- Specified tightening torque
- 68.6 N*m { 700 kgf*cm, 51 ft.*lbf }
Tech Tips
-
This torque value is effective when SST is straight to a torque wrench.
-
Calculate the torque wrench reading when changing the fulcrum length of the torque wrench.
-
When using SST (fulcrum length of 150 mm (5.91 in.)) + torque wrench (fulcrum length of 255 mm (10.04 in.)):
43.2 N*m (441 kgf*cm, 32 ft.*lbf)
-
INSTALL CONTINUOUSLY VARIABLE TRANSAXLE ASSEMBLY