TRANSFER CASE FRONT OIL SEAL(for RH Side) REPLACEMENT

CAUTION / NOTICE / HINT
The necessary procedures (adjustment, calibration, initialization, or registration) that must be performed after parts are removed and installed, or replaced during the transfer case oil seal RH removal/installation are shown below.
| Replacement Part or Procedure | Necessary Procedure | Effect/Inoperative when not Performed | Link |
|---|---|---|---|
| Front wheel alignment adjustment |
|
|
PROCEDURE
-
REMOVE FRONT DRIVE SHAFT ASSEMBLY RH
-
for TMC Made:
-
for TMMT Made:
-
-
REMOVE DRIVE SHAFT BEARING BRACKET
-
REMOVE TRANSFER CASE OIL SEAL RH
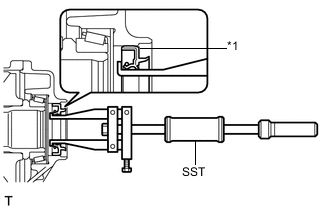
*1 Transfer Case Oil Seal RH
-
Using SST, remove the transfer case oil seal RH from the No. 1 transfer case cover.
- SST
- 09308-00010
Note
Do not scratch the press-fitting surface of the transfer case oil seal RH.
-
-
INSTALL TRANSFER CASE OIL SEAL RH
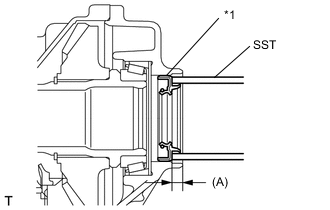
*1 Transfer Case Oil Seal RH
-
Coat the lip of a new drive shaft oil seal RH with MP grease.
-
Using SST and a hammer, tap in a new transfer case oil seal RH as shown in the illustration.
- SST
- 09316-60011 ( 09316-00011 )
Drive in depth (A) 7.5 to 8.5 mm (0.296 to 0.334 in.) Note
-
Tap the transfer case oil seal RH uniformly so that the transfer case oil seal RH is straight.
-
Do not tap the transfer case oil seal RH in too far.
-
-
INSTALL DRIVE SHAFT BEARING BRACKET
-
INSTALL FRONT DRIVE SHAFT ASSEMBLY RH
-
for TMC Made:
-
for TMMT Made:
-
-
ADD TRANSFER OIL
-
INSPECT TRANSFER OIL LEAK