FRONT DIFFERENTIAL OIL SEAL(for LH Side) REPLACEMENT

CAUTION / NOTICE / HINT
The necessary procedures (adjustment, calibration, initialization, or registration) that must be performed after parts are removed, installed, or replaced during the front drive shaft oil seal replacement are shown below.
| Replacement Part or Procedure | Necessary Procedure | Effect/Inoperative when not Performed | Link |
|---|---|---|---|
| Replacement of CVT fluid | ATF thermal degradation estimate reset | The value of the Data List item "ATF Thermal Degradation Estimate" is not estimated correctly | |
| Front wheel alignment adjustment | Perform the following procedures in the order shown:
|
|
PROCEDURE
-
REMOVE NO. 1 ENGINE UNDER COVER
-
REMOVE REAR ENGINE UNDER COVER LH
-
DRAIN CONTINUOUSLY VARIABLE TRANSAXLE FLUID
-
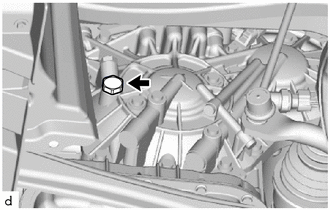
Remove the refill plug and gasket from the rear transaxle case.
-
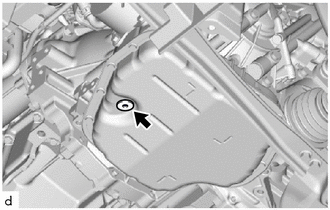
Using a 6 mm hexagon socket wrench, remove the overflow plug and gasket from the transaxle oil (CVT) pan sub-assembly.
-
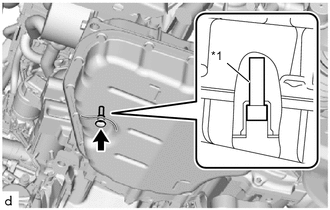
*1 No. 1 Transmission Oil Filler Tube Using a 6 mm hexagon socket wrench, remove the No. 1 transmission oil filler tube from the transaxle oil (CVT) pan sub-assembly, and drain the fluid.
Tech Tips
Removing the No. 1 transmission oil filler tube will drain all oil in the transaxle oil (CVT) pan sub-assembly.
-
Using a 6 mm hexagon socket wrench, install the No. 1 transmission oil filler tube to the transaxle oil (CVT) pan sub-assembly.
- Torque:
- 1.7 N*m { 17 kgf*cm, 15 in.*lbf }
-
Using a 6 mm hexagon socket wrench, temporarily install the overflow plug and gasket to the transaxle oil (CVT) pan sub-assembly.
Tech Tips
Reuse the old gasket as the overflow plug will be removed again to adjust the fluid level.
-
Temporarily install the gasket and refill plug to the rear transaxle case.
Tech Tips
Reuse the old gasket as the refill plug will be removed again to adjust the fluid level.
-
-
REMOVE FRONT DRIVE SHAFT ASSEMBLY LH (for TMMT Made)
-
REMOVE FRONT DRIVE SHAFT ASSEMBLY LH (for TMC Made)
-
REMOVE FRONT DRIVE SHAFT OIL SEAL LH
-
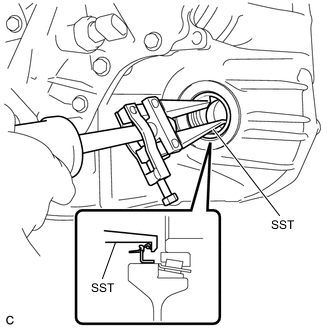
Using SST, remove the front drive shaft oil seal LH from the transaxle case.
- SST
- 09308-00010
Note
Do not damage the transaxle case.
-
-
INSTALL FRONT DRIVE SHAFT OIL SEAL LH
-
Coat the lip of a new front drive shaft oil seal LH with MP grease.
-
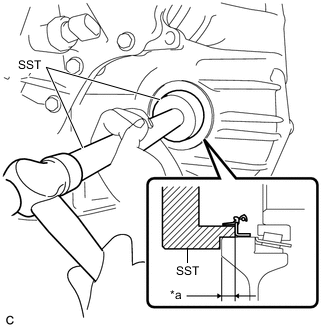
*a Depth Using SST and a hammer, install the front drive shaft oil seal LH to the transaxle case.
- SST
- 09387-00010
- 09950-70010 ( 09951-07150 )
Standard Depth -0.5 to 0.5 mm (-0.0197 to 0.0197 in.) Note
-
Be sure to install the front drive shaft oil seal LH in the correct direction.
-
Make sure to install the front drive shaft oil seal LH as specified, otherwise malfunctions such as a fluid leak will occur.
-
Do not damage the lip of the front drive shaft oil seal LH.
-
-
INSTALL FRONT DRIVE SHAFT ASSEMBLY LH (for TMMT Made)
-
INSTALL FRONT DRIVE SHAFT ASSEMBLY LH (for TMC Made)
-
ADD CONTINUOUSLY VARIABLE TRANSAXLE FLUID
-
INSPECT FOR FLUID LEAK
-
INSTALL REAR ENGINE UNDER COVER LH
-
INSTALL NO. 1 ENGINE UNDER COVER