SHIFT LEVER INSTALLATION
Info Added 2017-10-06 ![]()
PROCEDURE
-
INSTALL FLOOR SHIFT SHIFT LEVER ASSEMBLY
-
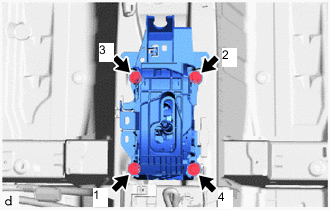
Temporarily install the floor shift shift lever assembly to the body with the 4 bolts.
-
Fully tighten the 4 bolts in the order shown in the illustration.
- Torque:
- 12 N*m { 122 kgf*cm, 9 ft.*lbf }
-
Engage the 6 clamps to install the wire harness to the floor shift shift lever assembly.
-
Connect the 2 connectors to the floor shift shift lever assembly.
-
-
CONNECT TRANSMISSION CONTROL CABLE ASSEMBLY
-
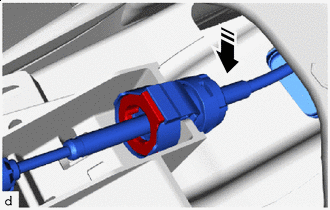

Install in this Direction Install the transmission control cable assembly to the floor shift shift lever assembly.
Note
Make sure that the transmission control cable assembly is securely locked.
-

Install in this Direction Connect the end of the transmission control cable assembly to the floor shift shift lever assembly.
Note
-
Before connecting the transmission control cable assembly, check that the park/neutral position switch and shift lever are in N.
-
Install the end of the transmission control cable assembly so that the lock piece faces the driver side.
-
Install the end of the transmission control cable assembly all the way to the base of the pin.
-
-
-
INSTALL NO. 1 CONSOLE BOX MOUNTING BRACKET
-
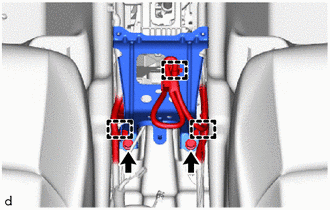
Install the No. 1 console box mounting bracket to the vehicle body with the 2 bolts.
-
Engage the 3 clamps to install the wire harness to the No. 1 console box mounting bracket.
-
-
ADJUST SHIFT LEVER POSITION
-
INSTALL TELEMATICS TRANSCEIVER (w/ Telematics Transceiver)
-
INSTALL CONSOLE BOX ASSEMBLY
-
INSTALL SHIFT LEVER KNOB SUB-ASSEMBLY
-
INSTALL SHIFT LEVER CAP
-
Engage the 2 claws to install the shift lever cap to the instrument panel ornament.
-
-
INSPECT SHIFT LEVER POSITION