CLUTCH MASTER CYLINDER(for RHD) INSTALLATION
PROCEDURE
-
INSTALL CLUTCH MASTER CYLINDER ASSEMBLY
-
Install the clutch master cylinder assembly to the body with the 2 nuts.
- Torque:
- 12.7 N*m { 130 kgf*cm, 9 ft.*lbf }
-
-
CONNECT CLUTCH MASTER CYLINDER ASSEMBLY
-
CONNECT CLUTCH MASTER CYLINDER TO FLEXIBLE HOSE TUBE
-
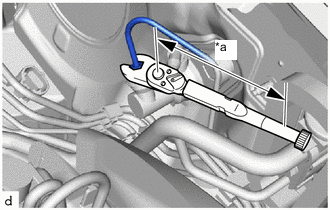
*a Torque Wrench Fulcrum Length Using a 10 mm union nut wrench, connect the clutch master cylinder to flexible hose tube to the clutch master cylinder assembly.
- Torque:
- Specified Tightening Torque
- 15.2 N*m { 155 kgf*cm, 11 ft.*lbf }
Note
-
Do not kink or damage the clutch master cylinder to flexible hose tube.
-
Do not allow any foreign matter such as dirt or dust to enter the clutch master cylinder to flexible hose tube from the connecting part.
Tech Tips
-
Calculate the torque wrench reading when changing the fulcrum length of the torque wrench.
-
When using a union nut wrench (fulcrum length of 22 mm (0.866 in.)) + torque wrench (fulcrum length of 162 mm (6.38 in.)): 13.4 N*m (137 kgf*cm, 10 ft.*lbf)
-
-
CONNECT CLUTCH RESERVOIR TUBE
-
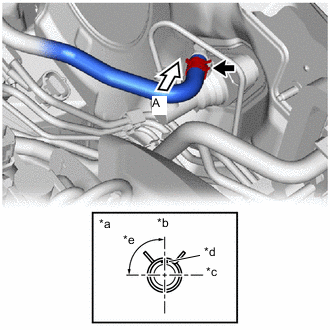
*a View A *b Top of Vehicle *c Left of Vehicle *d Paint Mark *e 90° Connect the clutch reservoir tube to the clutch master cylinder assembly and slide the hose clip to secure it.
Note
Perform the installation with the clutch reservoir tube and hose clip at the correct angle.
-
-
FILL RESERVOIR WITH BRAKE FLUID
-
BLEED CLUTCH LINE
-
INSPECT FOR BRAKE FLUID LEAK
-
INSPECT BRAKE FLUID LEVEL IN RESERVOIR
-
INSPECT CLUTCH PEDAL
-
INSTALL NO. 1 AIR DUCT