CANISTER(for 2WD) ON-VEHICLE INSPECTION
PROCEDURE
-
INSPECT CANISTER (FUEL SUCTION PLATE SUB-ASSEMBLY) (for Fuel Tank Cap Method)
-
Inspect evaporative emission control system.
-
Check for clogs in the air filter (when not using the GTS).
-
Start the engine.
-
Warm up the engine.
-
Allow the engine to idle for 15 minutes.
-
Open the fuel tank cap assembly to discharge the pressure in the fuel tank assembly.
-
Close the fuel tank cap assembly and allow the engine to idle for 30 seconds.
-
Open the fuel tank cap assembly and check for inhalation sounds.
OK No whooshing sounds (inhalation sound) are heard. Tech Tips
If there is a smell of gasoline and a whooshing sound (exhalation sound) is heard, positive pressure in the fuel tank assembly is being discharged. This is not a malfunction.
-
-
Check for clogs in the air filter (when using the GTS).
-
Connect the GTS to the DLC3.
-
Start the engine.
-
Turn the GTS on.
-
Enter the following menus: Powertrain / Engine / Active Test / Activate the VSV for Evap Control.
Powertrain > Engine > Active TestTester Display Activate the EVAP Purge VSV -
Open the fuel tank cap assembly to discharge the pressure in the fuel tank assembly.
-
Perform the Active Test "Activate the VSV for Evap Control" while the engine is idling.
-
Close the fuel tank cap assembly and allow the engine to idle for 30 seconds.
-
Open the fuel tank cap assembly and check for inhalation sounds.
OK No whooshing sounds (inhalation sound) are heard. Tech Tips
If there is a smell of gasoline and a whooshing sound (exhalation sound) is heard, positive pressure in the fuel tank assembly is being discharged. This is not a malfunction.
-
-
-
INSPECT CANISTER (FUEL SUCTION PLATE SUB-ASSEMBLY) (for Vacuum Measurement Method)
-
Visually check the canister (fuel suction plate sub-assembly) for airtightness.
-
Visually check the canister (fuel suction plate sub-assembly) for cracks or damage, and check that there is no smell of gasoline.
-
-
Inspect the airflow of the canister (fuel suction plate sub-assembly).
Note
When inspecting with parts installed on the vehicle, be sure to remove the fuel tank cap assembly.
-
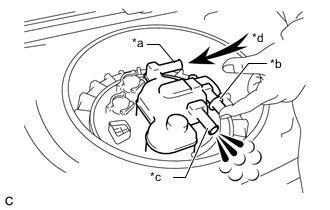
*a Port (A) *b Port (B) *c Port (C) *d Air Close the port (B) and check that air flows from the port (C) when air is blown into the port (A).
OK The air flows from the port (C).
-
-
Inspect the check valve.
Note
When inspecting with parts installed to the vehicle, be sure to remove the fuel tank cap assembly.
-
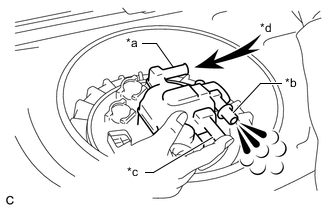
*a Port (A) *b Port (B) *c Port (C) *d Air Close the port (C) and check that air flows from the port (B) when air is blown into the port (A).
OK The air flows from the port (B). -
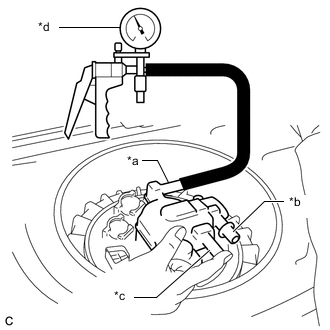
*a Port (A) *b Port (B) *c Port (C) *d Vacuum Pump Using a vacuum pump, apply vacuum to the port (A) with the port (C) closed and check that air flows into the port (B).
OK The vacuum is maintained at first. By gradually increasing the vacuum, air flows and the vacuum decreases after the vacuum reaches a certain level.
-
-
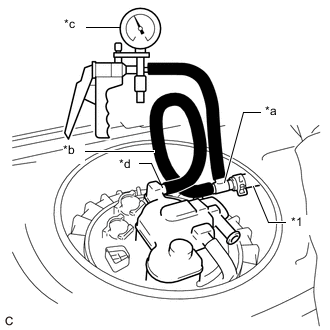
*1 No. 1 Fuel Evaporation Tube Sub-assembly *a 3-way Connector *b Hose *c Vacuum Pump *d Port (A) Check for clogs in the air filter (when not using the GTS).
-
Connect the No. 1 fuel evaporation tube sub-assembly to the canister (fuel suction plate sub-assembly) via the 3-way connector, hose and vacuum pump as shown in the illustration.
-
Start the engine.
-
Warm up the engine.
-
Allow the engine to idle for 15 minutes.
-
Check the needle of the vacuum pump.
OK The needle of the vacuum pump does not rise from its initial position. Tech Tips
The needle may shake due to engine vibration, etc., but if it immediately returns to its initial position, there is no problem.
-
-
*1 No. 1 Fuel Evaporation Tube Sub-assembly *a 3-way Connector *b Hose *c Vacuum Pump *d Port (A) Check for clogs in the air filter (when using the GTS).
-
Connect the No. 1 fuel evaporation tube sub-assembly to the canister (fuel suction plate sub-assembly) via the 3-way connector, hose and vacuum pump as shown in the illustration.
-
Connect the GTS to the DLC3.
-
Start the engine.
-
Turn the GTS on.
-
Enter the following menus: Powertrain / Engine / Active Test / Activate the VSV for Evap Control.
Powertrain > Engine > Active TestTester Display Activate the EVAP Purge VSV -
Perform the Active Test "Activate the VSV for Evap Control" while the engine is idling.
-
Check the needle of the vacuum pump.
OK The needle of the vacuum pump does not rise from its initial position. Tech Tips
The needle may shake due to engine vibration, etc., but if it immediately returns to its initial position, there is no problem.
-
-