ECM INSTALLATION
PROCEDURE
-
INSTALL NO. 2 ECM BRACKET
-
Install the No. 2 ECM bracket to the ECM with the 2 screws.
- Torque:
- 4.5 N*m { 46 kgf*cm, 40 in.*lbf }
-
-
INSTALL NO. 1 ECM BRACKET
-
Install the No. 1 ECM bracket to the ECM with the 2 screws.
- Torque:
- 4.5 N*m { 46 kgf*cm, 40 in.*lbf }
-
-
INSTALL ECM
Tech Tips
-
Perform "reset memory", "deceleration sensor 0 point calibration", "CVT oil pressure calibration" after replacing the ECM.
-
Perform "Vehicle Identification Number (VIN) or frame number registration" after replacing the ECM.
-
When replacing the ECM, use the GTS to save "Heavy Knock History" and then upload it to the new ECM.
-
Install the ECM with the bolt and nut.
- Torque:
- Bolt
- 12.5 N*m { 127 kgf*cm, 9 ft.*lbf }
- Nut
- 8.0 N*m { 82 kgf*cm, 71 in.*lbf }
Note
If the ECM has been struck or dropped, replace it.
-
Engage the 2 claws to connect the engine wire to the No. 1 engine room relay block.
-
Connect the 3 connectors to the No. 1 engine room relay block.
-
Connect the 2 ECM connectors and lower the 2 levers.
Note
-
When connecting the ECM connectors, make sure that dirt, water or other foreign matter does not contact the connecting parts of the ECM connectors.
-
Be sure to securely connect the ECM connectors.
-
-
Install the No. 1 relay block cover to the No. 1 engine room relay block.
-
-
INSTALL AIR CLEANER CASE SUB-ASSEMBLY
-
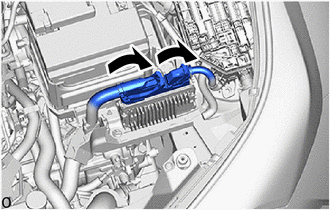
INSTALL AIR CLEANER CAP SUB-ASSEMBLY
-
Connect the air cleaner cap with air cleaner hose and tighten the hose clamp.
- Torque:
- 2.0 N*m { 20 kgf*cm, 18 in.*lbf }
-
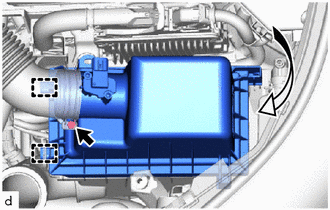
Engage the 2 guides to install the air cleaner cap sub-assembly to the air cleaner case sub-assembly.
-
Engage the 2 air cleaner cap sub-assembly clamps.
-
Engage the clamp to the air cleaner cap sub-assembly.
-
Connect the mass air flow meter connector.
-
-
INSTALL NO. 1 AIR CLEANER INLET
-
INSTALL RADIATOR COVER
-
CONNECT CABLE TO NEGATIVE BATTERY TERMINAL
Note
When disconnecting the cable, some systems need to be initialized after the cable is reconnected.
-
PERFORM INITIALIZATION
-
Perform "reset memory", "deceleration sensor 0 point calibration", "CVT oil pressure calibration" after replacing the ECM.
-
Perform "Vehicle Identification Number (VIN) or frame number registration" after replacing the ECM.
-
When replacing the ECM, use the GTS to save "Heavy Knock History" and then upload it to the new ECM.
-