CAMSHAFT OIL CONTROL SOLENOID INSTALLATION

PROCEDURE
-
INSTALL CAMSHAFT TIMING OIL CONTROL SOLENOID ASSEMBLY (for Exhaust Side)
-
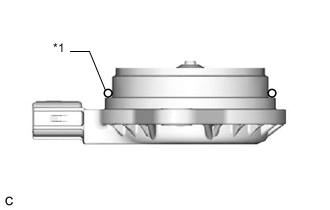
*1 O-ring Apply engine oil to a new O-ring and install it to the camshaft timing oil control solenoid assembly as shown in the illustration.
Note
Do not damage the O-ring.
-
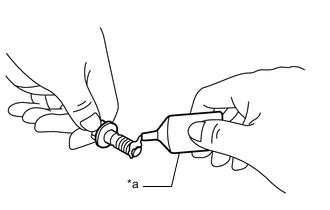
*a Adhesive Apply adhesive to 2 or 3 threads of 2 new bolts.
Adhesive Toyota Genuine Adhesive 1324, Three Bond 1324 or equivalent -
Install the camshaft timing oil control solenoid assembly to the timing chain cover assembly with the 2 bolts.
- Torque:
- 10 N*m { 102 kgf*cm, 7 ft.*lbf }
Note
-
If the camshaft timing oil control solenoid assembly has been struck or dropped, replace it.
-
Make sure that the O-ring is not cracked or moved out of place when installing the camshaft timing oil control solenoid assembly.
-
Connect the camshaft timing oil control solenoid assembly connector.
-
Engage the clamp to install the wire harness clamp bracket to the engine wire.
-
Install the engine wire to the cylinder head cover sub-assembly with the bolt.
- Torque:
- 10 N*m { 102 kgf*cm, 7 ft.*lbf }
-
-
INSTALL CAMSHAFT TIMING OIL CONTROL SOLENOID ASSEMBLY (for Intake Side)
-
*1 O-ring Apply engine oil to a new O-ring and install it to the camshaft timing oil control solenoid assembly as shown in the illustration.
Note
Do not damage the O-ring.
-
*a Adhesive Apply adhesive to 2 or 3 threads of 2 new bolts.
Adhesive Toyota Genuine Adhesive 1324, Three Bond 1324 or equivalent -
Install the camshaft timing oil control solenoid assembly to the timing chain cover assembly with the 2 bolts.
- Torque:
- 10 N*m { 102 kgf*cm, 7 ft.*lbf }
Note
-
If the camshaft timing oil control solenoid assembly has been struck or dropped, replace it.
-
Make sure that the O-ring is not cracked or moved out of place when installing the camshaft timing oil control solenoid assembly.
-
Connect the camshaft timing oil control solenoid assembly connector.
-
-
INSTALL ENGINE MOUNTING INSULATOR SUB-ASSEMBLY RH (w/ Air Conditioning System)
-
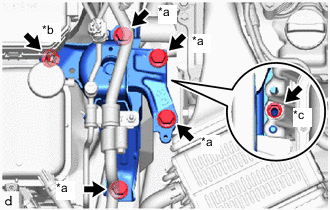
*a Bolt *b Nut A *c Nut B Install the engine mounting insulator sub-assembly RH to the vehicle and engine mounting bracket RH with the 4 bolts and 2 nuts.
- Torque:
- Bolt
- 72 N*m { 734 kgf*cm, 53 ft.*lbf }
- Nut A
- 72 N*m { 734 kgf*cm, 53 ft.*lbf }
- Nut B
- 41 N*m { 418 kgf*cm, 30 ft.*lbf }
-
Install the air conditioner tube and accessory assembly to the engine mounting insulator sub-assembly RH with the bolt.
- Torque:
- 9.8 N*m { 100 kgf*cm, 87 in.*lbf }
-
Install the air conditioner tube and accessory assembly to the vehicle with the nut.
- Torque:
- for DENSO Made
- 9.8 N*m { 100 kgf*cm, 87 in.*lbf }
- for VALEO Made
- 5.4 N*m { 55 kgf*cm, 48 in.*lbf }
-
Install the No. 2 earth wire from the engine mounting insulator sub-assembly RH with the bolt.
- Torque:
- 10.5 N*m { 107 kgf*cm, 8 ft.*lbf }
-
-
INSTALL ENGINE MOUNTING INSULATOR SUB-ASSEMBLY RH (w/o Air Conditioning System)
-
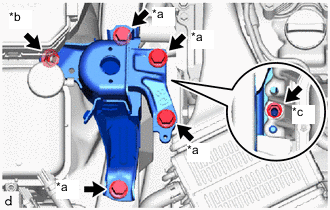
*a Bolt *b Nut A *c Nut B Install the engine mounting insulator sub-assembly RH to the vehicle and engine mounting bracket RH with the 4 bolts and 2 nuts.
- Torque:
- Bolt
- 72 N*m { 734 kgf*cm, 53 ft.*lbf }
- Nut A
- 72 N*m { 734 kgf*cm, 53 ft.*lbf }
- Nut B
- 41 N*m { 418 kgf*cm, 30 ft.*lbf }
-
Install the No. 2 earth wire from the engine mounting insulator sub-assembly RH with the bolt.
- Torque:
- 10.5 N*m { 107 kgf*cm, 8 ft.*lbf }
-
-
REMOVE ENGINE SUPPORT BRIDGE
-
REMOVE ENGINE HANGER
-
INSTALL OUTER COWL TOP PANEL SUB-ASSEMBLY (for LHD)
-
INSTALL OUTER COWL TOP PANEL SUB-ASSEMBLY (for RHD)
-
INSTALL COWL BODY MOUNTING REINFORCEMENT RH
-
INSTALL COWL BODY MOUNTING REINFORCEMENT LH
-
INSTALL WATER GUARD PLATE LH
-
INSTALL NO. 1 HEATER AIR DUCT SPLASH SHIELD SEAL
-
INSTALL WINDSHIELD WIPER MOTOR AND LINK
-
INSPECT FOR ENGINE OIL LEAK
-
INSTALL REAR ENGINE UNDER COVER RH
-
INSTALL NO. 1 ENGINE UNDER COVER
-
INSTALL FRONT WHEEL RH