BLACK OUT TAPE(for Rear Door) INSTALLATION
CAUTION / NOTICE / HINT
Tech Tips
-
Use the same procedure for the RH side and LH side.
-
The following procedure is for the LH side.
PROCEDURE
-
REPAIR INSTRUCTION
-
INSTALL REAR DOOR UPPER OUTSIDE STRIPE
-
Refer to the illustration to position a new rear door upper outside stripe.
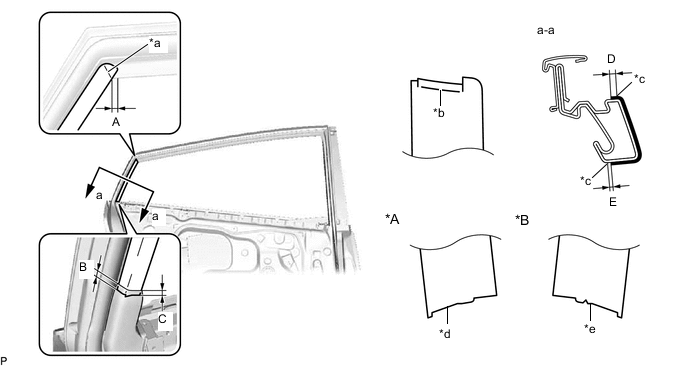
*A LH Side *B RH Side *a Point A *b Point B *c Edge of Curved Surface *d Straight *e Triangle - - Standard Measurement Area Measurement Area Measurement A 4.0 mm (0.158 in.) B 5.0 mm (0.197 in.) C 5.0 mm (0.197 in.) D 2.8 mm (0.110 in.) E 1.0 mm (0.0394 in.) - - -
Remove the release paper and install the rear door upper outside stripe.
Tech Tips
Align the point (B) on the rear door upper outside stripe with the point (A) on the door frame and install the rear door upper outside stripe.
-
-
INSTALL REAR DOOR OUTSIDE STRIPE
-
Refer to the illustration to position a new rear door outside stripe.
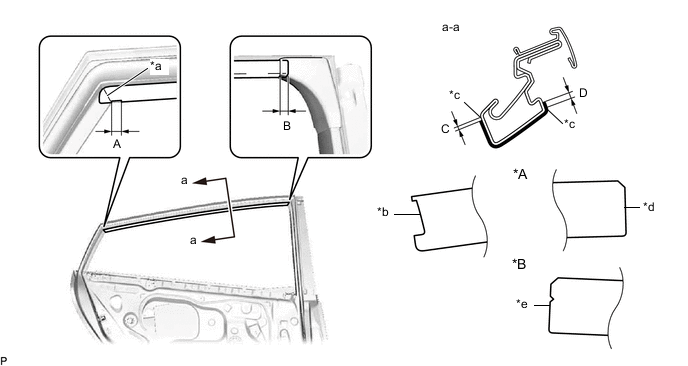
*A LH Side *B RH Side *a Point A *b Point B *c Edge of Curved Surface *d Straight *e Triangle - - Standard Measurement Area Measurement Area Measurement A 4.0 mm (0.158 in.) B 10.0 mm (0.394 in.) C 1.0 mm (0.0394 in.) D 2.8 mm (0.110 in.) -
Remove the release paper and install the rear door outside stripe.
Tech Tips
Align the point (B) on the rear door outside stripe with the point (A) on the door frame and install the rear door outside stripe.
-
-
INSTALL REAR DOOR LOWER OUTSIDE STRIPE
-
Refer to the illustration to position a new rear door lower outside stripe.
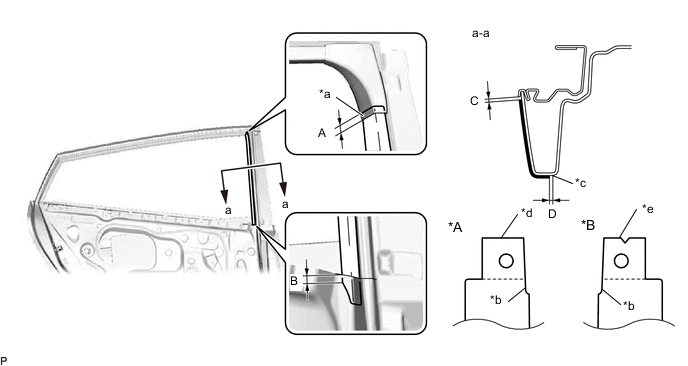
*A LH Side *B RH Side *a Point A *b Point B *c Edge of Curved Surface *d Straight *e Triangle - - Standard Measurement Area Measurement Area Measurement A 10.0 mm (0.394 in.) B 5.0 mm (0.197 in.) C 1.2 mm (0.0472 in.) D 1.0 mm (0.0394 in.) -
Remove the release paper and install the rear door lower outside stripe.
Tech Tips
Align the point (B) on the rear door lower outside stripe with the point (A) on the door frame and install the rear door lower outside stripe.
-
-
INSTALL REAR DOOR FRAME GARNISH
-
INSTALL REAR DOOR GLASS SUB-ASSEMBLY
-
INSTALL REAR DOOR QUARTER WINDOW GLASS
-
INSTALL REAR DOOR WINDOW DIVISION BAR SUB-ASSEMBLY
-
CONNECT REAR DOOR WEATHERSTRIP
-
INSTALL REAR DOOR GLASS RUN
-
INSTALL REAR DOOR NO. 2 SERVICE HOLE COVER
-
INSTALL REAR DOOR PANEL PROTECTOR
-
INSTALL REAR DOOR SERVICE HOLE COVER
-
INSTALL REAR DOOR INNER GLASS WEATHERSTRIP WITH REAR DOOR NO. 2 VENT SEAL
-
INSTALL REAR DOOR TRIM BOARD SUB-ASSEMBLY
-
INSTALL REAR POWER WINDOW REGULATOR SWITCH ASSEMBLY WITH REAR DOOR UPPER ARMREST BASE PANEL
-
INSTALL REAR ARMREST ASSEMBLY
-
INSTALL REAR DOOR INSIDE HANDLE BEZEL PLUG
-
CONNECT CABLE TO NEGATIVE AUXILIARY BATTERY TERMINAL
-
INITIALIZE POWER WINDOW CONTROL SYSTEM
-
INSPECT POWER WINDOW OPERATION