CHARGE LID OPENER MOTOR ASSEMBLY REMOVAL
PROCEDURE
-
REMOVE TONNEAU COVER ASSEMBLY
-
REMOVE REAR NO. 2 FLOOR BOARD
-
REMOVE REAR NO. 4 FLOOR BOARD
-
REMOVE REAR NO. 3 FLOOR BOARD
-
REMOVE REAR NO. 1 FLOOR BOARD
-
REMOVE DECK FLOOR BOX LH
-
REMOVE DECK FLOOR BOX RH
-
REMOVE DECK TRIM SERVICE HOLE COVER
-
REMOVE REAR DECK TRIM COVER
-
REMOVE REAR SEAT HEADREST ASSEMBLY
-
REMOVE REAR SEATBACK HINGE COVER
-
REMOVE REAR SEATBACK ASSEMBLY RH
-
REMOVE REAR SEAT CUSHION ASSEMBLY RH
-
REMOVE REAR SEAT CUSHION LOCK HOOK
-
REMOVE REAR DOOR SCUFF PLATE RH
-
DISCONNECT REAR DOOR OPENING TRIM WEATHERSTRIP RH
-
Disconnect the rear door opening trim weatherstrip RH.
-
-
REMOVE REAR UNDER SIDE COVER RH
-
REMOVE REAR SEATBACK HINGE SUB-ASSEMBLY RH
-
REMOVE REAR SEAT SIDE GARNISH RH
-
REMOVE ROPE HOOK (w/o Toyota Safety Sense)
-
REMOVE NO. 2 ROPE HOOK (w/o Toyota Safety Sense)
-
REMOVE NO. 1 TONNEAU COVER HOLDER CAP (w/ Toyota Safety Sense)
-
REMOVE TONNEAU COVER HOOK A (w/ Toyota Safety Sense)
-
REMOVE NO. 1 LUGGAGE COMPARTMENT LIGHT ASSEMBLY
-
REMOVE DECK TRIM SIDE PANEL ASSEMBLY RH
-
REMOVE NO. 1 HYBRID BATTERY INTAKE DUCT
-
REMOVE NO. 2 HYBRID BATTERY INTAKE DUCT
-
DISCONNECT AC CHARGER INLET CABLE (w/o CABLE EV CHARGER LOCK ASSEMBLY)
-
DISCONNECT AC CHARGER INLET CABLE WITH CABLE EV CHARGER LOCK ASSEMBLY (w/ CABLE EV CHARGER LOCK ASSEMBLY)
-
REMOVE FUEL FILLER OPENING LID LOCK BRACKET
-
REMOVE CHARGING PORT OPENING LID LOCK RETAINER
-
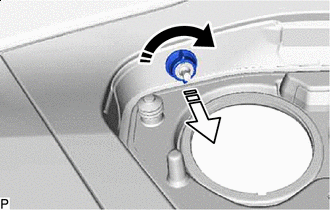

Turn in this Direction (1) 
Remove in this Direction (2) Turn and remove the charging port opening lid lock retainer as indicated by the arrows, in the order shown in the illustration.
-
-
REMOVE CHARGE LID LOCK WITH MOTOR ASSEMBLY
-
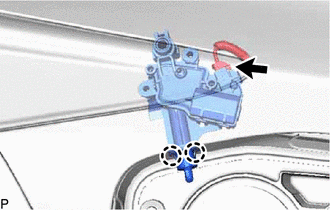
Disconnect the connector.
-
Disengage the 2 claws to remove the charge lid lock with motor assembly.
-