ELECTRICAL KEY OSCILLATOR(for Outside Luggage Compartment) REMOVAL
CAUTION / NOTICE / HINT
The necessary procedures (adjustment, calibration, initialization, or registration) that must be performed after parts are removed and installed, or replaced during electrical key antenna removal/installation are shown below.
| Replaced Part or Performed Procedure | Necessary Procedure | Effect/Inoperative Function when Necessary Procedure not Performed | Link |
|---|---|---|---|
| Rear bumper assembly (w/ Intuitive Parking Assist System) |
|
|
PROCEDURE
-
REMOVE REAR BUMPER ASSEMBLY
-
REMOVE ELECTRICAL KEY ANTENNA (for Center)
-
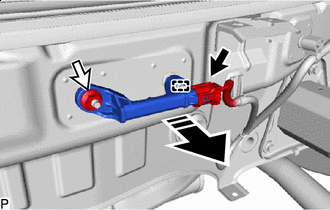

Remove in this Direction Disconnect the connector.
-
Remove the nut.
-
Disengage the guide to remove the electrical key antenna as shown in the illustration.
Note
Be careful when removing the electrical key antenna. If the electrical key antenna is dropped, replace it with a new one.
-
-
REMOVE NO. 2 ELECTRICAL KEY ANTENNA (for RH Side)
-
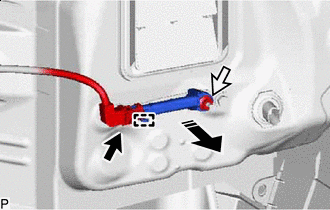
Remove in this Direction Disconnect the connector.
-
Remove the nut.
-
Disengage the guide to remove the No. 2 electrical key antenna as shown in the illustration.
Note
Be careful when removing the No. 2 electrical key antenna. If the No. 2 electrical key antenna is dropped, replace it with a new one.
-