SOLAR BATTERY REMOVAL
CAUTION / NOTICE / HINT
The necessary procedures (adjustment, calibration, initialization, or registration) that must be performed after parts are removed and installed, or replaced during service plug grip removal/installation are shown below.
| Replaced Part or Performed Procedure | Necessary Procedures | Effect/Inoperative Function when Necessary Procedure not Performed | Link |
|---|---|---|---|
| Auxiliary battery terminal is disconnected/reconnected | Memorize steering angle neutral point | Lane departure alert system (w/ Steering Control) | |
| Intelligent clearance sonar system*1 | |||
| Simple advanced parking guidance system*1 | |||
| Pre-crash safety system | |||
| Adaptive high beam system | |||
| Parking assist monitor system | |||
| Initialize back door lock | Power door lock control system |
*1: When performing learning using the GTS.
Note
-
After turning the power switch off, waiting time may be required before disconnecting the cable from the negative (-) auxiliary battery terminal. Therefore, make sure to read the disconnecting the cable from the negative (-) auxiliary battery terminal notices before proceeding with work.
-
When removing/installing/moving the solar battery, make sure not to tilt it more than 80°.
Tech Tips
When disposing of an solar battery, make sure to return it through an authorized collection agent who is capable of handling it safely. If the solar battery is returned via the manufacturer specified route, it will be returned properly and in a safe manner by an authorized collection agent.
PROCEDURE
-
DISCONNECT CABLE FROM NEGATIVE AUXILIARY BATTERY TERMINAL
Note
When disconnecting the cable, some systems need to be initialized after the cable is reconnected.
-
REMOVE FRONT CONSOLE BOX
-
REMOVE NO. 1 SOLAR BATTERY SHIELD PANEL
-


Pull out 
Remove in this Direction Remove the No. 1 solar battery shield panel with disengage the 4 claws in several steps in the order shown in the illustration.
-
-
REMOVE SOLAR BATTERY
-

Disconnect the solar battery connector.
-
Disengage the 2 clamps and remove the floor wire from the solar battery.
-
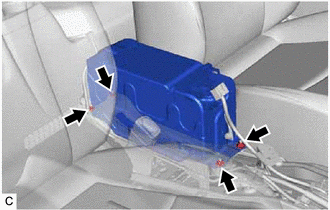
Remove the 4 bolts and remove the solar battery from the solar battery bracket.
Note
-
When lifting the solar battery, hold the solar battery at the shaded areas shown in the illustration which prevent deformation.

*a Front of Vehicle *b Front of Vehicle *c Upper Side of Vehicle - - -
When removing/installing/moving the solar battery, make sure not to tilt it more than 80°.
-
-
-
REMOVE NO. 1 SOLAR BATTERY MOUNT BRACKET