OIL AND OIL FILTER REPLACEMENT

CAUTION / NOTICE / HINT
CAUTION:
-
Prolonged and repeated contact with engine oil will result in the removal of natural oils from the skin, leading to dryness, irritation and dermatitis. In addition, used engine oil contains potentially harmful contaminants which may cause skin cancer.
-
Wear protective clothing and gloves. Avoid contact with used oil. If contact occurs, wash your skin thoroughly with soap or waterless hand cleaner. Never use gasoline, thinners, or solvents to wash the skin.
-
In order to protect the environment, dispose of used oil and used oil filters at designated disposal sites only.
PROCEDURE
-
REMOVE CENTER NO. 4 ENGINE UNDER COVER
-
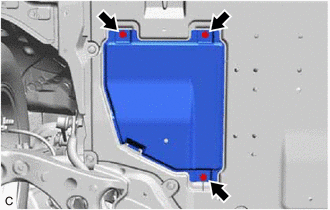
Remove the 3 screws and center No. 4 engine under cover.
-
-
DRAIN ENGINE OIL
-
Remove the oil filler cap sub-assembly.
-
Remove the oil pan drain plug and gasket, and drain the engine oil into a container.
-
Clean the oil pan drain plug.
-
Install a new gasket to the oil pan drain plug.
-
Install the oil pan drain plug.
- Torque:
- 37 N*m { 377 kgf*cm, 27 ft.*lbf }
-
-
REMOVE OIL FILTER
-
for Oil Filter Sub-assembly Type:
-
Using SST, remove the oil filter sub-assembly.
- SST
- 09228-06502
-
-
for Oil Filter Element Kit Type:
-
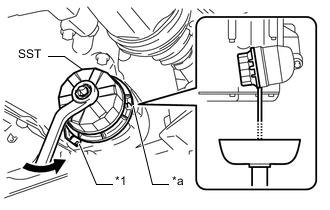
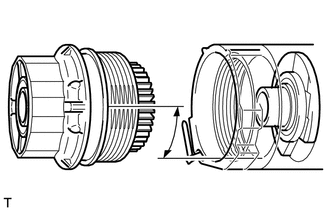
*1 Oil Filter Bracket Clip *a Cap Rib Using SST, loosen the oil filter cap assembly 4 turns, align the cap ribs vertically, and drain the remaining engine oil from the oil filter cap assembly.
- SST
- 09228-06502
Note
Do not remove the oil filter bracket clip when removing the oil filter cap assembly.
Tech Tips
Set a container below the oil filter cap assembly before loosening the oil filter cap assembly.
-
Remove the oil filter cap assembly.
-
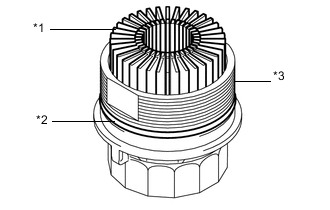
*1 Oil Filter Element *2 O-ring *3 Oil Filter Cap Assembly Remove the oil filter element and O-ring from the oil filter cap assembly.
Note
To prevent damage to the oil filter cap assembly, be sure to remove the O-ring by hand.
-
-
-
INSTALL OIL FILTER
-
for Oil Filter Sub-assembly Type:
-
Check and clean the oil filter sub-assembly installation surface.
-
Apply clean engine oil to the gasket of a new oil filter sub-assembly.
-
Lightly screw the oil filter sub-assembly into place by hand. Tighten it until the gasket contacts the seat.
-
Using SST, tighten the oil filter sub-assembly.
- SST
- 09228-06502
-
If enough space is available, use a torque wrench to tighten the oil filter sub-assembly.
Depending on the work space available, choose from the following:
- Torque:
- 17.5 N*m { 178 kgf*cm, 13 ft.*lbf }
-
If not enough space is available to use a torque wrench, tighten the oil filter sub-assembly 3/4 of a turn by hand or use a common wrench.
-
-
for Oil Filter Element Kit Type:
-
Clean the inside of the oil filter cap assembly, its threads and O-ring groove.
-
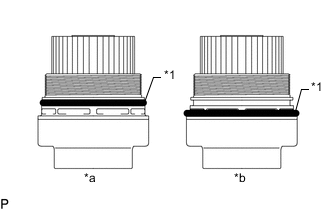
*1 O-ring *a Correct *b Incorrect Apply a small amount of engine oil to a new O-ring and install it to the oil filter cap assembly.
Note
-
Be sure to install the O-ring to the proper position, or engine oil may leak.
-
Do not twist the O-ring.
-
-
Set a new oil filter element in the oil filter cap assembly.
-
Remove any dirt or foreign matter from the installation surface of the engine.
-
Apply a small amount of engine oil to the O-ring of the oil filter cap assembly again. Align the cutout in the oil filter cap assembly threads 90° to the grooves in the oil filter bracket and temporarily tighten the oil filter cap assembly.
Note
Make sure that the O-ring does not get caught between the parts.
-
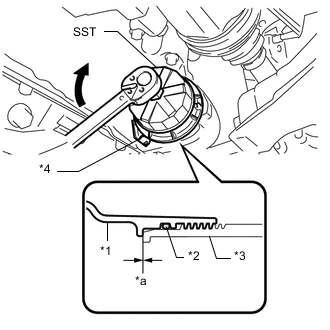
*1 Oil Filter Cap Assembly *2 O-ring *3 Oil Filter Bracket *4 Oil Filter Bracket Clip *a No Gap Using SST, tighten the oil filter cap assembly.
- SST
- 09228-06502
- Torque:
- 25 N*m { 255 kgf*cm, 18 ft.*lbf }
Note
-
After tightening the oil filter cap assembly, make sure that there is no gap and that the O-ring is not protruding.
-
Do not remove the oil filter bracket clip when installing the oil filter cap assembly.
-
Do not cross thread the oil filter cap assembly.
-
-
-
ADD ENGINE OIL
-
Add new engine oil and install the oil filler cap sub-assembly.
Standard Oil Grade: Oil Grade Oil Viscosity (SAE) API grade SL "energy-conserving", SM "energy-conserving", SN "resource-conserving" or ILSAC multigrade engine oil
-
0W-20
-
5W-20
-
5W-30
-
10W-30
API grade SL, SM or SN multigrade engine oil
-
15W-40
Standard Oil Grade (Destination package for Europe): Oil Grade Oil Viscosity (SAE) API grade SL "energy-conserving", SM "energy-conserving", SN "resource-conserving" or ILSAC multigrade engine oil
-
0W-20
-
5W-30
-
10W-30
API grade SL, SM or SN multigrade engine oil
-
15W-40
Standard Capacity: Item Standard Condition Drain and refill with oil filter change 4.2 liters (4.4 US qts, 3.7 Imp. qts) Drain and refill without oil filter change 3.9 liters (4.1 US qts, 3.4 Imp. qts) Dry fill 4.7 liters (5.0 US qts, 4.1 Imp. qts) -
-
-
INSPECT FOR OIL LEAK
-
Put the engine in inspection mode (maintenance mode).
-
Start the engine. Make sure that there are no engine oil leaks from the area that was worked on.
-
-
CHECK ENGINE OIL LEVEL
-
INSTALL CENTER NO. 4 ENGINE UNDER COVER
-
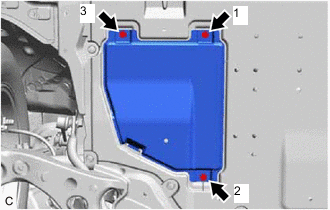
Install the center No. 4 engine under cover with the 3 screws in several steps in the order shown in the illustration.
-