HV BATTERY STACK INSTALLATION
PROCEDURE
-
INSTALL NO. 5 HV SUPPLY STACK SUB-ASSEMBLY
CAUTION:
Be sure to wear insulated gloves and protective goggles.
-
Install the No. 5 HV supply stack sub-assembly with the 4 nuts.
- Torque:
- 19 N*m { 194 kgf*cm, 14 ft.*lbf }
-
-
INSTALL NO. 4 HV SUPPLY STACK SUB-ASSEMBLY
CAUTION:
Be sure to wear insulated gloves and protective goggles.
-
Install the No. 4 HV supply stack sub-assembly with the 4 nuts.
- Torque:
- 19 N*m { 194 kgf*cm, 14 ft.*lbf }
-
-
INSTALL NO. 3 HV SUPPLY STACK SUB-ASSEMBLY
CAUTION:
Be sure to wear insulated gloves and protective goggles.
-
Install the No. 3 HV supply stack sub-assembly with the 4 nuts.
- Torque:
- 19 N*m { 194 kgf*cm, 14 ft.*lbf }
-
-
INSTALL NO. 2 HV SUPPLY STACK SUB-ASSEMBLY
CAUTION:
Be sure to wear insulated gloves and protective goggles.
-
Install the No. 2 HV supply stack sub-assembly with the 4 nuts.
- Torque:
- 19 N*m { 194 kgf*cm, 14 ft.*lbf }
-
-
INSTALL NO. 1 HV SUPPLY STACK SUB-ASSEMBLY
CAUTION:
Be sure to wear insulated gloves and protective goggles.
-
Install the No. 1 HV supply stack sub-assembly with the 4 nuts.
- Torque:
- 19 N*m { 194 kgf*cm, 14 ft.*lbf }
-
-
INSTALL NO. 1 HV BATTERY SHIELD REINFORCEMENT
CAUTION:
Be sure to wear insulated gloves and protective goggles.
-
Install the 4 No. 1 HV battery shield reinforcements to the HV battery with the 16 bolts.
- Torque:
- 7.5 N*m { 76 kgf*cm, 66 in.*lbf }
-
-
INSTALL NO. 7 HYBRID BATTERY INTAKE DUCT
CAUTION:
Be sure to wear insulated gloves and protective goggles.
-
Engage each claw to install the 5 No. 7 hybrid battery intake ducts.
-
Engage the 2 claws of 2 hybrid battery thermistors (sensor portion) to connect the hybrid battery thermistor to the No. 7 hybrid battery intake duct.
-
-
INSTALL NO. 1 HV BATTERY PROTECTOR
CAUTION:
Be sure to wear insulated gloves and protective goggles.
-
Install the No. 1 HV battery protector to the HV battery with the bolt.
- Torque:
- 7.5 N*m { 76 kgf*cm, 66 in.*lbf }
-
-
INSTALL NO. 1 HYBRID BATTERY PACK WIRE
CAUTION:
Be sure to wear insulated gloves and protective goggles.
-
Install the No. 1 hybrid battery pack wire to the HV battery with the 3 bolts.
- Torque:
- 7.5 N*m { 76 kgf*cm, 66 in.*lbf }
-
Engage the 6 clamps.
-
Connect the 7 connectors.
-
Connect the 2 connectors.
Note
Make sure that the connectors are connected securely.
-
-
INSTALL NO. 1 HV BATTERY HOSE
CAUTION:
Be sure to wear insulated gloves and protective goggles.
-
Engage 10 claws to install the No. 1 HV battery hose.
-
Install the 10 clips.
-
-
INSTALL NO. 4 HYBRID BATTERY INTAKE DUCT
CAUTION:
Be sure to wear insulated gloves and protective goggles.
-
Install the 5 No. 4 hybrid battery intake ducts to the HV battery with the 5 clips.
-
-
INSTALL NO. 1 HYBRID BATTERY EXHAUST DUCT
CAUTION:
Be sure to wear insulated gloves and protective goggles.
-
Engage the 2 claws to install the No. 1 hybrid battery exhaust duct to the HV battery.
-
-
INSTALL NO. 2 BATTERY FRAME
CAUTION:
Be sure to wear insulated gloves and protective goggles.
-
Install the No. 2 battery frame with the 2 nuts.
- Torque:
- 7.5 N*m { 76 kgf*cm, 66 in.*lbf }
-
-
INSTALL NO. 1 BATTERY FRAME
CAUTION:
Be sure to wear insulated gloves and protective goggles.
-
Install the No. 1 battery frame with the 3 nuts.
- Torque:
- 7.5 N*m { 76 kgf*cm, 66 in.*lbf }
-
-
CONNECT WIRE HARNESS
CAUTION:
Be sure to wear insulated gloves and protective goggles.
-
Engage the 4 clamps.
-
Install the fuse box bracket with the 2 nuts.
- Torque:
- 7.5 N*m { 76 kgf*cm, 66 in.*lbf }
-
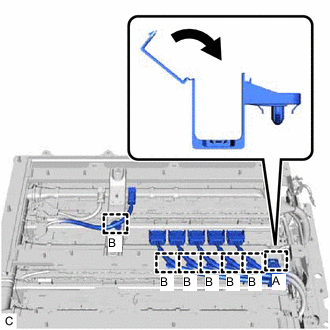
Engage the clamp (A) to install the wire harness protector.
-
Engage the 6 clamps (B).
-
Close the wire harness protector.
-
Install the service plug bracket with the 2 nuts.
- Torque:
- 7.5 N*m { 76 kgf*cm, 66 in.*lbf }
-
Install the nut.
- Torque:
- 7.5 N*m { 76 kgf*cm, 66 in.*lbf }
-
Engage the 3 clamps.
-
Connect the connector.
Note
Make sure that the connector is connected securely.
-
Engage the 6 clamps.
-
Connect the connector.
-
Engage the 3 clamps.
-
-
INSTALL HV BATTERY HEATER RELAY
-
INSTALL HYBRID BATTERY TERMINAL BLOCK
-
INSTALL BATTERY ECU ASSEMBLY
-
INSTALL HV BATTERY JUNCTION BLOCK ASSEMBLY
-
PERFORM UTILITY
Note
-
Perform "Battery Diagnosis" after replacing a malfunctioning HV supply stack sub-assembly.
-
Perform "Battery Status Info Update" after replacing a malfunctioning HV supply stack sub-assembly.
-