HV BATTERY INSTALLATION
PROCEDURE
-
INSTALL NO. 1 HV BATTERY MOUNT BRACKET
Tech Tips
Perform this procedure only when replacement of the No. 1 HV battery mount bracket is necessary.
-
Install the No. 1 HV battery mount bracket with the 2 bolts.
- Torque:
- 19.5 N*m { 199 kgf*cm, 14 ft.*lbf }
-
-
INSTALL NO. 2 HV BATTERY MOUNT BRACKET
Tech Tips
Perform this procedure only when replacement of the No. 2 HV battery mount bracket is necessary.
-
Install the No. 2 HV battery mount bracket with the 2 bolts.
- Torque:
- 19.5 N*m { 199 kgf*cm, 14 ft.*lbf }
-
-
INSTALL NO. 3 HV BATTERY MOUNT BRACKET
Tech Tips
Perform this procedure only when replacement of the No. 3 HV battery mount bracket is necessary.
-
Install the No. 3 HV battery mount bracket with the 3 bolts.
- Torque:
- 35 N*m { 357 kgf*cm, 26 ft.*lbf }
-
-
INSTALL NO. 4 HV BATTERY MOUNT BRACKET
Tech Tips
Perform this procedure only when replacement of the No. 4 HV battery mount bracket is necessary.
-
Install the No. 4 HV battery mount bracket with the 3 bolts.
- Torque:
- 35 N*m { 357 kgf*cm, 26 ft.*lbf }
-
-
INSTALL HV BATTERY
CAUTION:
Wear insulated gloves.
-
Set the 4 hooks and 2 straps.
-
Using a suitable adaptor such as straps, install the HV battery while tilting the HV battery.
CAUTION:
To prevent any accidents and injuries due to the weight of the HV battery, follow all specified procedures and be careful to balance the HV battery when removing or installing it.
Note
-
To prevent the wire harness from being caught, make sure to bundle the wire harness using insulating tape or equivalent.
-
Use cardboard or another similar material to protect the HV battery and vehicle body from damage.
-
Since the HV battery is very heavy, 2 people are needed to install it. When installing the HV battery, be careful not to damage the parts around it.
-
When removing/installing/moving the HV battery, make sure not to tilt it more than 80°.
-
While lowering the HV battery into the vehicle, do not allow it to contact the vehicle.
-
If the HV battery has been struck or dropped, replace it.
-
-
Install the HV battery to the vehicle with the 4 bolts (A) and 6 bolts (B).
- Torque:
- 29.5 N*m { 301 kgf*cm, 22 ft.*lbf }
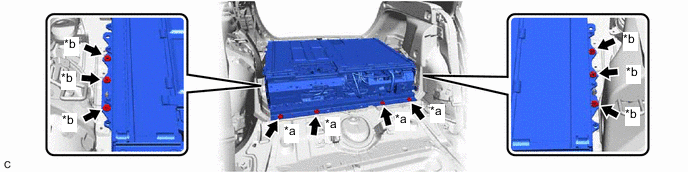
*a Bolt (A)
(Bolt Length: 23 mm (0.906 in.))
*b Bolt (B)
(Bolt Length: 25 mm (0.984 in.))
Note
Do not allow foreign matter, such as grease or oil, to adhere to the bolts of the HV battery.
-
-
CONNECT FLOOR WIRE
CAUTION:
Wear insulated gloves.
-
Connect the 2 HV battery connectors.
-
Engage the clamp.
-
-
CONNECT WIRE HARNESS
CAUTION:
Wear insulated gloves.
-
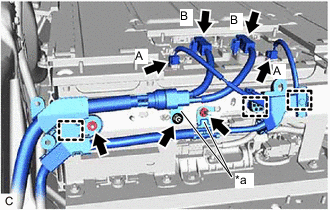
*a Earth Terminal Engage the 3 clamps.
-
Install the nut.
- Torque:
- 8.0 N*m { 82 kgf*cm, 71 in.*lbf }
-
Install the 2 nuts to connect the earth terminals.
- Torque:
- 8.0 N*m { 82 kgf*cm, 71 in.*lbf }
-
Connect the 2 HV battery junction block assembly connectors (B).
Note
Make sure that the connectors are connected securely.
-
Connect the 2 HV battery junction block assembly connectors (A).
Note
Make sure that the connectors are connected securely.
-
-
INSTALL NO. 2 HV BATTERY SHIELD PANEL
CAUTION:
Wear insulated gloves.
-
Install the No. 2 HV battery shield panel to the HV battery with the 3 nuts.
- Torque:
- 7.5 N*m { 76 kgf*cm, 66 in.*lbf }
-
-
INSTALL NO. 3 HV BATTERY SHIELD PANEL
CAUTION:
Wear insulated gloves.
-
Install the No. 3 HV battery shield panel to the HV battery with the 4 nuts.
- Torque:
- 7.5 N*m { 76 kgf*cm, 66 in.*lbf }
-
-
INSTALL NO. 1 HV BATTERY SHIELD PANEL
CAUTION:
Wear insulated gloves.
-
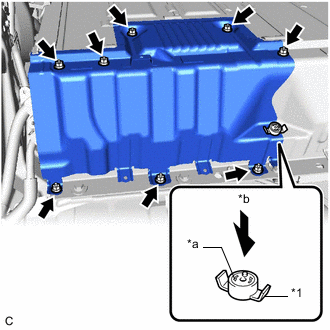
*1 Battery Cover Lock Striker *a Button *b Push Install the No. 1 HV battery shield panel to the HV battery with the 8 nuts.
- Torque:
- 7.5 N*m { 76 kgf*cm, 66 in.*lbf }
-
Install the battery cover lock striker, then push the button to lock it.
-
-
INSTALL CENTER REAR SEATBACK HINGE SUB-ASSEMBLY
-
INSTALL NO. 2 HYBRID BATTERY INTAKE DUCT (for RH Side)
-
INSTALL NO. 1 HYBRID BATTERY INTAKE DUCT (for RH Side)
-
INSTALL HYBRID BATTERY HOSE ASSEMBLY
-
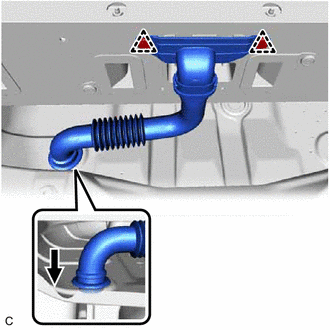
Install the hybrid battery hose assembly to the HV battery with the 2 clips.
-
Connect the hybrid battery hose assembly to the vehicle.
-
-
INSTALL NO. 3 HYBRID BATTERY INTAKE DUCT (for LH Side)
-
INSTALL NO. 3 HYBRID BATTERY INTAKE DUCT (for RH Side)
-
INSTALL DECK TRIM SIDE PANEL ASSEMBLY RH
-
INSTALL NO. 1 LUGGAGE COMPARTMENT LIGHT ASSEMBLY
-
INSTALL TONNEAU COVER HOOK A (for RH Side with Toyota Safety Sense)
-
INSTALL NO. 1 TONNEAU COVER HOLDER CAP (for RH Side with Toyota Safety Sense)
-
INSTALL NO. 2 ROPE HOOK (for RH Side without Toyota Safety Sense)
-
INSTALL ROPE HOOK (for RH Side without Toyota Safety Sense)
-
INSTALL REAR SEAT SIDE GARNISH LH
-
INSTALL REAR SEATBACK HINGE SUB-ASSEMBLY LH
-
INSTALL REAR DOOR OPENING TRIM WEATHERSTRIP LH
-
INSTALL REAR SEAT SIDE GARNISH RH
-
INSTALL REAR SEATBACK HINGE SUB-ASSEMBLY RH
-
INSTALL REAR DOOR OPENING TRIM WEATHERSTRIP RH
-
INSTALL NO. 3 INDOOR ELECTRICAL KEY ANTENNA ASSEMBLY
-
INSTALL REAR DECK TRIM COVER
-
INSTALL DECK TRIM SERVICE HOLE COVER
-
INSTALL DECK FLOOR BOX LH
-
INSTALL DECK FLOOR BOX RH
-
INSTALL REAR NO. 4 FLOOR BOARD
-
INSTALL REAR NO. 3 FLOOR BOARD
-
INSTALL SERVICE PLUG GRIP
-
PERFORM UTILITY
Note
-
Perform "Battery Diagnosis" after replacing the malfunctioning HV battery.
-
Perform "Battery Status Info Update" after replacing the malfunctioning HV battery.
-