NAME PLATE INSTALLATION
CAUTION / NOTICE / HINT
Tech Tips
-
Use the same procedure for the RH side and LH side.
-
The following procedure is for the LH side.
PROCEDURE
-
INSTALL SIDE PANEL EMBLEM
-
Clean the vehicle body surface.
-
Using a piece of cloth, rub the double-sided tape off the vehicle body.
-
Using a non-residue solvent, clean the attachment surface.
-
-
Using an infrared light, heat the vehicle body and a new side panel emblem.
Heating Temperature Item Temperature Vehicle Body 40 to 60°C (104 to 140°F)
3 to 5 minutes
Side Panel Emblem 20 to 30°C (68 to 86°F)
1 to 2 minutes
-
Remove the peeling paper on the new side panel emblem.
-
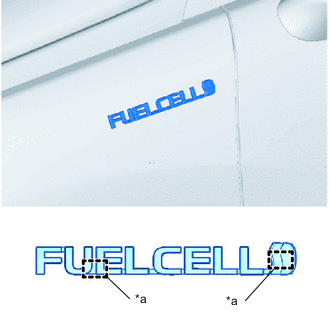
*a Location Pin Engage the location pins to install the side panel emblem.
Tech Tips
Apply sufficient pressure when attaching the side panel emblem to ensure proper adhesion.
-
-
INSTALL NO. 3 LUGGAGE COMPARTMENT DOOR NAME PLATE
-
Clean the vehicle body surface.
-
Using a piece of cloth, rub the double-sided tape off the vehicle body.
-
Using a non-residue solvent, clean the attachment surface.
-
-
Using an infrared light, heat the vehicle body and a new No. 3 luggage compartment door name plate.
Heating Temperature Item Temperature Vehicle Body 40 to 60°C (104 to 140°F)
3 to 5 minutes
No. 3 Luggage Compartment Door Name Plate 20 to 30°C (68 to 86°F)
1 to 2 minutes
CAUTION:
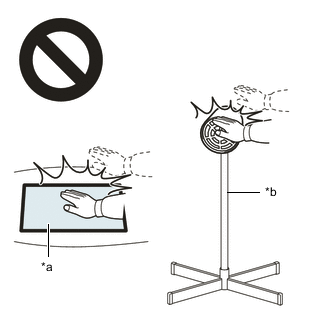
*a Heated Part *b Infrared Light
-
Do not touch the infrared light and heated parts.
-
Touching the infrared light may result in burns.
-
Touching heated parts for a long time may result in burns.
-
-
Remove the peeling paper on the new No. 3 luggage compartment door name plate.
-
Install the No. 3 luggage compartment door name plate as shown in the illustration.
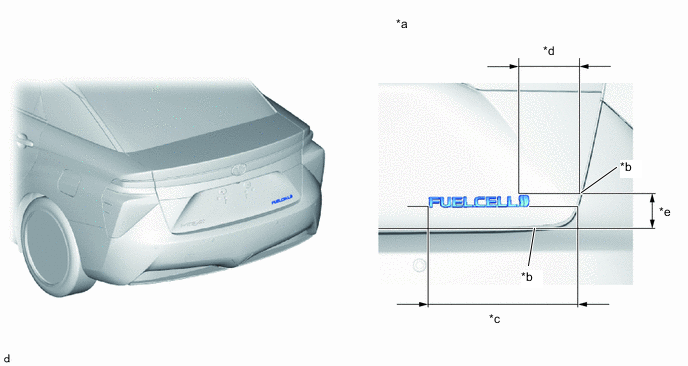
*a Reference Values *b Radius End Point of Back Door *c 250.7 mm (9.87 in.) *d 102.9 mm (4.05 in.) *e 56.2 mm (2.21 in.) - -
-
-
INSTALL NO. 2 LUGGAGE COMPARTMENT DOOR NAME PLATE
-
Clean the vehicle body surface.
-
Using a piece of cloth, rub the double-sided tape off the vehicle body.
-
Using a non-residue solvent, clean the attachment surface.
-
-
Using an infrared light, heat the vehicle body and a new No. 2 luggage compartment door name plate.
Heating Temperature Item Temperature Vehicle Body 40 to 60°C (104 to 140°F)
3 to 5 minutes
No. 2 Luggage Compartment Door Name Plate 20 to 30°C (68 to 86°F)
1 to 2 minutes
CAUTION:

*a Heated Part *b Infrared Light
-
Do not touch the infrared light and heated parts.
-
Touching the infrared light may result in burns.
-
Touching heated parts for a long time may result in burns.
-
-
Remove the peeling paper on the new No. 2 luggage compartment door name plate.
-
Install the No. 2 luggage compartment door name plate as shown in the illustration.
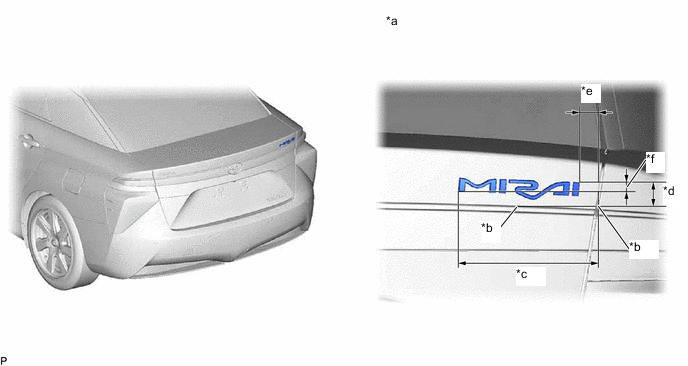
*a Reference Values *b Radius End Point of Back Door *c 205 mm (8.07 in.) *d 35.4 mm (1.39 in.) *e 31.1 mm (1.22 in.) *f 12.7 mm (0.50 in.)
-
-
INSTALL BACK DOOR NAME PLATE
-
Clean the vehicle body surface.
-
Using a piece of cloth, rub the double-sided tape off the vehicle body.
-
Using a non-residue solvent, clean the attachment surface.
-
-

*a Heated Part *b Infrared Light Using an infrared light, heat the vehicle body and a new back door name plate.
Heating Temperature Item Temperature Vehicle Body 40 to 60°C (104 to 140°F)
3 to 5 minutes
Back Door Name Plate 20 to 30°C (68 to 86°F)
1 to 2 minutes
CAUTION:
-
Do not touch the infrared light and heated parts.
-
Touching the infrared light may result in burns.
-
Touching heated parts for a long time may result in burns.
-
-
Remove the peeling paper on the new back door name plate.
-
Install the back door name plate as shown in the illustration.
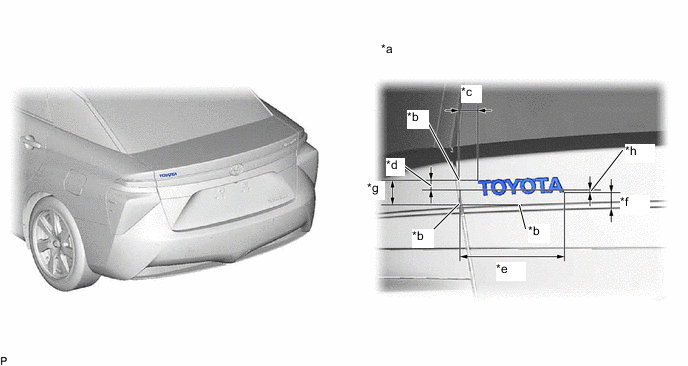
*a Reference Values *b Radius End Point of Back Door *c 30.4 mm (1.20 in.) *d 12.5 mm (0.49 in.) *e 153.7 mm (6.05 in.) *f 13.7 mm (0.54 in.) *g 35.1 mm (1.38 in.) *h 4.2 mm (0.17 in.)
-
-
INSTALL LUGGAGE COMPARTMENT DOOR EMBLEM
-
Using a piece of cloth, rub the double-sided tape off the luggage compartment door outside garnish.
-
Clean the luggage compartment door outside garnish surface.
-
Using a non-residue solvent, clean the attachment surface.
-
-
Using an infrared light, heat the luggage compartment door outside garnish and a new luggage compartment door emblem.
Heating Temperature Item Temperature Luggage Compartment Door Outside Garnish 40 to 60°C (104 to 140°F)
3 to 5 minutes
Luggage Compartment Door Emblem 20 to 30°C (68 to 86°F)
1 to 2 minutes
-
Remove the peeling paper on a new luggage compartment door emblem.
-
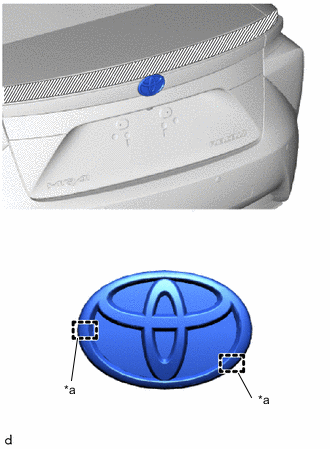
*a Location Pin Engage the location pins to install the luggage compartment door emblem.
Tech Tips
Apply sufficient pressure when attaching the luggage compartment door emblem to ensure proper adhesion.
-