LUGGAGE COMPARTMENT DOOR WEATHERSTRIP INSTALLATION
PROCEDURE
-
INSTALL LUGGAGE COMPARTMENT DOOR WEATHERSTRIP
-
Clean the vehicle body.
-


Install in this Direction Temporarily install a new luggage compartment door weatherstrip as shown in the illustration.
Note
While removing, do not allow the non-drying sealer to adhere to the vehicle body or trunk panel (luggage compartment door).
-
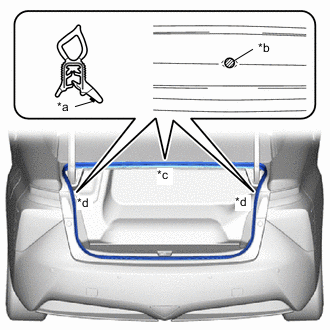
*a Paint Mark *b Mark Position *c Center Mark *d Corner Mark Align the point mark on the luggage compartment door weatherstrip with the mark position on the vehicle to install the luggage compartment door weatherstrip as shown in the illustration.
Paint Mark Location Color Center Mark White Corner Mark Pink Note
-
Always align the paint mark when installing the port. If the paint mark position is out of place, coolant leaks may occur.
-
After the installation, check that thecorners are properly installed.
Tech Tips
To easily install the luggage compartment door weatherstrip, first install the area with the paint mark as shown in the illustration. Then install the part to ward the corners and push any excess length into the corners.
-
-
-
INSTALL NO. 1 LUGGAGE COMPARTMENT UPPER COVER LH
-
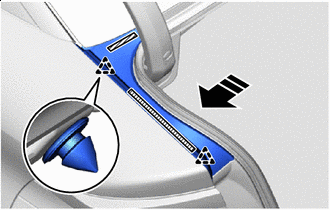

Double-side Tape Install in this Direction Engage the clips to install a new No. 1 luggage compartment upper cover LH as shown in the illustration.
Tech Tips
Remove the release paper before to install it.
-
Press the double-side tape area of the No. 1 luggage compartment upper cover LH.
-
-
INSTALL NO. 1 LUGGAGE COMPARTMENT UPPER COVER RH
Tech Tips
Use the same procedure described for the LH side.
-
INSTALL REAR COMBINATION LIGHT COVER LH
-
INSTALL REAR COMBINATION LIGHT COVER RH
Tech Tips
Use the same procedure described for the LH side.
-
INSTALL REAR FLOOR FINISH PLATE
-
INSTALL LUGGAGE COMPARTMENT FLOOR MAT