ROOF HEADLINING REMOVAL
CAUTION / NOTICE / HINT
CAUTION:
Some of these service operations affect the SRS airbag system. Read the precautionary notices concerning the SRS airbag system before servicing.
PROCEDURE
-
REMOVE FRONT SEAT ASSEMBLY LH
-
REMOVE FRONT SEAT ASSEMBLY RH
Tech Tips
Use the same procedure as for the LH side.
-
REMOVE REAR SEAT ASSEMBLY
-
REMOVE FRONT CONSOLE BOX
-
REMOVE NO. 1 INSTRUMENT PANEL SPEAKER PANEL SUB-ASSEMBLY
-
REMOVE NO. 2 INSTRUMENT PANEL SPEAKER PANEL SUB-ASSEMBLY
Tech Tips
Use the same procedure as for the No. 1 side.
-
REMOVE NO. 1 INSTRUMENT PANEL CUSHION
-
REMOVE FRONT DOOR OPENING TRIM WEATHERSTRIP LH
-
REMOVE FRONT DOOR OPENING TRIM WEATHERSTRIP RH
Tech Tips
Use the same procedure as for the LH side.
-
REMOVE FRONT PILLAR GARNISH LH
-
REMOVE FRONT PILLAR GARNISH RH
Tech Tips
Use the same procedure as for the LH side.
-
REMOVE REAR DOOR SCUFF PLATE LH
-
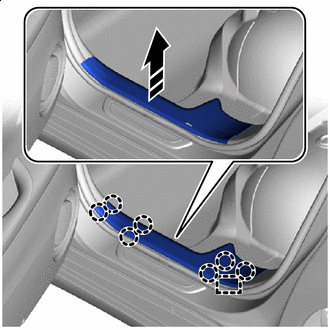

Remove in this Direction Disengage the claws and guide to remove the rear door scuff plate LH as shown in the illustration.
-
-
REMOVE REAR DOOR SCUFF PLATE RH
Tech Tips
Use the same procedure as for the LH side.
-
REMOVE REAR DOOR OPENING TRIM WEATHERSTRIP LH
-
REMOVE REAR DOOR OPENING TRIM WEATHERSTRIP RH
Tech Tips
Use the same procedure as for the LH side.
-
REMOVE LAP BELT OUTER ANCHOR COVER
Tech Tips
Use the same procedures for the opposite side.
-
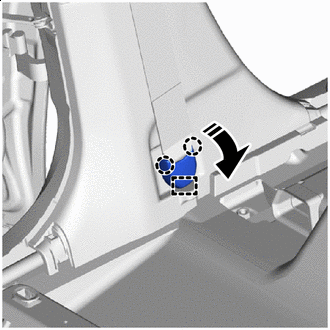
Remove in this Direction Disengage the claws and guide to remove the lap belt outer anchor cover as shown in the illustration.
-
-
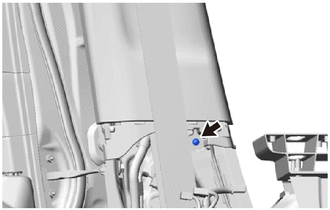
DISCONNECT FRONT SEAT OUTER BELT ASSEMBLY LH
-
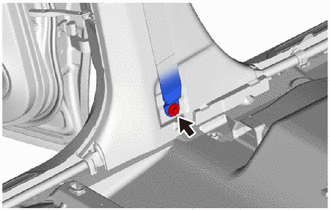
Remove the bolt to disconnect the front seat outer belt assembly LH.
-
-
DISCONNECT FRONT SEAT OUTER BELT ASSEMBLY RH
Tech Tips
Use the same procedure as for the LH side.
-
REMOVE CENTER PILLAR LOWER GARNISH LH
-


Place Hands Here Remove in this Direction Disengage the claws and clips to remove the center pillar lower garnish LH as shown in the illustration.
-
-
REMOVE CENTER PILLAR LOWER GARNISH RH
Tech Tips
Use the same procedure as for the LH side.
-
REMOVE CENTER PILLAR GARNISH ASSEMBLY LH
-
Remove the screw.
-
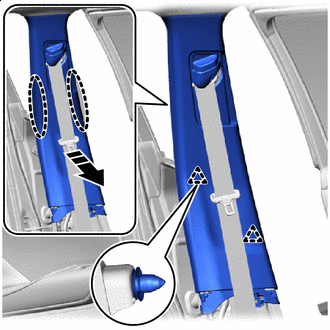
Place Hands Here Remove in this Direction Disengage the clips as shown in the illustration.
-
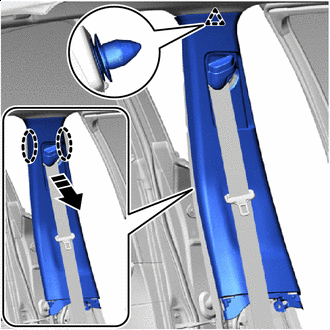
Place Hands Here Remove in this Direction Disengage the clip to remove the center pillar garnish assembly LH as shown in the illustration.
-
-
REMOVE CENTER PILLAR GARNISH ASSEMBLY RH
Tech Tips
Use the same procedure as for the LH side.
-
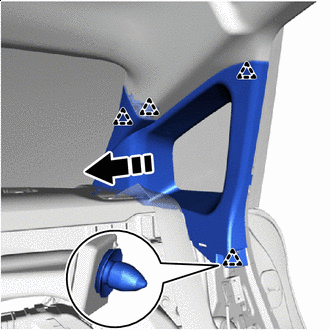
REMOVE REAR SEAT SIDE GARNISH LH
-
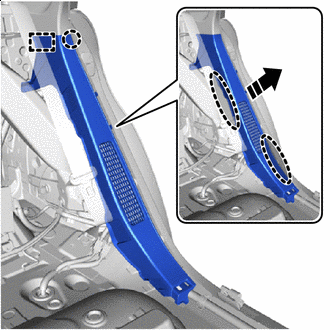
Place Hands Here Remove in this Direction Disengage the claw and guide to remove the rear seat side garnish LH as shown in the illustration.
-
-
REMOVE REAR SEAT SIDE GARNISH RH
Tech Tips
Use the same procedure as for the LH side.
-
REMOVE ROOF SIDE INNER GARNISH ASSEMBLY LH
-
Remove in this Direction Disengage the clips as shown in the illustration.
-
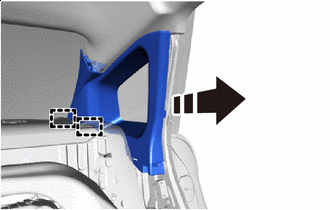
Remove in this Direction Disengage the guides to remove the roof side inner garnish assembly LH as shown in the illustration.
-
-
REMOVE ROOF SIDE INNER GARNISH ASSEMBLY RH
Tech Tips
Use the same procedure as for the LH side.
-
REMOVE PROTECTOR
-
REMOVE RAIN SENSOR COVER
-
REMOVE INNER REAR VIEW MIRROR STAY HOLDER COVER
-
REMOVE NO. 1 LANE RECOGNITION COVER (w/ Lane Departure Alert System)
-
REMOVE MAP LIGHT ASSEMBLY
-
REMOVE NO. 1 ROOM LIGHT ASSEMBLY
-
REMOVE ASSIST GRIP SUB-ASSEMBLY
Tech Tips
Using the same procedure, remove every assist grip sub-assembly.
-
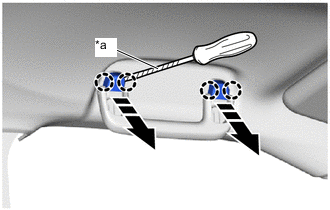
*a Protective Tape Remove in this Direction Using a screwdriver with its tip wrapped in protective tape, disengage the claws to remove the 2 assist grip covers as shown in the illustration.
-
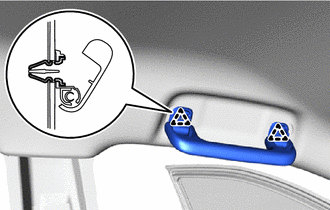
Disengage the clips to remove the assist grip sub-assembly.
-
Remove the 2 clips from the body.
-
-
REMOVE VISOR BRACKET COVER LH
-
Remove in this Direction Disengage the claws to remove the visor bracket cover LH as shown in the illustration.
-
-
REMOVE VISOR BRACKET COVER RH
Tech Tips
Use the same procedure as for the LH side.
-
REMOVE VISOR ASSEMBLY LH
-
Remove the 2 screws.
-
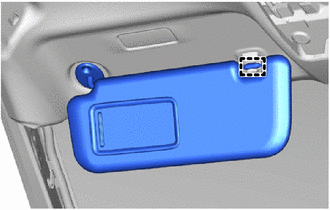
Disengage the guide to remove the visor assembly LH as shown in the illustration.
-
-
REMOVE VISOR ASSEMBLY RH
Tech Tips
Use the same procedure as for the LH side.
-
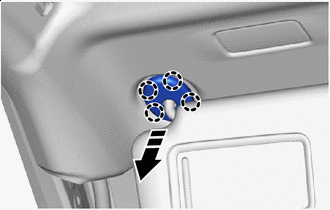
REMOVE VISOR HOLDER LH
-
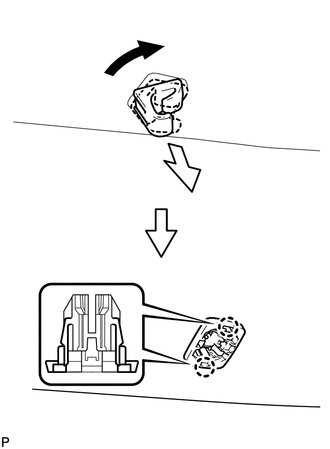
Turn the visor holder clockwise approximately 45° and pull it out as shown in the illustration.
-
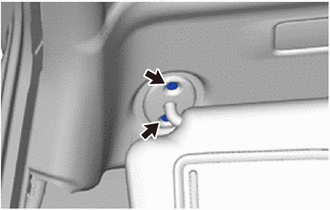
Disengage the claws to remove the visor holder LH.
-
-
REMOVE VISOR HOLDER RH
Tech Tips
Use the same procedure as for the LH side.
-
REMOVE VANITY LIGHT ASSEMBLY
-
REMOVE ROOF HEADLINING ASSEMBLY
-
Disconnect the 2 connectors.
-
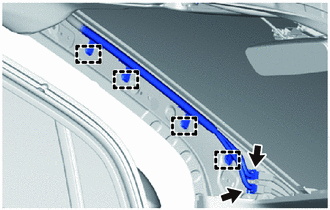
Disengage the clamps.
-
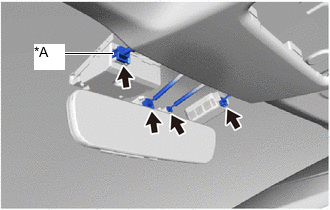
*A w/ Lane Departure Alert System w/ Lane Departure Alert System:
-
Disconnect the connector.
-
-
Disconnect the 3 connectors.
-
Disengage the guides as shown in the illustration.
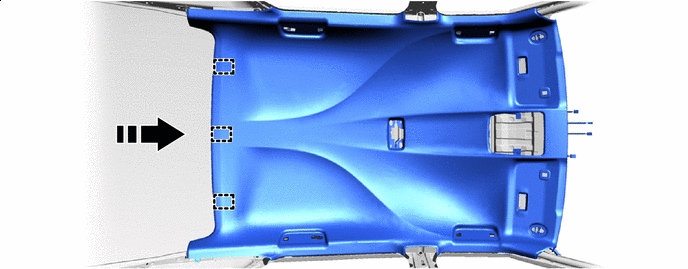
Remove in this Direction - - -
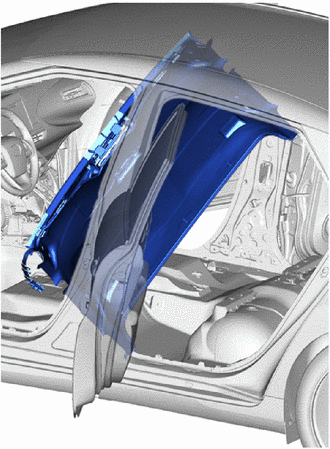
As shown in the illustration, tilt the roof headlining assembly, and while bending it slightly, remove it from the vehicle through the rear door.
Note
Remove the roof headlining assembly without wrinkling it.
-
Remove the 3 clips from the body.
-