REAR SEAT ASSEMBLY REASSEMBLY
PROCEDURE
-
INSTALL SEPARATE TYPE REAR SEAT CUSHION COVER (for LH Side)
-
Temporarily install the separate type rear seat cushion cover.
Tech Tips
-
When installing the seat cover, refer to the hints to prevent wrinkles in the separate type rear seat cushion cover.
-
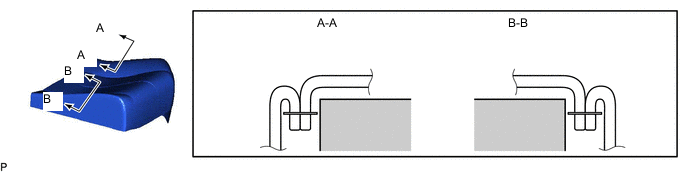
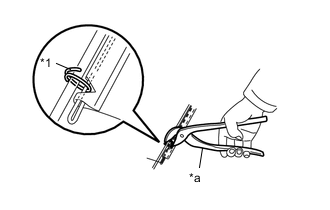
In stitch:
-
As shown in the illustration, adjust the cover seam allowance portions so that they are in the same direction.
-
-
Using hog ring pliers, securely install 14 new hog rings in the order shown in the illustration.
Note
-
Be careful not to damage or contaminate the separate type rear seat cushion cover.
-

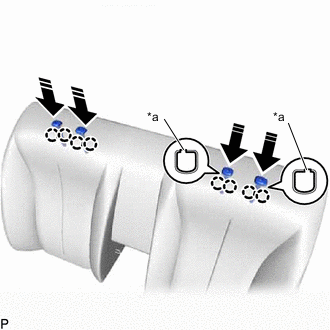
*1 Hog Ring *a Hog Ring Pliers Align the centers of the straps with the center of the rear seat cushion pad LH so that wrinkles do not form, and securely fasten the hog rings as shown in the illustration.
-
-
Engage the hooks and J hooks to install the separate type rear seat cushion cover.
-
-
INSTALL SEPARATE TYPE REAR SEAT CUSHION COVER (for RH Side)
Tech Tips
Use the same procedure as for the LH side.
-
INSTALL BENCH TYPE REAR SEATBACK COVER
-
Temporarily install the bench type rear seatback cover.
Tech Tips
-
When installing the seat cover, refer to the hints to prevent wrinkles in the bench type rear seatback cover.
-
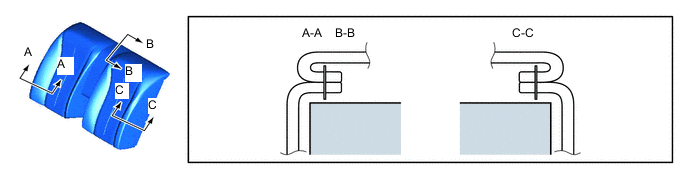
In stitch:
-
As shown in the illustration, adjust the cover seam allowance portions so that they are in the same direction.
-
-
Using hog ring pliers, securely install 22 new hog rings in the order shown in the illustration.
Note
-
Be careful not to damage or contaminate the bench type rear seatback cover.
-

*1 Hog Ring *a Hog Ring Pliers Align the centers of the straps with the center of the rear seatback pad so that wrinkles do not form, and securely fasten the hog rings as shown in the illustration.
-
-
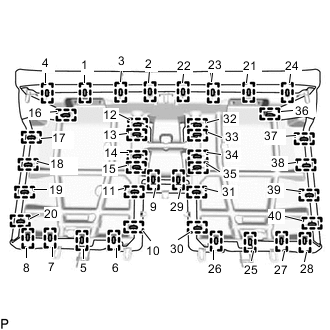
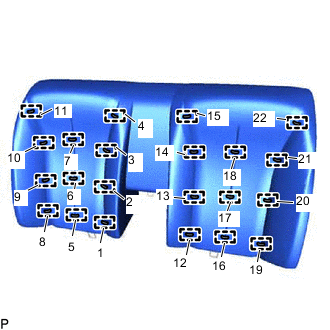
Using hog ring pliers, securely install 40 new hog rings in the order shown in the illustration, and install the bench type rear seatback cover.
Note
-
Be careful not to damage or contaminate the bench type rear seat back cover.
-
*1 Hog Ring *a Hog Ring Pliers Align the centers of the straps with the center of the rear seatback pad so that wrinkles do not form, and securely fasten the hog rings as shown in the illustration.
-
-
-
INSTALL REAR SEAT HEADREST SUPPORT
-
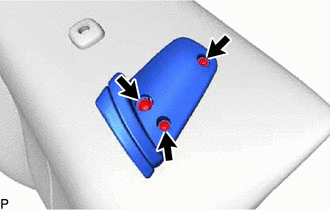
*a Protrusion 
Install in this Direction Engage the protrusion of the rear seat headrest supports with the groove in the installation portion of the rear seatback frame sub-assembly.
-
Push in the direction indicated by the arrows in the illustration, engage the claws to install the 4 rear seat headrest supports.
-
-
INSTALL REAR SEAT SHOULDER BELT GUIDE LH
-
Install the rear seat shoulder belt guide LH with the 3 screws.
-
-
INSTALL REAR SEAT SHOULDER BELT GUIDE RH
Tech Tips
Use the same procedure as for the LH side.
-
INSTALL REAR SEAT HEADREST ASSEMBLY
-
Install the 2 rear seat headrest assemblies.
-