RADIO RECEIVER INSTALLATION
CAUTION / NOTICE / HINT
Tech Tips
-
Use the same procedure for RHD and LHD vehicle.
-
The procedure listed below is for LHD vehicles.
PROCEDURE
-
INSTALL NAVIGATION COMPUTER ASSEMBLY
-
Install the navigation computer assembly.
-
-
INSTALL NO. 1 RADIO RECEIVER BRACKET
-
Install the No. 1 radio receiver bracket with the 5 bolts.
-
-
INSTALL NO. 2 RADIO RECEIVER BRACKET
-
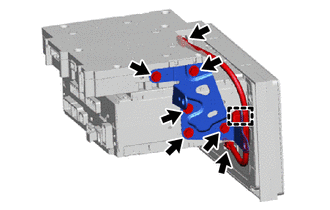
Engage the clamp to install the telephone antenna cord sub-assembly.
-
Install the No. 2 radio receiver bracket with the 5 bolts.
-
Connect the 2 connectors.
-
-
INSTALL NAVIGATION WIRE
-
Connect the connectors to install the navigation wire.
-
-
INSTALL RADIO RECEIVER ASSEMBLY
-
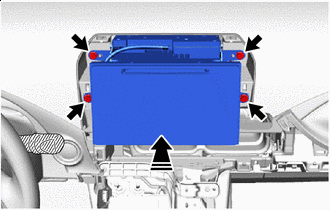

Install in this Direction Connect the connectors.
-
Push in the direction shown by the arrow in the illustration, and temporarily install the radio receiver assembly.
-
Install the radio receiver assembly with the 4 bolts.
-
-
INSTALL INSTRUMENT PANEL CENTER REGISTER ASSEMBLY
-
CONNECT INTEGRATION CONTROL AND PANEL ASSEMBLY
-
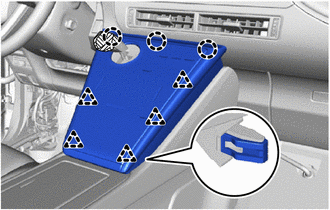
Align the positions of the claws and the clips, and temporarily install the integration control panel assembly.
-
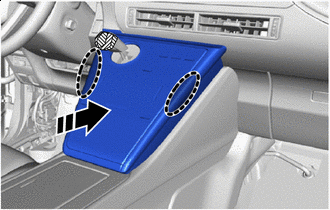

Place Hands Here Install in this Direction Press inward in the direction shown by the arrows in the illustration, engage the claws and the clips, and connect the integration and panel assembly.
Tech Tips
Check that the claw at the position shown in the illustration is engaged, and if it is raised up or not properly engaged, press the claw portion inward to engage it.

-
Remove the protective tape.
-
-
CONNECT CABLE TO NEGATIVE AUXILIARY BATTERY TERMINAL
-
INSTALL LUGGAGE TRIM SERVICE HOLE COVER