REAR SHOCK ABSORBER INSTALLATION

CAUTION / NOTICE / HINT
Tech Tips
-
Use the same procedure for the RH side and LH side.
-
The following procedure is for the LH side.
PROCEDURE
-
INSTALL REAR NO. 1 SPRING BUMPER
-
Install the rear No. 1 spring bumper to the rear shock absorber assembly.
Note
Make sure there is no dirt or other foreign matter adhering to the threaded portion of the rear shock absorber assembly.
-
-
TEMPORARILY TIGHTEN REAR SHOCK ABSORBER ASSEMBLY
-
Insert the upper end of the rear shock absorber assembly with rear suspension support assembly into the vehicle.
-
Temporarily install the rear shock absorber assembly to the rear axle beam assembly with the bolt and nut.
Note
Because the nut has its own stopper, do not turn the nut. Tighten the bolt with the nut secured.
Tech Tips
Insert the bolt with the threaded end facing the outside of the vehicle.
-
-
INSTALL REAR SUSPENSION SUPPORT
-
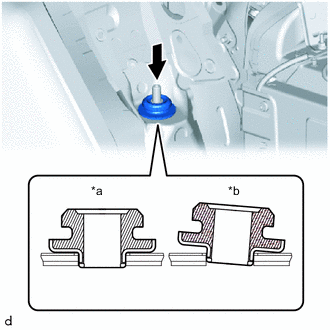
*a Correct *b Incorrect Install the rear suspension support to the rear shock absorber assembly.
Note
Make sure that the rear suspension support is correctly installed as shown in the illustration.
-
-
INSTALL REAR SHOCK ABSORBER CUSHION RETAINER
-
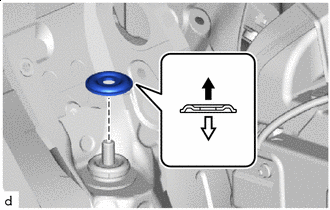

Upper Side of Vehicle 
Lower Side of Vehicle Install the rear shock absorber cushion retainer to the rear shock absorber assembly.
Note
Be sure to install the rear shock absorber cushion retainer in the correct direction.
-
Apply a few drops of adhesive to 2 or 3 threads at a new nut.
Adhesive Toyota Genuine Adhesive 1324, Three Bond 1324 or equivalent -
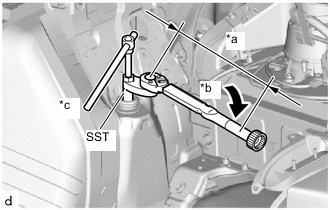
*a Torque Wrench Fulcrum Length *b Turn *c Hold Using a SST, fully tighten the nut while holding the rod of the rear shock absorber assembly with a 6 mm long socket hexagon wrench.
- SST
- 09729-97202
- Torque:
- 25 N*m { 255 kgf*cm, 18 ft.*lbf }
Tech Tips
-
Calculate the torque wrench reading when changing the fulcrum length of the torque wrench.
-
When using a SST (fulcrum length of 30 mm (1.18 in.)) + torque wrench (fulcrum length of 180 mm (7.09 in.)): 20.5 N*m (209 kgf*cm, 15 ft.*lbf)
-
-
INSTALL REAR HEIGHT CONTROL SENSOR SUB-ASSEMBLY
-
INSTALL NO. 3 BODY MOUNTING BRACKET SUB-ASSEMBLY LH
-
INSTALL NO. 3 BODY MOUNTING BRACKET SUB-ASSEMBLY RH
-
INSTALL LUGGAGE COMPARTMENT TRIM COVER ASSEMBLY LH
-
INSTALL LUGGAGE COMPARTMENT TRIM COVER ASSEMBLY RH
-
INSTALL ROPE HOOK
-
INSTALL REAR FLOOR FINISH PLATE
-
INSTALL FRONT LUGGAGE COMPARTMENT TRIM COVER
-
INSTALL NO. 2 LUGGAGE COMPARTMENT TRIM HOOK
-
INSTALL NO. 1 LUGGAGE COMPARTMENT LIGHT ASSEMBLY
-
INSTALL LUGGAGE COMPARTMENT FLOOR MAT
-
INSTALL REAR WHEEL
-
STABILIZE SUSPENSION
-
Lower the vehicle.
-
Bounce the vehicle up and down several times to stabilize the suspension.
-
Measure the vehicle height.
-
-
FULLY TIGHTEN REAR SHOCK ABSORBER ASSEMBLY
-

Fully tighten the bolt and nut of the rear shock absorber assembly.
- Torque:
- 90 N*m { 918 kgf*cm, 66 ft.*lbf }
Note
Because the nut has its own stopper, do not turn the nut. Tighten the bolt with the nut secured.
-
-
INSPECT REAR WHEEL ALIGNMENT
-
PERFORM YAW RATE AND ACCELERATION SENSOR CALIBRATION
-
ADJUST LANE DEPARTURE WARNING CAMERA
-
PERFORM INITIALIZATION
-
Initialization of the headlight light control ECU sub-assembly LH.
-