SERVICE PLUG GRIP INSTALLATION
PROCEDURE
-
INSTALL FC STACK SERVICE PLUG GRIP
CAUTION:
Wear insulated gloves.
Note
Before connecting the FC stack service plug grip, check that no components or tools have been left behind, and check that high voltage terminals are tightened and connectors are connected.
-
To prevent contamination by foreign matter or water droplets, remove the protective tape from the openings of the FC stack service plug grip and FC stack assembly immediately before performing the procedure.
-
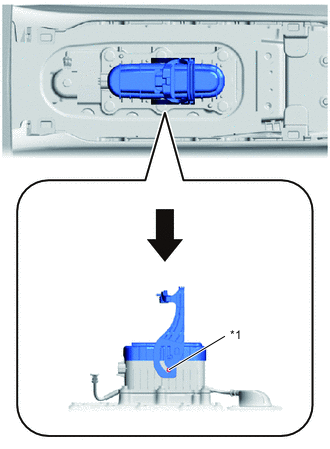
*1 Stopper 
Push In Slowly push in the FC stack service plug grip until its lever contacts the stopper to install the FC stack service plug grip to the FC stack assembly.
-

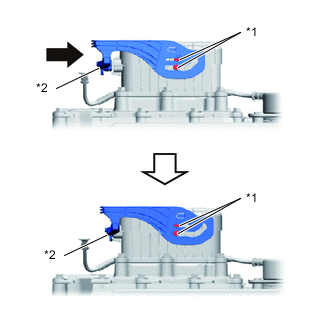
*1 Stopper *2 Interlock Connector Rotating Direction Slowly rotate the lever of the FC stack service plug grip in the direction shown in the illustration until it contacts the stopper.
Note
-
Do not touch the rubber seal of the FC stack service plug grip interlock connector.
-
Do not excessively twist the lever of the FC stack service plug grip.
-
-
*1 Stopper *2 Interlock Connector Sliding Direction Slide the lever of the FC stack service plug grip in the direction shown in the illustration until it contacts the stopper.
Note
-
Slide the lever of the FC stack service plug grip in the until the word "UNLOCK" disappears completely.
-
The FC stack service plug grip has an interlock connector, so slide it horizontally.
-
After lowering the lever of the FC stack service plug grip 90°, securely slide it until a "click" sound is heard.

*a Correct *b Incorrect -
-
-
INSTALL FRONT FLOOR HOLE SEAL
-
Install a new front floor hole seal to the front floor service hole cover.
Note
Make sure the front floor hole seal has no twists, slack, etc., and that it is securely installed into the groove of the front floor service hole cover.
-
-
INSTALL FRONT FLOOR SERVICE HOLE COVER
-
Install the front floor service hole cover to the vehicle with the 4 bolts.
- Torque:
- 5.4 N*m { 55 kgf*cm, 48 in.*lbf }
-
Install the front floor carpet assembly.
-
-
INSTALL NO. 1 CONSOLE BOX DUCT
-
INSTALL NO. 2 CONSOLE BOX DUCT
-
INSTALL CONSOLE COMPARTMENT BOX ASSEMBLY
-
INSTALL FRONT CONSOLE BOX COVER
-
INSTALL INTEGRATION CONTROL AND PANEL ASSEMBLY
-
CONNECT CABLE TO NEGATIVE AUXILIARY BATTERY TERMINAL
-
INSTALL LUGGAGE TRIM SERVICE HOLE COVER