FC CONTROL SYSTEM, Diagnostic DTC:P0100-450
| DTC Code | DTC Name |
|---|---|
| P0100-450 | Mass Air Flow Circuit |
DESCRIPTION
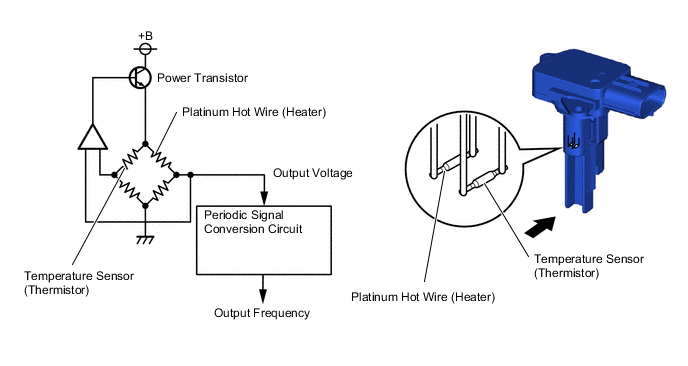
The mass air flow meter consists of a platinum hot wire, temperature sensor and control circuit installed in a plastic housing. The temperature sensor (located in the intake air by-pass of the housing) detects the intake air temperature.
There is little variation in the output from the mass air flow meter, as it is hardly affected by the resistance of the wire harness.
The internal circuit of the mass air flow meter contains a hot wire and cold wire. A voltage is output through a bridge circuit (refer to the illustration) indicating the cooling of the hot wire according to the intake air amount. This voltage is then converted into a periodic signal by the periodic signal conversion circuit and output to the FC control ECU.
The frequency varies between approximately 250 and 11000 Hz depending on the air flow rate. The FC control ECU calculates the mass air flow rate based on this frequency.
| DTC No. | Detection Item | DTC Detection Condition | Trouble Area | Warning Indicate |
|---|---|---|---|---|
| P0100-450 | Mass Air Flow Circuit | All of the following conditions are met, and the output frequency of the mass air flow meter is less than 0.75 kHz and such a frequency continues for 3 seconds or more:
(1 trip detection logic) |
|
Master Warning Light: Comes on |
| Vehicle Condition | FC shutdown (power switch on (IG)) |
FC startup process | FC intermittent operation | FC is generating power (vehicle is in stationary) |
FC is generating power (vehicle is traveling) |
FC shutdown process |
|---|---|---|---|---|---|---|
| Data List "FC Mode" |
FC Shutdown | FC Startup Process | FC Working | FC Shutdown Process | ||
| Data List "FC Intermittent Operation" |
OFF | ON | OFF | OFF | ||
| DTC Detection | - | ○ | ○ | ○ | ○ | - |
Tech Tips
By accessing the "FC Mode" and "FC Intermittent Operation" in the freeze frame data, the FC system condition at the time the malfunction occurred can be checked.
| DTC No. | Data List |
|---|---|
| P0100-450 | Mass Air Flow Sensor Output Frequency |
The following items can be helpful when performing repairs:
-
Mass Air Flow Value
-
Air Compressor Revolution
-
FC Mode
Data List
Tech Tips
It is suspected that the mass air flow sensor is malfunctioning, an open circuit has occurred, or there is something wrong with the mass air flow meter power voltage.
WIRING DIAGRAM
CAUTION / NOTICE / HINT
Note
-
Inspect the fuses of circuits related to this system before performing the following procedure.
-
When the vehicle is parked with the power switch off, if the FC control ECU judges that the FC stack temperature will go below 0°C (32°F), it activates the FC air compressor, hydrogen pump and FC cooling water pump for a maximum of 180 seconds and drains water from the FC stack assembly. When performing inspection or repairs with the power switch off (not on (IG) or on (READY)), disconnect the cable from the negative (-) auxiliary battery terminal before performing work (If the auxiliary battery voltage is needed to conduct inspection, warm up the FC system beforehand).
Tech Tips
After the repair, clear the DTCs and perform the following procedure to check that DTCs are not output.
-
Connect the GTS to the DLC3.
-
Turn the power switch on (READY) with the shift lever in P, and check the Data List that "FC Mode" is FC Working.
-
Enter the following menus: Powertrain / FC / Active Test / FC Air Compressor
-
Set the "FC Air Compressor" to 1500 rpm on the GTS, and then drive it for 5 seconds.
PROCEDURE
-
CHECK DTC OUTPUT
-
Connect the GTS to the DLC3.
-
Turn the power switch on (IG).
-
Turn the GTS on.
-
Enter the following menus: Powertrain / FC / Trouble Codes.
-
Check for DTCs.
Powertrain > FC > Trouble CodesResult Result Proceed to Any of the following DTCs are also output. A P0100-450 only is output, or DTCs except the ones in the table below are also output. B Malfunction Content Relevant DTC Sensor and Actuator Circuit Malfunction P1DCC-450 Motor Room Side Hydrogen Detector Circuit Low P1DCD-450 Motor Room Side Hydrogen Detector Circuit High P1DD2-450 Tank Side Hydrogen Detector Circuit Low P1DD3-450 Tank Side Hydrogen Detector Circuit High U1162-450 Lost Communication with Hydrogen Filling System -
Turn the power switch off.
B 
GO TO STEP 6 Click here
A 
-
-
CHECK TERMINAL VOLTAGE (FC PWR2 RELAY VOLTAGE)
-

*1 Motor Compartment Relay Block *2 FC PWR2 Relay Holder Remove the FC PWR2 relay from the motor compartment relay block.
-
Turn the power switch on (IG).
-
Measure the voltage according to the value(s) in the table below.
Standard Voltage Tester Connection Condition Specified Condition 1 (FC PWR2 relay holder) - Body ground Power switch on (IG) 11 to 14 V -
Turn the power switch off.
-
Reinstall the FC PWR2 relay.
Result Proceed to OK NG
NG
CHECK HARNESS AND CONNECTOR (FC CONTROL ECU - FC PWR2 RELAY) Click here
OK
-
-
INSPECT RELAY (FC PWR2)
-
Inspect the FC PWR2 relay.
Result Proceed to OK NG
NG 
REPLACE RELAY (FC PWR2)
OK
-
-
CHECK HARNESS AND CONNECTOR (FC PWR2 RELAY - BODY GROUND)
-
*1 Motor Compartment Relay Block *2 FC PWR2 Relay Holder Remove the FC PWR2 relay from the motor compartment relay block.
-
Measure the resistance according to the value(s) in the table below.
Standard Resistance Tester Connection Condition Specified Condition 2 (FC PWR2 relay holder) - Body ground Always Below 1 Ω -
Reinstall the FC PWR2 relay.
Result Proceed to OK NG
NG
REPAIR OR REPLACE HARNESS OR CONNECTOR
OK
-
-
CHECK TERMINAL VOLTAGE (POWER SOURCE OF FC PWR2 RELAY)
-
*1 Motor Compartment Relay Block *2 FC PWR2 Relay Holder Remove the FC PWR2 relay from the motor compartment relay block.
-
Measure the voltage according to the value(s) in the table below.
Standard Voltage Tester Connection Condition Specified Condition 5 (FC PWR2 relay holder) - Body ground Power switch off 11 to 14 V -
Reinstall the FC PWR2 relay.
Result Proceed to OK NG
NG
REPAIR OR REPLACE HARNESS OR CONNECTOR
OK
-
-
CHECK TERMINAL VOLTAGE (POWER SOURCE OF MASS AIR FLOW METER)
-
Disconnect the mass air flow meter connector.
-
Turn the power switch on (IG).
-
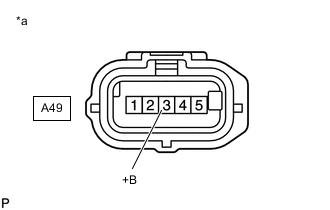
*a Front view of wire harness connector
(to Mass Air Flow Meter)
Measure the voltage according to the value(s) in the table below.
Standard Voltage Tester Connection Condition Specified Condition A49-3 (+B) - Body ground Power switch on (IG) 11 to 14 V -
Turn the power switch off.
-
Reconnect the mass air flow meter connector.
Result Proceed to OK NG
NG
REPAIR OR REPLACE HARNESS OR CONNECTOR (MASS AIR FLOW METER - FC PWR2 RELAY HOLDER)
OK
-
-
CHECK HARNESS AND CONNECTOR (FC CONTROL ECU - MASS AIR FLOW METER)
-
Disconnect the FC control ECU connector.
-
Disconnect the mass air flow meter connector.
-
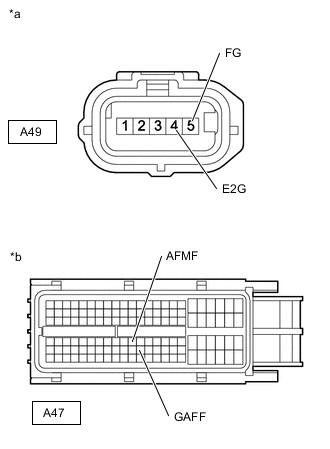
*a Front view of wire harness connector
(to Mass Air Flow Meter)
*b Front view of wire harness connector
(to FC Control ECU)
Measure the resistance according to the value(s) in the table below.
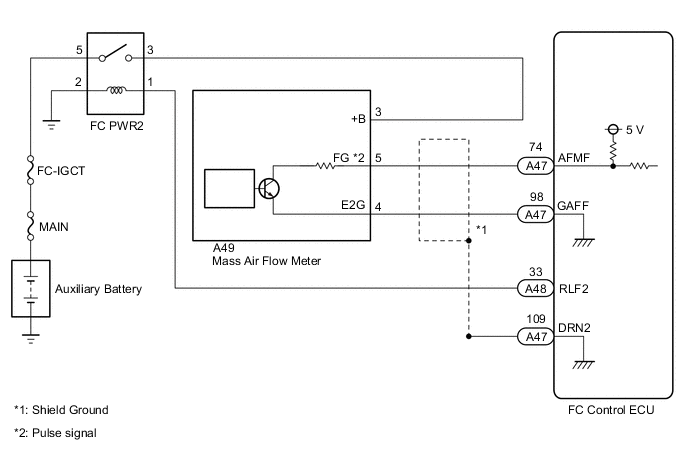
Standard Resistance Tester Connection Condition Specified Condition A47-74 (AFMF) - A49-5 (FG) Always Below 1 Ω A47-98 (GAFF) - A49-4 (E2G) Always Below 1 Ω A47-74 (AFMF) or A49-5 (FG) - Body ground and other terminals Always 10 kΩ or higher -
Reconnect the intake mass air flow meter sub-assembly connector.
-
Reconnect the FC control ECU connector.
Result Proceed to OK NG
NG
REPAIR OR REPLACE HARNESS OR CONNECTOR
OK
-
-
REPLACE MASS AIR FLOW METER
-
Result Proceed to NEXT
NEXT
-
-
CLEAR DTC
-
Connect the GTS to the DLC3.
-
Turn the power switch on (IG).
-
Turn the GTS on.
-
Enter the following menus: Powertrain / FC / Trouble Codes.
-
Clear the DTCs.
Powertrain > FC > Clear DTCs -
Turn the power switch off and wait for 3 minutes or more.
Result Proceed to NEXT
NEXT
-
-
CHECK DTC OUTPUT
-
Connect the GTS to the DLC3.
-
Turn the power switch on (READY).
-
Turn the GTS on.
-
Enter the following menus: Powertrain / FC / Active Test /
Powertrain > FC > Active TestTester Display FC Air Compressor -
Set the "FC Air Compressor" to 1500 rpm on the GTS, and then drive it for 5 seconds.
-
Enter the following menus: Powertrain / FC / Trouble Codes.
-
Check for DTCs.
Powertrain > FC > Trouble CodesResult Result Proceed to DTC P0100-450 is output A DTCs are not output B -
Turn the power switch off.
A
REPLACE FC CONTROL ECU Click here
B
END
-
-
CHECK HARNESS AND CONNECTOR (FC CONTROL ECU - FC PWR2 RELAY)
-
Disconnect the FC control ECU connector.
-
Remove the FC PWR2 relay from the motor compartment relay block.
-
Measure the resistance according to the value(s) in the table below.
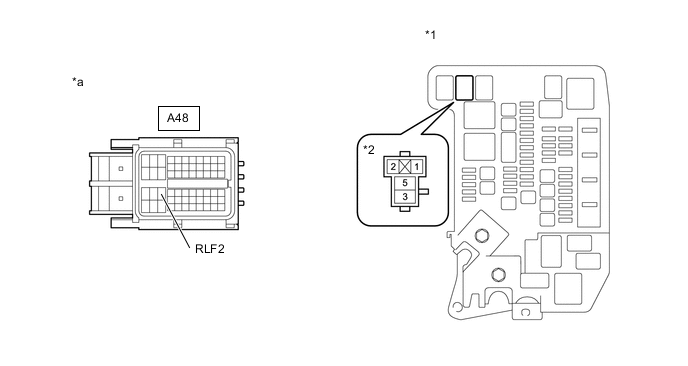
*1 Motor Compartment Relay Block *2 FC PWR2 Relay Holder *a Front view of wire harness connector
(to FC Control ECU)
- - Standard Resistance Tester Connection Condition Specified Condition A48-33 (RLF2) - 1 (FC PWR2 relay holder) Always Below 1 Ω A48-33 (RLF2) or 1 (FC PWR2 relay holder) - Body ground and other terminals Always 10 kΩ or higher -
Reinstall the FC PWR2 relay.
-
Reconnect the FC control ECU connector.
Result Proceed to OK NG
OK
REPLACE FC CONTROL ECU Click here
NG
REPAIR OR REPLACE HARNESS OR CONNECTOR (FC CONTROL ECU - FC PWR2 RELAY)
-