MOTOR COMPARTMENT CROSS MEMBER INSTALLATION
PROCEDURE
-
INSTALL NO. 3 FRAME CROSS MEMBER BRACKET SUB-ASSEMBLY RH
-
Install the No. 3 frame crossmember bracket sub-assembly RH to the vehicle with the 3 bolts.
- Torque:
- 85 N*m { 867 kgf*cm, 63 ft.*lbf }
-
Install the cooler bracket to the No. 3 frame crossmember bracket sub-assembly RH with the bolt and nut.
- Torque:
- 9.8 N*m { 100 kgf*cm, 87 in.*lbf }
-
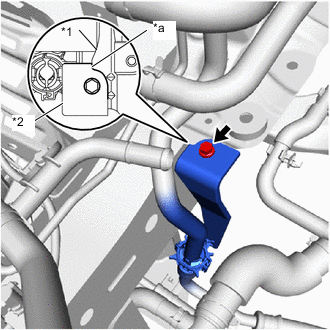
*1 No. 3 Frame Crossmember Bracket Sub-assembly RH *2 Cooler Bracket *a Contacting detent Install the cooler bracket to the No. 3 frame crossmember bracket sub-assembly RH with the bolt.
- Torque:
- 9.8 N*m { 100 kgf*cm, 87 in.*lbf }
Note
When installing, install with the detent portion of the cooler bracket contacting the No. 3 frame crossmember bracket sub-assembly RH.
-
Connect the frame wire to the No. 3 frame crossmember bracket sub-assembly RH with the bolt.
- Torque:
- 8.4 N*m { 86 kgf*cm, 74 in.*lbf }
-
Engage the clamp to install the hose clamp together with the FC cooling ion exchanger outlet hose and FC cooling ion exchanger inlet hose from the No .3 frame crossmember bracket sub-assembly.
-
-
INSTALL FRAME CENTER CROSSMEMBER PLATE
-
Engage the 2 clamps to install the front frame rod support outer LH to the frame center crossmember plate.
-
Engage the hook and temporarily install the frame center crossmember plate to the vehicle with the bolt.
-
Fully tighten the 4 bolts.
- Torque:
- 60 N*m { 612 kgf*cm, 44 ft.*lbf }
-
-
INSTALL CENTER FRAME CROSSMEMBER SUB-ASSEMBLY
-
Using "TORX" socket wrench E8, install the stud bolt to the center frame crossmember sub-assembly.
- Torque:
- 10 N*m { 102 kgf*cm, 7 ft.*lbf }
Tech Tips
This procedure is only performed when the stud bolt is being replaced with a new one.
-
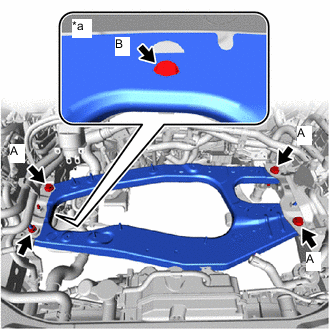
*a Bottom View Install the center frame crossmember sub-assembly to the frame center crossmember plate and No. 3 frame crossmember bracket sub-assembly with the 4 bolts and nut.
- Torque:
- Bolt A and Nut
- 60 N*m { 612 kgf*cm, 44 ft.*lbf }
- Bolt B
- 42 N*m { 428 kgf*cm, 31 ft.*lbf }
-

*a Temporarily Tighten Install the motor mounting insulator LH to the center frame crossmember sub-assembly with the 3 bolts in the sequence shown in the illustration.
- Torque:
- 72 N*m { 734 kgf*cm, 53 ft.*lbf }
-
Engage the hook and temporarily install the FC converter power outlet bracket to the center frame crossmember sub-assembly with the bolt.
-
Fully tighten the bolt.
- Torque:
- 8.0 N*m { 82 kgf*cm, 71 in.*lbf }
-
Engage the hook and temporarily install the motor cable bracket to the center frame crossmember sub-assembly with the bolt.
-
Fully tighten the bolt.
- Torque:
- 12 N*m { 122 kgf*cm, 9 ft.*lbf }
-
Engage the clamp to connect the hydrogen pump inverter cable to the center frame crossmember sub-assembly.
-
Install the bolt.
- Torque:
- 12 N*m { 122 kgf*cm, 9 ft.*lbf }
-
Engage the 2 clamps to connect the No. 3 motor wire to the center frame crossmember sub-assembly.
-
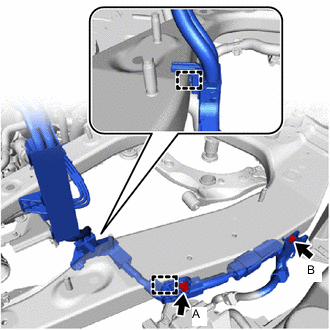
Install the 2 bolts.
- Torque:
- Bolt A
- 13 N*m { 133 kgf*cm, 10 ft.*lbf }
- Bolt B
- 9.8 N*m { 100 kgf*cm, 87 in.*lbf }
-
Install the EV water pump outlet pipe to the center frame crossmember sub-assembly with the 2 bolts.
- Torque:
- 8.0 N*m { 82 kgf*cm, 71 in.*lbf }
-
-
INSTALL EV WATER PUMP WITH MOTOR ASSEMBLY
-
INSTALL WINDSHIELD WASHER MOTOR AND PUMP ASSEMBLY
-
INSTALL FC COOLING WATER ION EXCHANGER ASSEMBLY
-
INSTALL 3 WAY VALVE
-
INSTALL ELECTRIC HEATER SUB-ASSEMBLY
-
INSTALL FC WATER AND HYDROGEN PUMP INVERTER ASSEMBLY
-
INSTALL INVERTER WITH CONVERTER ASSEMBLY
-
INSTALL FC AIR COMPRESSOR WITH MOTOR ASSEMBLY