HV BATTERY INSTALLATION

PROCEDURE
-
INSTALL NO. 2 EV BATTERY PACK WIRE
-
Engage the 5 clamps to install the No. 2 EV battery pack wire to the EV battery.
-
Connect the No. 2 EV battery pack wire connector.
-
-
INSTALL EV BATTERY JUNCTION BLOCK ASSEMBLY
-
INSTALL NO. 1 EV BATTERY SHIELD SUB-ASSEMBLY
-
INSTALL BATTERY VOLTAGE SENSOR
-
INSTALL NO. 2 EV BATTERY SHIELD PANEL
-
INSTALL NO. 1 EV BATTERY LH COVER BRACKET
-
INSTALL HOOK FASTENER
Tech Tips
This procedure is only performed when the hook fastener will be replaced.
-
Install the 2 hook fasteners to the EV battery.
-
-
INSTALL EV BATTERY
CAUTION:
Wear insulated gloves.
-
Using 2 lashing belt, set the EV battery on a board.
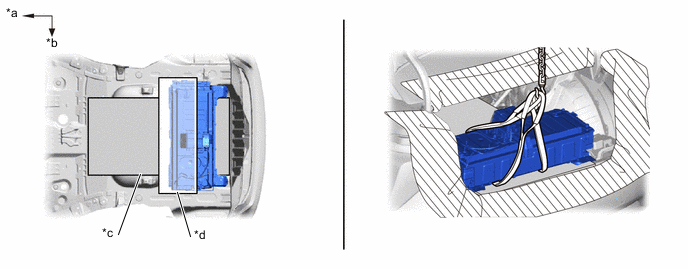
*a Front of the vehicle *b Left of the vehicle *c Board *d Cardboard Note
-
Make sure not to scratch or damage the vehicle.
-
This procedure must be performed by at least 2 people.
If the the EV battery is dropped or subjected to a strong impact, replace it with a new one.
-
-
Remove the 2 lashing belt.
Note
This procedure must be performed by 2 people.
-
Push in the EV battery together with cardboard to the front of the vehicle as shown in the illustration.
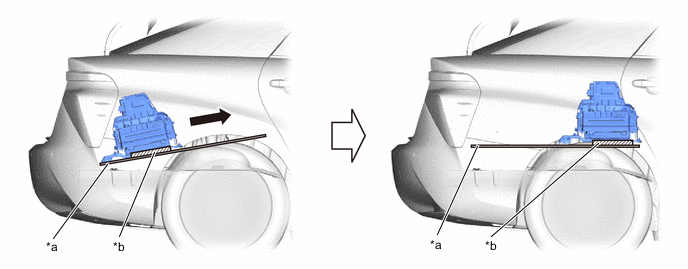
*a Board *b Cardboard 
Push in the board to the front of the vehicle. - - Note
-
When push in the board, be careful not to damage the stud bolts.
-
Make sure not to scratch or damage the vehicle.
Tech Tips
When pushing in the EV battery, push in the EV battery to the front of the vehicle while tilting the board as shown in the illustration.
-
-
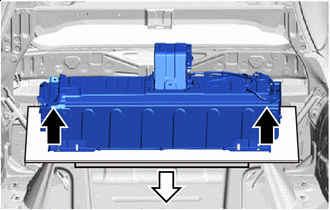
Lift up 
Pull out As shown in the illustration, lift up the EV battery and remove the cardboard from the vehicle.
Note
-
Make sure not to scratch or damage the vehicle.
-
This procedure must be performed by at least 2 people.
-
-
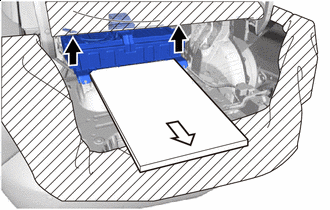
Lift up Pull out As shown in the illustration, lift up the EV battery and remove the board from the vehicle.
Note
-
When removing the board, be careful that the No. 5 rear floor silencer does not peel off.
-
Make sure not to scratch or damage the vehicle.
-
This procedure must be performed by at least 2 people.
-
-
Install the 6 bolts.

*a Front of the vehicle *b Rear of the vehicle *c Install a grounding bolt to one of these. - - - Torque:
- 19 N*m { 194 kgf*cm, 14 ft.*lbf }
Note
Do not touch the bolts of the EV battery when there is grease or oil on your hands.
Tech Tips
-
One of the bolts used on the rear side of the vehicle is a grounding bolt.
-
The grounding bolt may be installed on either the LH or RH side.
Item Measurement Length Bolts Other Than The Grounding bolt. 25 mm (0.984 in.) The Grounding Bolt 24 mm (0.945 in.) -
Connect the No. 2 EV battery pack wire connector.
-
Connect the battery voltage sensor connector.
-
Connect the EV battery junction block connector.
-
Engage the clamp to install the indoor electrical key oscillatoll wire to the vehicle.
-
-
CONNECT FRAME WIRE
-
INSTALL NO. 4 EV BATTERY SHIELD PANEL
-
INSTALL BATTERY COOLING BLOWER ASSEMBLY
-
INSTALL HYDROGEN FUEL CONTROL ECU ASSEMBLY
-
INSTALL INDOOR ELECTRICAL KEY OSCILLATOR
-
INSTALL NO. 3 BODY MOUNTING BRACKET SUB-ASSEMBLY RH
-
Install the No. 3 body mounting bracket sub-assembly RH to the vehicle with the 2 nuts.
- Torque:
- 30 N*m { 306 kgf*cm, 22 ft.*lbf }
-
Engage the clamp to install the wire harness to the No. 3 body mounting bracket sub-assembly RH.
-
-
INSTALL NO. 3 BODY MOUNTING BRACKET SUB-ASSEMBLY LH
-
Install the No. 3 body mounting bracket sub-assembly LH to the vehicle with the 2 bolts.
- Torque:
- 30 N*m { 306 kgf*cm, 22 ft.*lbf }
-
-
INSTALL CHILD RESTRAINT SEAT ANCHOR BRACKET
-
INSTALL LUGGAGE COMPARTMENT TRIM COVER ASSEMBLY LH
-
INSTALL LUGGAGE COMPARTMENT TRIM COVER ASSEMBLY RH
-
Install the luggage compartment trim cover assembly RH to the vehicle with the 3 clips.
-
-
INSTALL ROPE HOOK
-
INSTALL REAR FLOOR FINISH PLATE
-
INSTALL INVERTER COVER
-
INSTALL FC STACK SERVICE PLUG GRIP
-
INSTALL SERVICE PLUG GRIP (for EV)