RADIATOR REMOVAL
CAUTION / NOTICE / HINT
The necessary procedures (adjustment, calibration, initialization, or registration) that must be performed after parts are removed, installed, or replaced during the radiator assembly removal/installation are shown below.
| Replacement Part or Procedure | Necessary Procedure | Effects/Inoperative when not Performed | Link |
|---|---|---|---|
| Removal/installation millimeter wave radar sensor assembly | Adjust millimeter wave radar sensor assembly |
|
PROCEDURE
-
RECOVER REFRIGERANT FROM REFRIGERATION SYSTEM
-
REMOVE LOWER FRONT BUMPER ABSORBER
-
REMOVE NO. 3 RADIATOR AIR GUIDE
-
DRAIN INVERTER COOLANT
-
REMOVE FRONT BUMPER COVER
-
REMOVE FRONT BUMPER ENERGY ABSORBER
-
REMOVE FRONT BUMPER REINFORCEMENT SUB-ASSEMBLY
-
REMOVE NO. 1 RADIATOR AIR GUIDE RH
-
REMOVE NO. 1 RADIATOR AIR GUIDE LH
-
REMOVE MILLIMETER WAVE RADAR SENSOR ASSEMBLY
-
REMOVE COOL AIR INTAKE DUCT RETAINER SUB-ASSEMBLY
-

Disconnect the ambient temperature sensor connector.
-
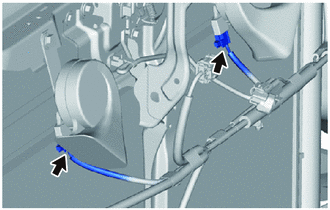
Disconnect the low pitched horn assembly connector.
-
Disconnect the high pitched horn assembly connector.
-
Disconnect the hood courtesy switch connector (hood lock assembly).
-
Disengage the 2 clamps to separate the hood courtesy switch connector (hood lock assembly).
-

Remove the 4 bolts and cool air intake duct retainer sub-assembly from the vehicle.
-
-
DISCONNECT DISCHARGE TUBE SUB-ASSEMBLY
-
DISCONNECT AIR CONDITIONER TUBE AND ACCESSORY ASSEMBLY
-
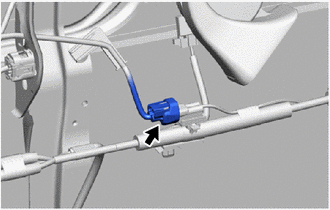
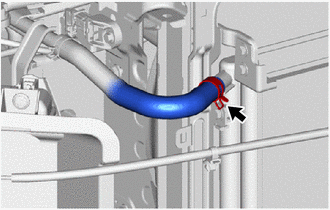
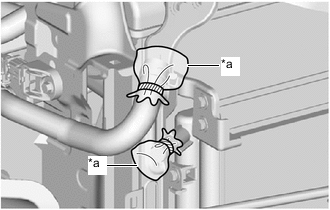
DISCONNECT EV RADIATOR OUTLET HOSE
-
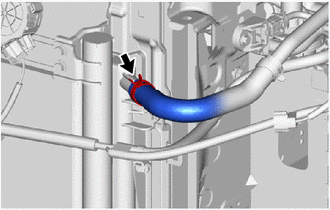
Slide the hose clip and disconnect the EV radiator outlet hose from the radiator assembly.
Note
-
During removal, make sure not to damage the port of the EV water pump with motor assembly or the inner surface of the hose.
-
Perform the work by hand. Do not use tools.
-
-
*a Plastic Bag To prevent contamination by foreign matter, cover the connecting portions of the EV radiator outlet hose and radiator assembly with plastic bags.
-
-
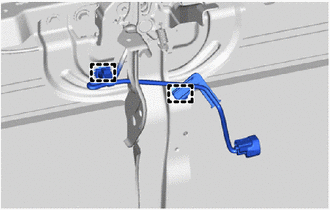
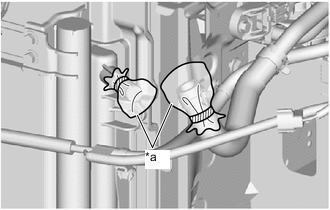
DISCONNECT NO. 1 EV RADIATOR INLET HOSE
-
Slide the hose clip and disconnect the No. 1 EV radiator inlet hose from the radiator assembly.
Note
-
During removal, make sure not to damage the port of the EV water pump with motor assembly or the inner surface of the hose.
-
Perform the work by hand. Do not use tools.
-
-
*a Plastic Bag To prevent contamination by foreign matter, cover the connecting portions of the No. 1 EV radiator inlet hose and radiator assembly with plastic bags.
-
-
REMOVE RADIATOR ASSEMBLY
-
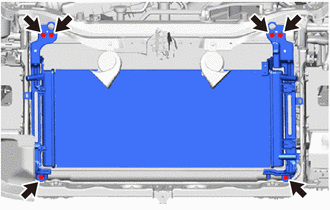
Remove the 6 bolts, and remove the radiator support sub-assembly and No. 2 radiator support sub-assembly together with the radiator assembly and cooler condenser assembly, as a single unit, from the FC radiator assembly.
Note
During removal, make sure not to damage the radiator assembly, cooler condenser assembly or FC radiator assembly.
-

Remove the 4 bolts.
-
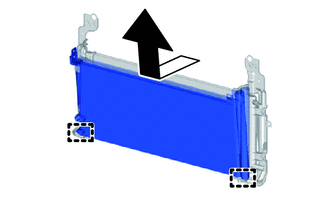
Pull up in the direction shown by the arrow in the illustration to disengage the 2 guides, and remove the cooler condenser assembly from the radiator support sub-assembly and No. 2 radiator support sub-assembly.
Note
During removal, make sure not to damage the radiator assembly or cooler condenser assembly.
-
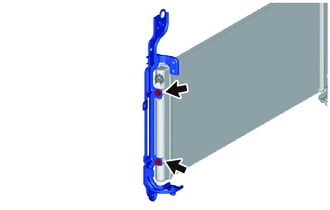
Remove the 2 bolts and radiator sub-assembly from the radiator assembly.
-
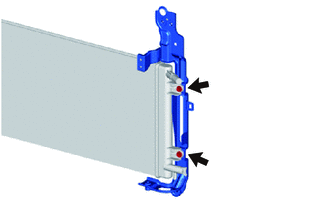
Remove the 2 bolts and No. 2 radiator support sub-assembly from the radiator assembly.
-