ROOF DRIP SIDE FINISH MOULDING INSTALLATION
CAUTION / NOTICE / HINT
Tech Tips
-
Use the same procedure for the RH and LH sides.
-
The procedure listed below is for the LH side.
PROCEDURE
-
INSTALL ROOF DRIP SIDE FINISH MOULDING CLIP
Note
-
It is only necessary to perform this procedure when replacing a roof drip side finish moulding clip with a new one.
-
If installing new roof drip side finish moulding clips, remove the adhesive remaining where the roof drip side finish moulding clips will be installed on the vehicle body and clean the vehicle body with a non-residue solvent.
Tech Tips
When installing the roof drip side finish moulding clip, heat the vehicle body and roof drip side finish moulding clip using a heat light.
Standard Item Temperature Vehicle Body 40 to 60°C (104 to 140°F) Roof Drip Side Finish Moulding Clip 20 to 30°C (68 to 86°F)
-
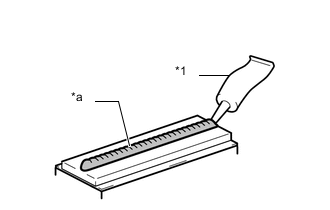
*1 Adhesive *a 2.0 to 3.0 mm Bead of Adhesive Apply a 2.0 to 3.0 mm (0.0787 to 0.118 in.) bead of adhesive (3M DP-105 or equivalent) to new roof drip side finish moulding clips.
Tech Tips
Adhesive strength (tensile strength): 13.7 MPa (140.0 kgf/cm2, 1991 psi) or more (when the temperature is 23°C (73°F))
-
Apply primer to the body where the roof drip side finish moulding clip will be installed.
Note
Do not let the primer dry.
-
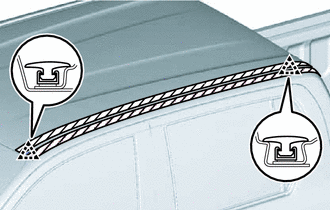
Single Cab:
-
While using the position shown in the illustration as a reference, place the roof drip side finish moulding clip onto the roof panel. Then position and install the roof drip side finish moulding clip after lightly pressing it so that the adhesive adheres to the primer.
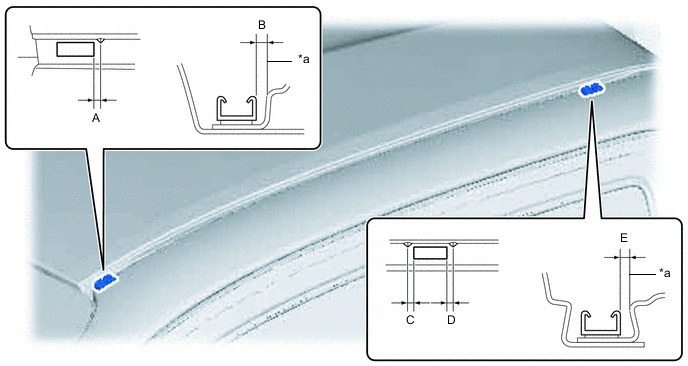
*a Edge of Curved Surface - - Standard Area Specified Condition Area Specified Condition A 4.0 mm (0.157 in.) B 2.6 mm (0.102 in.) C 4.0 mm (0.157 in.) D 4.0 mm (0.157 in.) E 2.0 mm (0.0787 in.) - - Note
Install the roof drip side finish moulding LH when 40 minutes or more have elapsed after pressing and installing the roof drip side finish moulding clips.
Tech Tips
-
Initial hardening time: 40 minutes
-
Complete hardening time: 48 hours
-
-
-
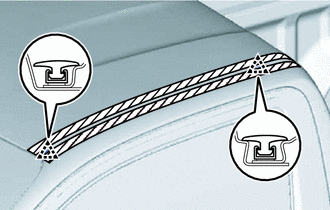
Smart Cab:
-
While using the position shown in the illustration as a reference, place the roof drip side finish moulding clip onto the roof panel. Then position and install the roof drip side finish moulding clip after lightly pressing it so that the adhesive adheres to the primer.
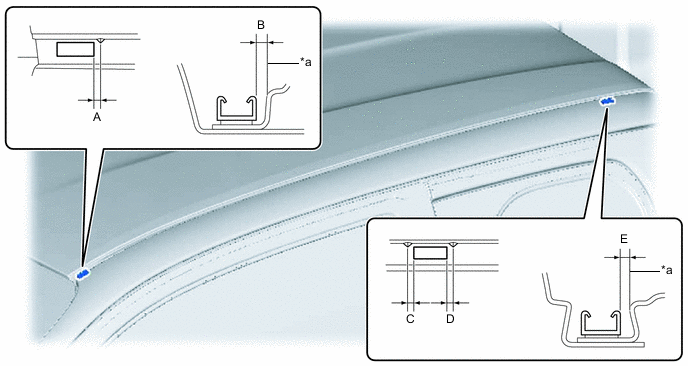
*a Edge of Curved Surface - - Standard Area Specified Condition Area Specified Condition A 4.0 mm (0.157 in.) B 2.6 mm (0.102 in.) C 4.0 mm (0.157 in.) D 4.0 mm (0.157 in.) E 2.0 mm (0.0787 in.) - - Note
Install the roof drip side finish moulding LH when 40 minutes or more have elapsed after pressing and installing the roof drip side finish moulding clips.
Tech Tips
-
Initial hardening time: 40 minutes
-
Complete hardening time: 48 hours
-
-
-
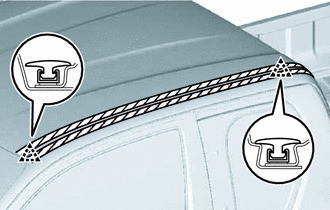
Double Cab:
-
While using the position shown in the illustration as a reference, place the roof drip side finish moulding clip onto the roof panel. Then position and install the roof drip side finish moulding clip after lightly pressing it so that the adhesive adheres to the primer.
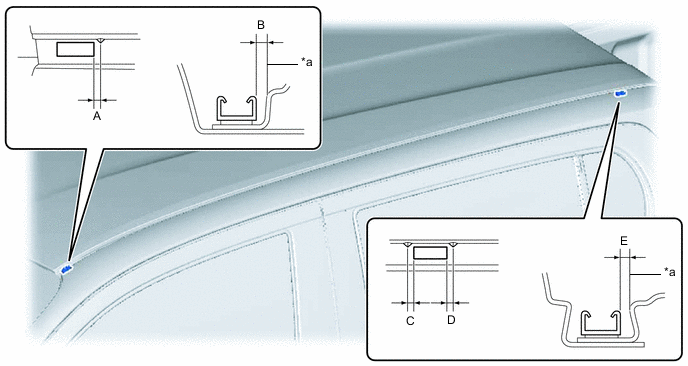
*a Edge of Curved Surface - - Standard Area Specified Condition Area Specified Condition A 4.0 mm (0.157 in.) B 2.6 mm (0.102 in.) D 4.0 mm (0.157 in.) C 4.0 mm (0.157 in.) E 2.0 mm (0.0787 in.) - - Note
Install the roof drip side finish moulding LH when 40 minutes or more have elapsed after pressing and installing the roof drip side finish moulding clips.
Tech Tips
-
Initial hardening time: 40 minutes
-
Complete hardening time: 48 hours
-
-
-
-
INSTALL ROOF DRIP SIDE FINISH MOULDING LH
Tech Tips
When installing the roof drip side finish moulding LH, heat the vehicle body and roof drip side finish moulding LH using a heat light.
Standard Item Temperature Vehicle Body 40 to 60°C (104 to 140°F) Roof Drip Side Finish Moulding LH 20 to 30°C (68 to 86°F) CAUTION:
-
Do not touch the heat light and heated parts.
-
Touching the heat light may result in burns.
-
Touching heated parts for a long time may result in burns.
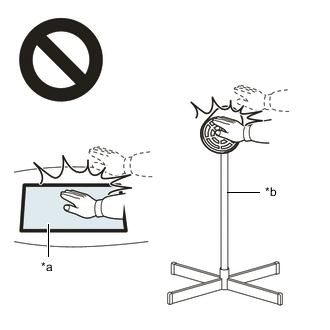
*a Heated Part *b Heat Light
-
Clean the vehicle body surface.
-
Using a heat light, heat the vehicle body surface.
-
Remove the double-sided tape from the vehicle body.
-
Wipe off any tape adhesive residue with cleaner.
-
-
Install a new roof drip side finish moulding LH.
-
Using a heat light, heat the vehicle body and a new roof drip side finish moulding LH.
-
Remove the peeling paper from the face of the roof drip side finish moulding LH.
Tech Tips
After removing the peeling paper, keep the exposed adhesive free from foreign matter.
-
for Single Cab:
-
Attach the clip to install the roof drip side finish moulding LH.
Tech Tips
Press the roof drip side finish moulding LH firmly to install it.
-
-
for Smart Cab:
-
Attach the clip to install the roof drip side finish moulding LH.
Tech Tips
Press the roof drip side finish moulding LH firmly to install it.
-
-
for Double Cab:
-
Attach the clip to install the roof drip side finish moulding LH.
Tech Tips
Press the roof drip side finish moulding LH firmly to install it.
-
-
-
Remove the protective tape.
-