REAR DOOR(for Smart Cab) REASSEMBLY

CAUTION / NOTICE / HINT
Tech Tips
-
Use the same procedure for the RH and LH sides.
-
The procedure listed below is for the LH side.
-
A bolt without a torque specification is shown in the standard bolt chart.
PROCEDURE
-
INSTALL REAR DOOR PANEL CUSHION
-

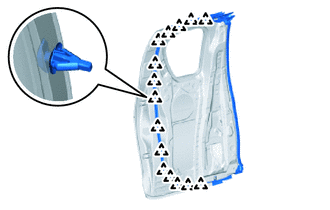
Attach the claw to install a new rear door panel cushion.
-
-
INSTALL REAR DOOR CUSHION
-
Attach the claw to install a new rear door cushion.
-
-
INSTALL REAR DOOR DUST PROOF SEAL
-
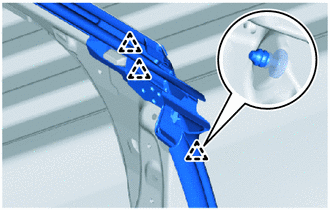
Attach the claw to install 2 new rear door dust proof seals.
-
-
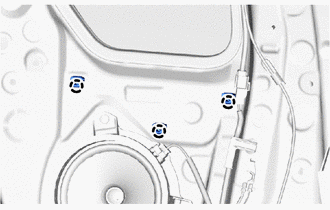
INSTALL ACCESS PANEL WEATHERSTRIP LH
-
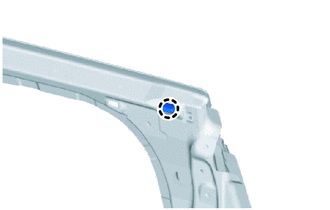
Attach the clip.
-
Attach the clip.
-
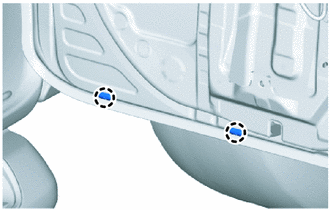
Attach the clip and remove the peeling paper from double-sided tape and press the double-sided tape to the rear side of the access door panel.
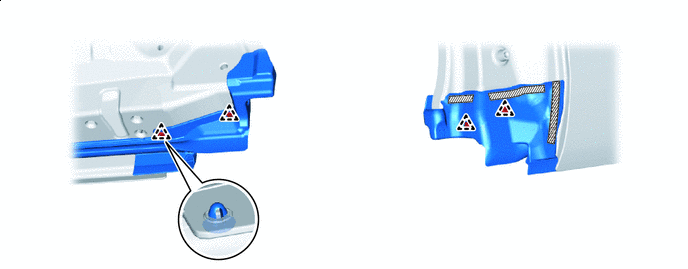

Double-sided Tape - - -

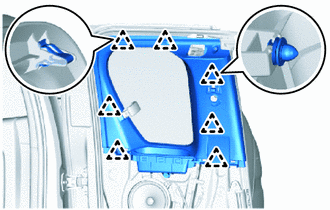
Double-sided Tape Remove the peeling paper from double-sided tape and press the double-sided tape to the upper side of the access door panel.
-
Remove the peeling paper from double-sided tape and press the double-sided tape to the corner of the access door panel.
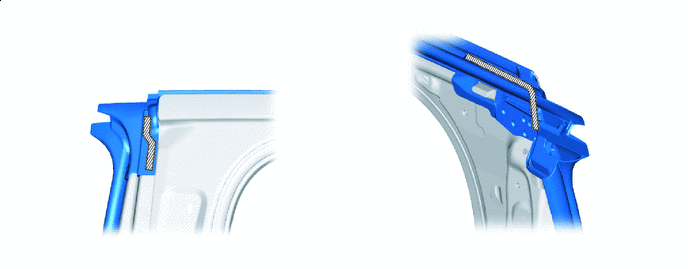
Double-sided Tape - - -
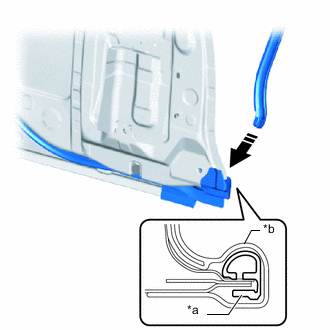
*a Mold Portion *b Lower Corner Portion 
Install in this Direction Insert the mold portion to the lower corner portion to install a new access panel weatherstrip LH.
-
-
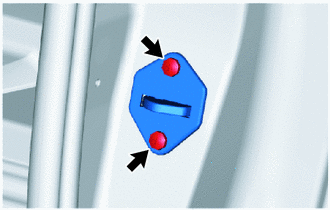
INSTALL ACCESS PANEL CHECK ASSEMBLY LH
-
Apply MP grease to the sliding area of the access panel check assembly LH.
-
When reusing a bolt:
-
Clean the threads of the bolt (B) with non-residue solvent.
-
Apply adhesive to the threads of the bolt (B).
Adhesive Toyota Genuine Adhesive 1324, Three Bond 1324 or equivalent.
-
-
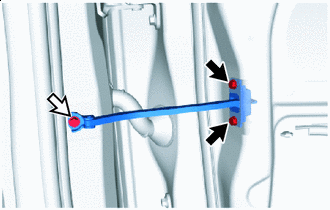

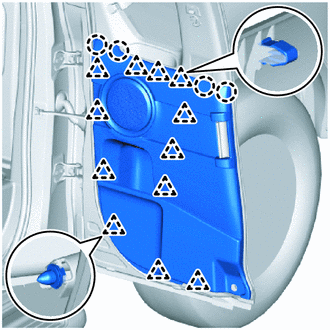
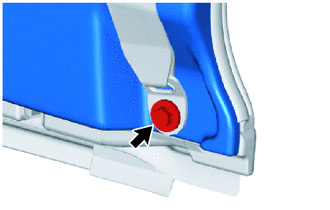
Bolt (A) 
Bolt (B) Install the access panel check assembly LH with the 2 bolts (A) and bolt (B).
- Torque:
- Bolt (A)
- 8.0 N*m { 82 kgf*cm, 71 in.*lbf }
- Bolt (B)
- 30 N*m { 306 kgf*cm, 22 ft.*lbf }
-
-
INSTALL ACCESS PANEL LOCK STRIKER PLATE ASSEMBLY
-

Using a T40 "TORX" socket wrench, install the access panel lock striker plate assembly with the 2 screws
- Torque:
- 23 N*m { 235 kgf*cm, 17 ft.*lbf }
-
-
INSTALL FRONT DOOR COURTESY LIGHT SWITCH ASSEMBLY
-
INSTALL ACCESS PANEL LOCK CANCEL LEVER ASSEMBLY LH
-
Apply MP grease to the rotating and sliding areas of the access panel lock cancel lever assembly LH.
-
When reusing a screw:
-
Clean the threads of the screw with non-residue solvent.
-
Apply adhesive to the threads of the screw.
Adhesive Toyota Genuine Adhesive 1324, Three Bond 1324 or equivalent.
-
-
Install the access panel lock cancel lever assembly LH with the 2 screws.
- Torque:
- 5.0 N*m { 51 kgf*cm, 44 in.*lbf }
-
-
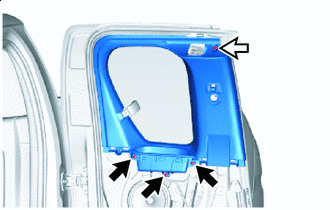
INSTALL QUARTER WINDOW WEATHERSTRIP LH
-
Remove any non-drying sealer on the body with non-residue solvent.
-
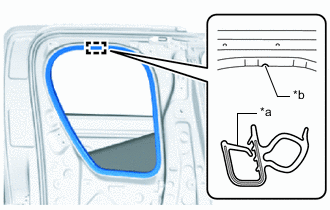
*a Paint Mark *b Mark Position Align the paint mark with the position on the access panel LH flange and install a new quarter window weatherstrip LH.
Note
-
Always align the paint mark when installing the part. If the paint mark position is out of place, coolant leaks may occur.
-
After the installation, check that the corners are properly installed.
Tech Tips
To easily install the weatherstrip, first install the area with the paint mark as shown in the illustration. Then install the part toward the corners and push any excess length into the corners.
-
-
-
INSTALL QUARTER WINDOW GLASS LH
-
INSTALL ACCESS PANEL LOCK REMOTE CONTROL ASSEMBLY LH
-
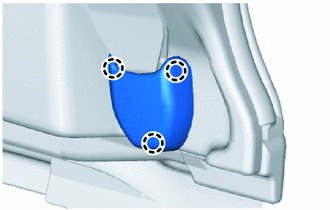
Apply MP grease to the rotating and sliding areas of the access panel lock remote control assembly LH.
-
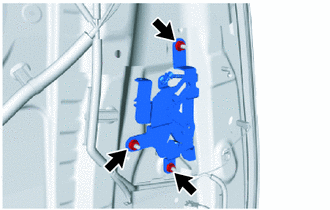
Install the access panel lock remote control assembly LH with the 3 nuts.
-
-
INSTALL LOWER ACCESS PANEL LOCK ASSEMBLY LH
-
INSTALL UPPER ACCESS PANEL LOCK ASSEMBLY LH
-
INSTALL ACCESS PANEL INSIDE HANDLE SUB-ASSEMBLY LH
-
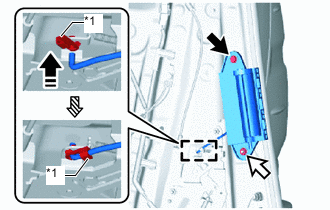
*1 Snap Bolt Nut 
Order of Installation Install in this Direction Install the nut, bolt and access panel inside handle sub-assembly LH.
-
Attach the snap as shown in the illustration.
-
-
INSTALL REAR SPEAKER ASSEMBLY
-
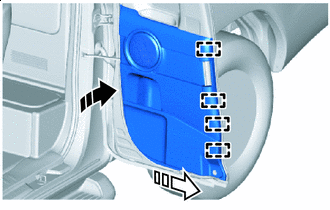
INSTALL SCREW GROMMET
-
Attach the claw to install 3 new screw grommets.
-
-
INSTALL REAR DOOR FRAME GARNISH LH
-
Attach the clip to install the rear door frame garnish LH.
-
Screw Clip Install the clip and 3 screws.
-
-
INSTALL FRONT SEAT OUTER BELT ASSEMBLY LH
-
INSTALL SEAT BELT ANCHOR COVER CAP
-

Install in this Direction (1) 
Install in this Direction (2) Attach the guide and claw to install the seat belt anchor cover cap as shown in the illustration.
-
-
INSTALL REAR DOOR TRIM BOARD SUB-ASSEMBLY LH
-
Install in this Direction (1) Install in this Direction (2) Attach the guide as shown in the illustration.
-
Attach the claw and clip to install the rear door trim board sub-assembly LH.
-
Connect the front seat outer belt floor anchor with the bolt.
-
-
INSTALL LAP BELT OUTER ANCHOR COVER
-
Attach the claw to install the lap belt outer anchor cover.
-
-
CONNECT CABLE TO NEGATIVE BATTERY TERMINAL (w/ Airbag System)
Note
When disconnecting the cable, some systems need to be initialized after the cable is reconnected.
-
CHECK SRS WARNING LIGHT (w/ Airbag System)
for Type A:
for Type B: