BACK WINDOW GLASS(for Single Cab) REMOVAL
PROCEDURE
-
REMOVE FRONT DOOR SCUFF PLATE LH
-
REMOVE FRONT DOOR SCUFF PLATE RH
-
REMOVE UPPER BACK PANEL GARNISH
-
REMOVE LOWER QUARTER TRIM PANEL LH
-
REMOVE LOWER QUARTER TRIM PANEL RH
-
REMOVE SEAT BELT ANCHOR COVER CAP
-
REMOVE QUARTER INSIDE TRIM BOARD LH
-
REMOVE QUARTER INSIDE TRIM BOARD RH
-
REMOVE MAP LIGHT ASSEMBLY
-
REMOVE VISOR BRACKET COVER LH
-
REMOVE VISOR BRACKET COVER RH
-
REMOVE VISOR ASSEMBLY LH
-
REMOVE VISOR ASSEMBLY RH
-
REMOVE VISOR HOLDER
-
REMOVE ASSIST GRIP SUB-ASSEMBLY
-
REMOVE ROOF HEADLINING SERVICE HOLE COVER
-
REMOVE ROOF HEADLINING ASSEMBLY
-
REMOVE BACK WINDOW ASSEMBLY (for Fixed Type)
Note
-
Be careful not to damage the back window glass when cutting as the back window glass spacers are installed to the back window glass.
-
The back window glass may fall while performing this procedure. Therefore, use suction cups to hold the back window glass from the outside of the vehicle.
-
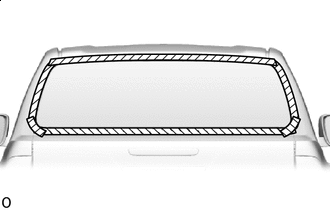

Protective Tape Put protective tape on the body panel around the back window assembly.
Note
When separating the back window assembly from the vehicle, be careful not to damage the vehicle paint or interior/exterior ornaments.
-
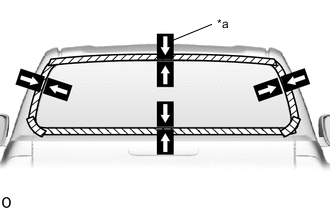
*a Matchmarks When reusing back window assembly:
-
Place adhesive tape on the back window assembly and body panel and use a pen to place matchmarks for installation.
-
Install the suction cups to the back window assembly.
-
-
w/ Window Defogger System:
Disconnect the back window defogger connector.
-
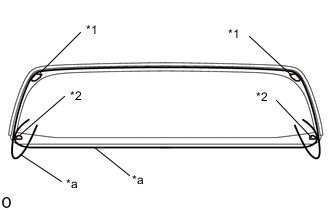
*1 Back Window Glass Spacer *2 Back Window Glass Clip *a Piano Wire From the interior, insert a piano wire between the vehicle body and back window assembly as shown in the illustration.
-
Tie objects that can serve as handles (for example, wooden blocks) to all wire ends.
-
Pull on the ends of the piano wire alternately and leave the back window assembly spacers and back window glass clips when cutting through the adhesive.
Note
-
Do not forcefully brush the piano wire against the back window assembly.
-
Be careful as the piano wire will break if it crosses itself.
-
-
Using suction cups, remove the back window assembly.
Note
Make sure that the back window assembly does not fall.
-
-
REMOVE BACK WINDOW ASSEMBLY (for Slide Type)
Note
The back window glass may fall while performing this procedure. Therefore, use suction cups to hold the back window glass from the outside of the vehicle.
-
Protective Tape Put protective tape on the body panel around the back window assembly.
Note
When separating the back window assembly from the vehicle, be careful not to damage the vehicle paint or interior/exterior ornaments.
-
Using a knife, cut off the moulding as shown in the illustration.
Note
Be careful not to damage the vehicle body.
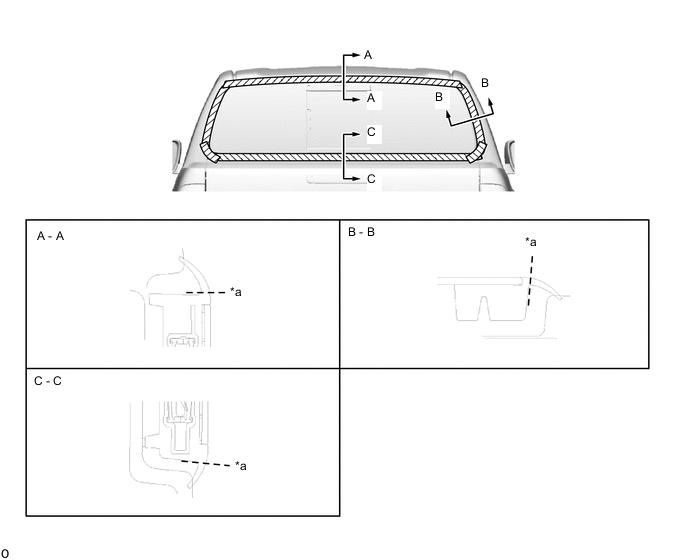
*a Cut - - -
Install the suction cups to the back window assembly.
-

*1 Spacer *2 Clip *a Piano Wire From the interior, insert a piano wire between the vehicle body and back window assembly as shown in the illustration.
-
Tie objects that can serve as handles (for example, wooden blocks) to all wire ends.
-
Pull on the ends of the piano wire alternately and leave the spacers and clips when cutting through the adhesive.
Note
-
Do not forcefully brush the piano wire against the back window assembly.
-
Be careful as the piano wire will break if it crosses itself.
-
-
Using suction cups, remove the back window assembly.
Note
Make sure that the back window assembly does not fall.
-